Magento 2 Image Size Tutorial: Basic Knowledge for New Online Stores

For an eCommerce business, image size, amongst other elements, has a significant impact on the SEO performance of an online store, user experience, and conversion rates.
This is because eCommerce sites typically have more images than other business types and heavily rely on the images displayed on the site to earn a conversion.
There are many factors affecting a customer’s purchase decision. And the performance of product images is one of them. So what’s the most optimal image size for your online store, and how to configure them in Magento 2.
Together, let’s discuss them more in this post!
About Image Roles in Magento 2
Magento allows its users to upload unlimited images for each product, link to videos, and eventually place them in order so that your customers can have the best viewing experience.
All images of a product can be divided into 4 main categories with completely different sizes, purposes, and usages, particularly:
-
Magento Base Image
-
Magento Small Image
-
Magento Thumbnail Image
-
Magento Switch Image
Now, let’s dig deeper into the functionality and definition of each image role in Magento 2.
Magento Base Images

As its name suggests, the base image is the primary image you see when clicking on any product detail page. By default,
-
Magento base image is the largest image displayed on the product page. So it comes as no surprise when it requires the highest resolution compared to other versions of images in Magento 2.
-
Viewers can zoom out 2 to 3 times the container size. And this feature is only available if you upload images that are larger than the image container.
For instance, an image with 470 x 470 pixels (without zoom) can become 1100 x 1100 pixels after zooming.
So the idea for Magento base images is that you should upload the photos with high resolution (1100 x 1100 pixels) and leave Magento to render them under suitable sizes.
Magento Thumbnail Images

Web visitors can see Magento thumbnail images as small image blocks in a product page, thumbnail gallery, or shopping cart.
These images are around 100 pixels high and wide. Still, we recommend you to use a 50 x 50 photo thumbnail.
Magento Small Images

The usage of minor image versions in Magento 2 is represented mainly via product recommendation boxes for up-sells or cross-sells.
Small images can also be used for product images in listings on category and search results pages such as the New Products Lists and so forth. The size of Magento small images can reach up to 470 x 470 pixels.
Still, a 370 x 370-pixel image might be the best option for listings on category and search result pages.
Magento Swatch Images

Basically, swatch images refer to those used to illustrate a product’s color, pattern, or texture. When clicking on the swatch image, your store’s visitors can see the base version of that image.
This allows shoppers to visualize the store’s product better and choose their favorable variation of that item to purchase. The size of a Magento swatch image can be around 50 x 50 pixels.
Why do image sizes matter to online shops?
Unoptimized images seriously harm a web page load. And slow websites also result in a bad user experience and lower rankings in search results.

Optimizing your images with appropriate dimensions can help online merchants with a few things:
-
Page Load speed – According to Think With Google, if a web page loads from 1 to 10 seconds, the bounce rate of mobile users can increase up to 123%. By resizing your image sizes, you directly increase your page load speed
-
User experience – high-quality images give visitors a more engaging experience when they browse your online store. And by keeping those images optimized, merchants ensure a seamless user experience. As a result, web visitors are willing to spend more time on your site and explore your content as well
-
SEO performance – site speed is one of the vital ranking factors. The faster your site is, the better you can rank on Google result pages. Web pages with optimized images can load faster on both desktops and smartphones
-
Conversion rates – Fast loading speed with good user experience increases your chances of being inquired and booked
By utilizing a Magento audit checklist, you can optimize your website’s images. The checklist provides guidelines to ensure that your images are compressed correctly, resulting in faster loading times. Plus, when we talk about image size, we mean the image dimension in pixels.
Optimize Magento 2 image automatically size by default
By default, Magento 2 enables automatic resizing of unnecessarily large images. You have the flexibility to configure the maximum allowed width and height for images. Additionally, if necessary, you can disable this feature.
This optimization reduces the image sizes in your Magento 2 storefront, leading to improved performance.
Below is a step-by-step guide on how to resize all product images in Magento using the default settings:
Log in to your Magento 2 admin account.
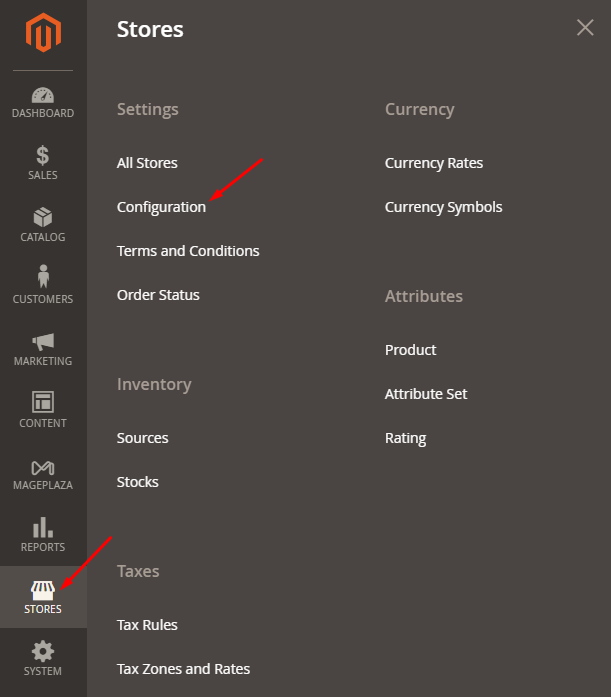
Navigate to Stores > Settings > Configuration > Advanced > System.

Scroll down to the Images Upload Configuration section and expand it.
To customize the default settings, deselect the Use system value checkbox.

Set Enable Frontend Resize to Yes.
Adjust the Quality field from 1-100%. Magento recommends users choose between 80 - 90% because low quality can reduce the file size and its performance on the storefront.
Set the Maximum Width (default: 1920 pixels). Fill in the maximum pixel width for the image.
Set Maximum Height (default: 1200 pixels) for images. Like Maximum width, the store admin can also set the maximum pixel height for the images.
Click the Save Config button.
Insert code manually
In addition, you can customize Magento’s default product image dimensions by altering the 800 by 800 pixel size. By altering the configuration in the view.xml file, you can adjust the dimensions of your product images.
To achieve this, navigate to the view.xml file.
Locate the view.xml file
In Magento 2, the view.xml file is responsible for controlling almost all the configurations related to product images, including width and height. Consequently, to update or resize product images in Magento 2, you’ll need to modify the view.xml file.
You can find the View.xml in your theme’s directory at
<theme_dir>/etc/view.xml.
However, if your theme doesn’t have a view.xml file, you can look in your parent theme’s etc/ folder. If you find it there, you can copy it to your theme folder. This approach adheres to Magento’s fallback system ensures that if a file is not found in your theme, Magento will look for it in the parent theme.
Determine the image ID and type
Each product image is assigned a unique ID and a type property within the
To identify the ideal image ID and type for your product image, you need to locate the
<images module="Magento_Catalog">
	<image id="unique_image_id" type="image_type">
	...
	</image>
<images/>
Ensure you locate the unique ID to your image. This ID provides a comprehensive description of the product image.
Resize Product Images
You can customize the width and height dimensions of any “image ID” within this file according to your preferences.
<images module="Magento_Catalog">
    <image id="category_page_grid" type="small_image">
        <width><!-- Replace this with width in px : 300--></width>
        <height><!-- Replace this with height in px: 450 --></height>
    </image>
</images>
Clear the Cache
Using the Admin Panel
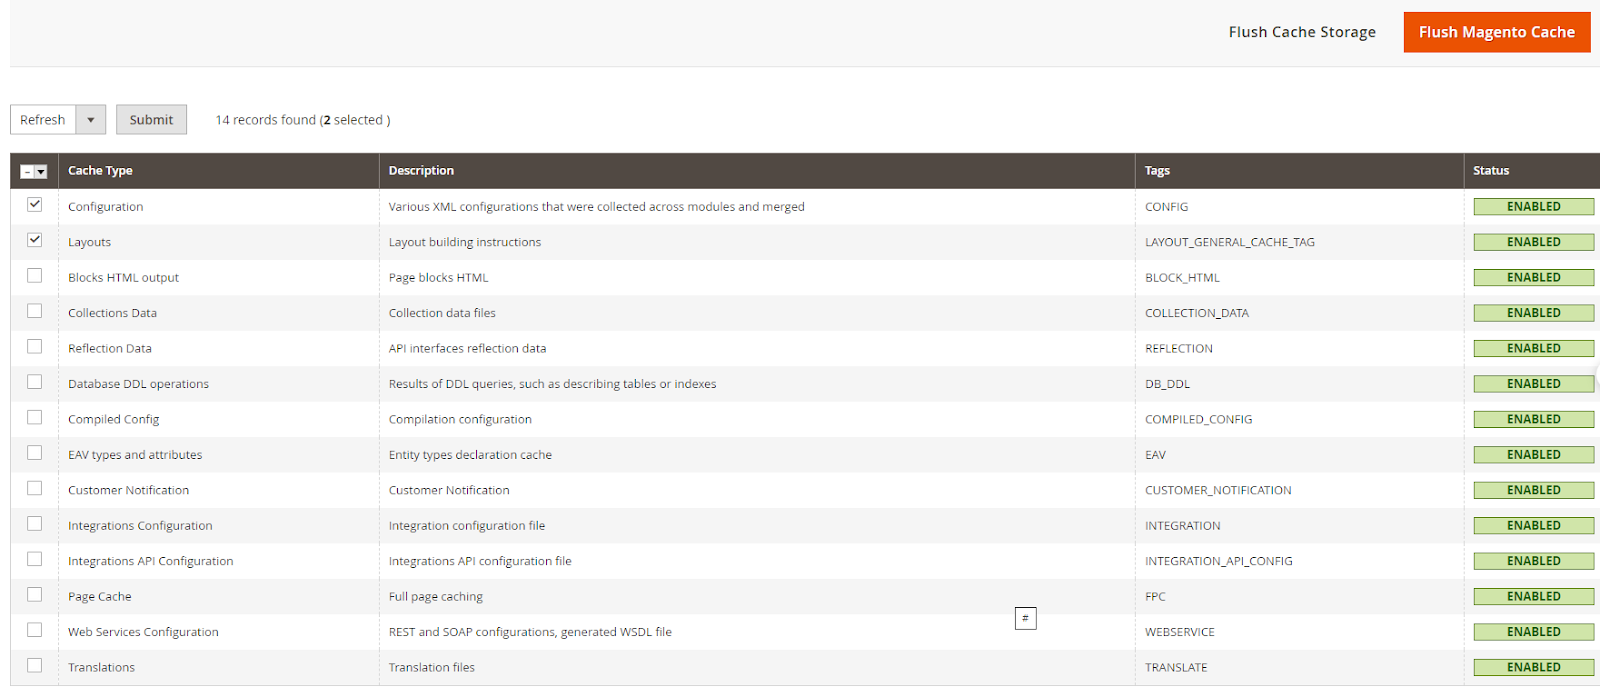
To apply the configurations, it’s crucial to clear the cache in Magento Log in to your Magento Admin Panel. Navigate to System > Tools > Cache Management. You’ll see a list of cache types. Select the ones you want to clean, or click “Select All” to choose all cache types. Click the “Flush Magento Cache” button to clear the selected cache types.

Command Line
You can achieve the desired changes by running the following command:
php /bin/magento catalog:images:resize -a
Make use of third-party extension
In the previous method, coding knowledge was required. Fortunately, beginners and store owners who want to save time and effort with minimal risks can take advantage of third-party extensions.
Image size reduction is important when you want to optimize your Magento 2 website for speed and user experience.
For this particular example, a hefty 15MB image can take an excruciating 17 seconds to load on a 3G connection. This is an 18,650 percent longer wait time than the time it takes to load a tiny 0.08MB compressed file, which loads instantly for visitors.
However, by using efficient techniques like converting images to WebP format, such as the Magento 2 Convert Images to WebP extension, you can significantly enhance your site’s loading times and overall performance.
| Pixel | JPG Original |
WebP 100 Quality | % Reduction | WebP 90 Quality | % Reduction | WebP 80 Quality | % Reduction |
|---|---|---|---|---|---|---|---|
| 800px | 384.4 KB | 344.9 KB | 10.28% | 185.8 KB | 51.66% | 123.2 KB | 67.95% |
| 151.6 KB | 149.7 KB | 1.25% | 39.9 KB | 73.68% | 21.2 KB | 86.02% | |
| 360.5 KB | 342.8 KB | 4.91% | 198.4 KB | 44.97% | 132.5 KB | 63.25% | |
| 132 KB | 114.2 KB | 13.48% | 32.9 KB | 75.08% | 19 KB | 85.61% | |
| 162 KB | 154.5 KB | 4.63% | 63.1 KB | 61.05% | 36.4 KB | 77.53% | |
| 81KB | 69.2 KB | 14.57% | 18.7 KB | 76.91% | 10.8 KB | 86.67% | |
| 131.6 KB | 116.2 KB | 11.70% | 37.4 KB | 71.58% | 19.7 KB | 85.03% | |
| 2024px | 1200 KB | 1300 KB | 8.33% | 532.6 KB | 55.62% | 308 KB | 74.3% |
| 1900 KB | 1900 KB | 0.00%. | 932.4 KB. | 50.93% | 599 KB |
68.47% | |
| 701.7 KB | 699 KB | 0.38% | 213.9 KB | 69.52% | 130 KB | 81.47% | |
| 1200 KB | 1200 KB | 0.00% | 430.4 KB | 64.13% | 242 KB | 79.83% |
WebP, a popular image format, offers superior compression capabilities compared to traditional formats like JPEG and PNG. It has 26% smaller file sizes than PNGs and 25–34% smaller sizes than equivalent JPEG images, ensuring faster loading without compromising image quality.
With the Magento 2 Convert Images to WebP extension, the cumbersome task of manual image format conversion is streamlined and accelerated into a single, effortless adjustment. Every image on your Magento 2 site experiences seamless conversion to WebP, eliminating the need for manual interventions.
Notably, the extension’s intuitive interface and strong functionality make it accessible to both beginners and seasoned store owners. Besides, its compatibility with various image formats (.jpg, .png, .svg, .gif, etc.) ensures comprehensive coverage, meet to diverse website needs. Moreover, by automating the conversion process, the extension minimizes human error and ensures consistent optimization across all images, guaranteeing a smooth and efficient user experience.
How to resize image sizes in Magento 2
Below are the steps to resize all product images automatically in Magento using configuration settings:

-
Log in to your admin account in Magento 2
-
Then navigate to Stores > Settings > Configuration > Advanced > System
-
Scroll down, and you will see the Images Upload Configuration section. Expand it
-
Now, to change the default settings, you have to deselect the Use system value checkbox
-
After that, set Enable Frontend Resize = Yes
-
Store admin now can set the Quality field from 1 to 100%. Magento recommends users to choose between 80 - 90% since low quality can reduce the file size and its performance on the storefront
-
Maximum Width: Fill in the maximum pixel width for the image. Magento’s default value is 1920 pixel
-
Maximum Height: Like Maximum width, the store admin can also set the maximum pixel height for the images. The default value is 1200 pixel
-
When you complete the setup for Magento image size, remember to tap on the Save Config button at the top-right corner
Related post: How to Get size of product image in Magento 2
Proven tips for Magento 2 image optimization
This sentence is undoubtedly true, especially in the world of promotion and marketing. There is a strong relationship between image size and image optimization.
For those who don’t truly understand the “image optimization” term, it’s a process of displaying high-quality images in the proper format, dimensions, and size while not affecting the page load speed.
Thus, in this post’s scope, let’s have a quick look at some tactics you can use to optimize images on your Magento 2 stores effectively:
-
Use relevant, descriptive keywords for image file names. To do this, think about how your customers search for your product name on Google’s searching bar, incorporate with analyzed keyword patterns via your site
-
Use and optimize alt attributes. An optimized alt attribute can help your product show up in Google image search results and web search as well. With relevant keywords to the image, the alt attribute is an important SEO element
-
Reduce the image’s file size. Each Magento image version has a different optimal file size in order not to cause a negative impact on the page load speed and user experience. For instance, you will want to keep your thumbnail file size as small as possible to prevent your category pages from loading slowly
-
Improve SEO performance with sitemaps. This action allows merchants to optimize web images for Google’s algorithms
-
Install Magento 2 Image Optimization. A powerful tool to automate the process of compressing store images. Plus, effectively manage and optimize multiple image types at the backend
A picture is worth a thousand words!
Read more: 12 Best free Image Optimization Tools for image compression
The bottom line!
It’s understandable why there are tons of tools out there for image optimization. The considerable influence of images on a Magento store to an eCommerce business is also proven over time.
And we have just scratched the surface of Magento image size and its configuration at the store’s backend. Thus, feel free to leave us any questions. We’re always here to help.
Thanks for reading!
Related Post


