


1 min read
|
03-30-2026
Import and Export Orders in Magento 2
Vinh Jacker
|
12-18-2024

1. From the Admin panel, select
4. Set the
7. Click
8. After preparing your CSV file, click the
9. Press
Efficient order management keeps your Magento 2 store running smoothly and ensures accurate transaction data. Exporting and importing orders streamlines your workflow, improves analysis, and optimizes overall performance.
If you’re working with product data, this guide on exporting products in Magento 2 offers practical steps to export full or filtered product data using CSV format.
This guide covers the best practices for importing and exporting orders in Magento 2, helping you gain insights into customer behavior, optimize processes, and elevate the overall shopping experience.
Key Takeaways
- Discover the applications of order import & export in Magento 2.
- Learn how to export via Magento 2 Admin Panel, programmatically, or with Mageplaza Magento 2 Order Export for fast, reliable, configurable exports.
- Issues like missing fields, CSV formatting errors, stuck exports, and SKU mismatches can be resolved with proper file preparation and extensions with logging/retry features.
Order Import & Export in Magento 2
In Magento 2, store admins can import and export data using various formats. CSV and XML:
- CSV (Comma-Separated Values): Plain text with comma-separated values, a simple and easy to edit with any text editor. Ideal for small to medium-sized data sets.
- XML (Extensible Markup Language): Structured with tags to define content blocks, which can store complex data including images and relationships, making it useful for large or detailed datasets.
Common purposes for order import/export:
- Migrating or backing up customer and order data.
- Syncing products, orders, and inventory with ERP or marketplaces.
- Updating bulk information efficiently.
- Integrating with third-party systems like CRMs and accounting tools.
- Analyzing data for business operation strategies
How to Export Orders in Magento 2
Exporting orders in Magento 2 is essential for maintaining transaction records, performing analysis, and streamlining order management. Here are three effective methods to export orders from your Magento 2 store:
Method 1: Export orders using the Magento 2 admin panel
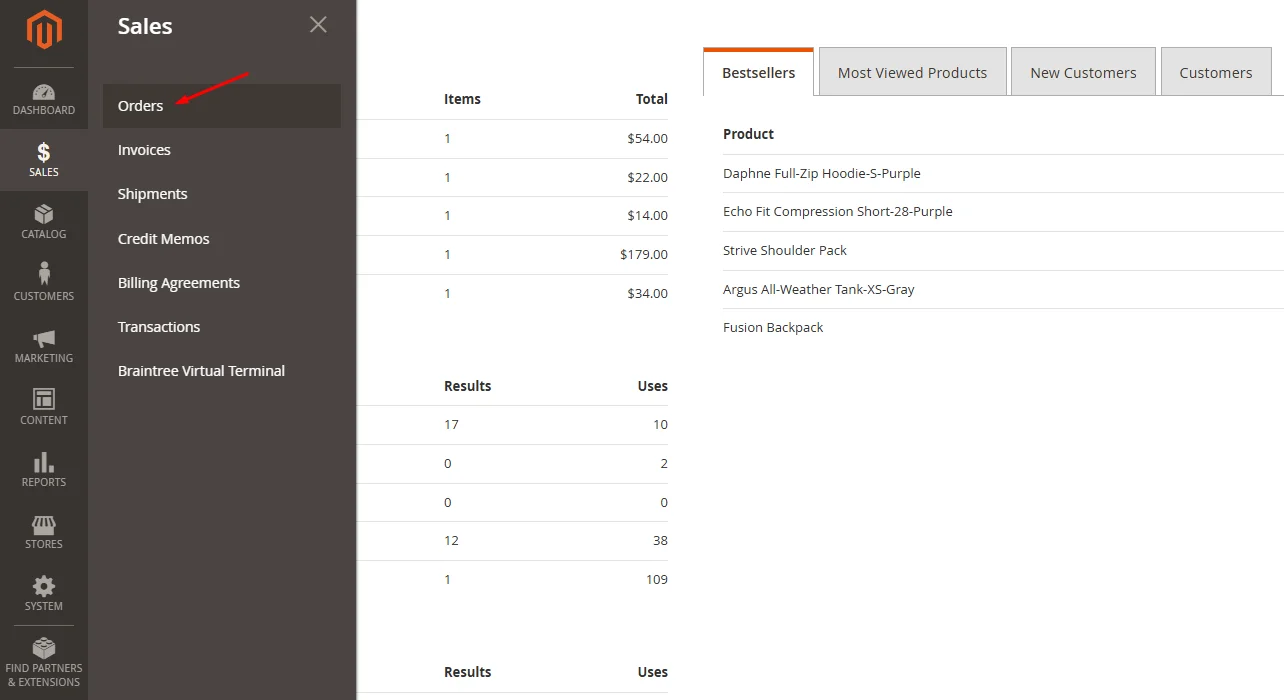
#1. Login to the Magento 2 Admin Panel and navigate to the Sale > Orders
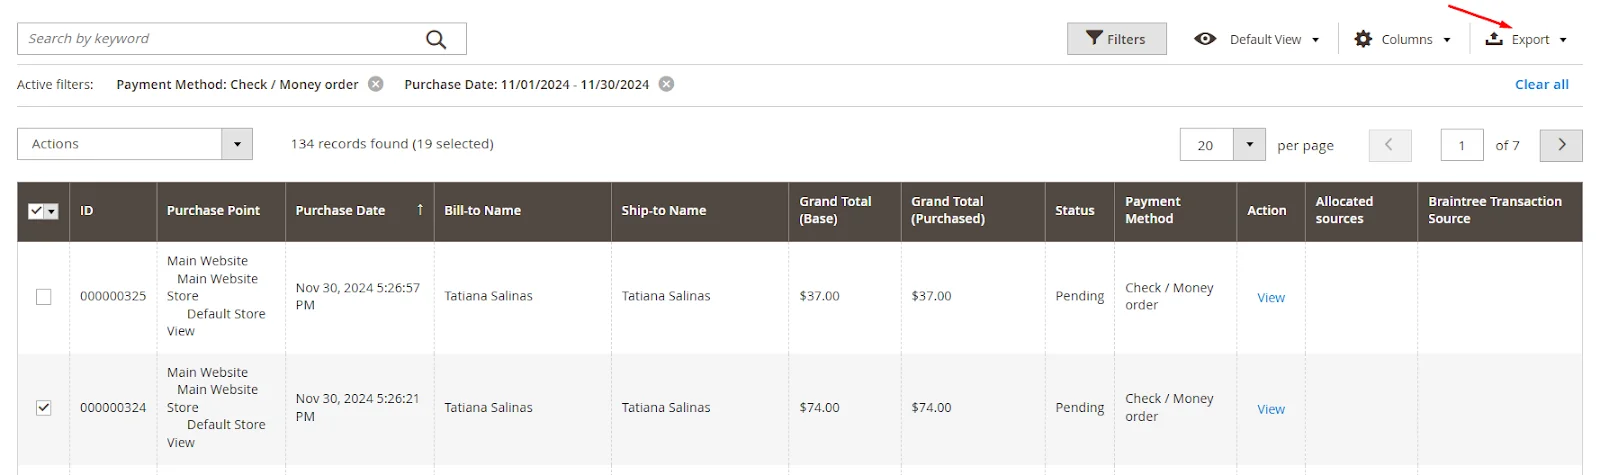
#2. On the Orders page, you’ll see a list of all store orders. Each row represents an individual order, with columns showing details, including:
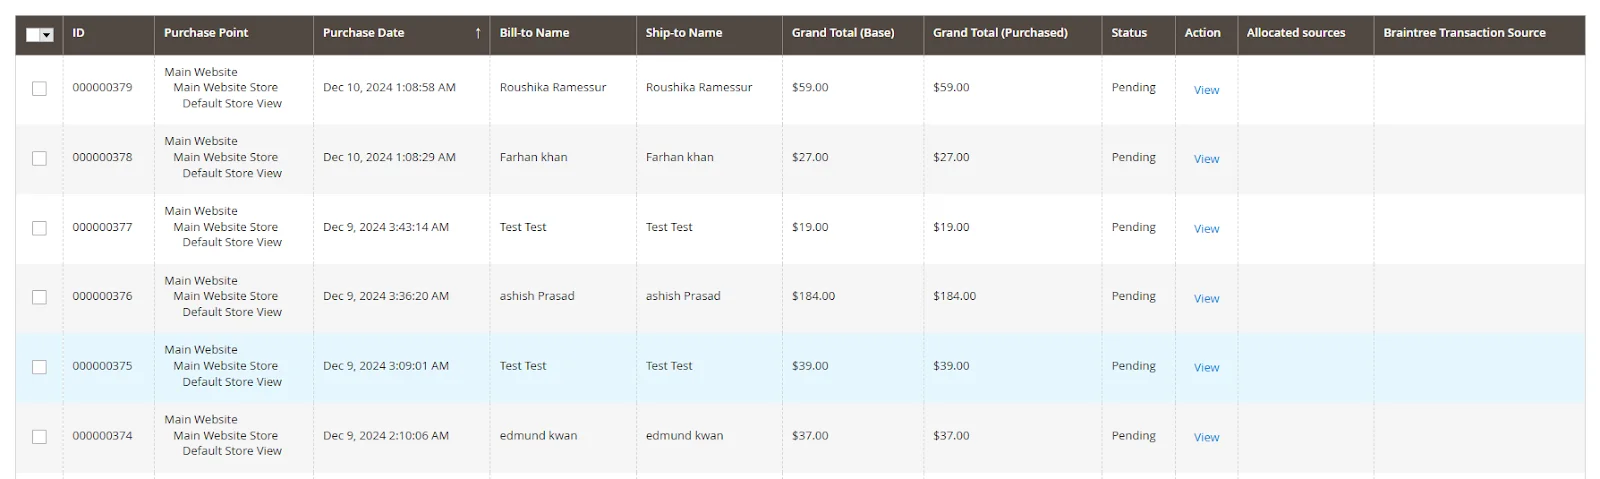
- ID
- Purchase Point
- Purchase Date
- Bill-to Name
- Ship-to Name
- Grand Total (Base)
- Grand Total (Purchased)
- Status
- Action
- Allocated sources
- Braintree Transaction Source
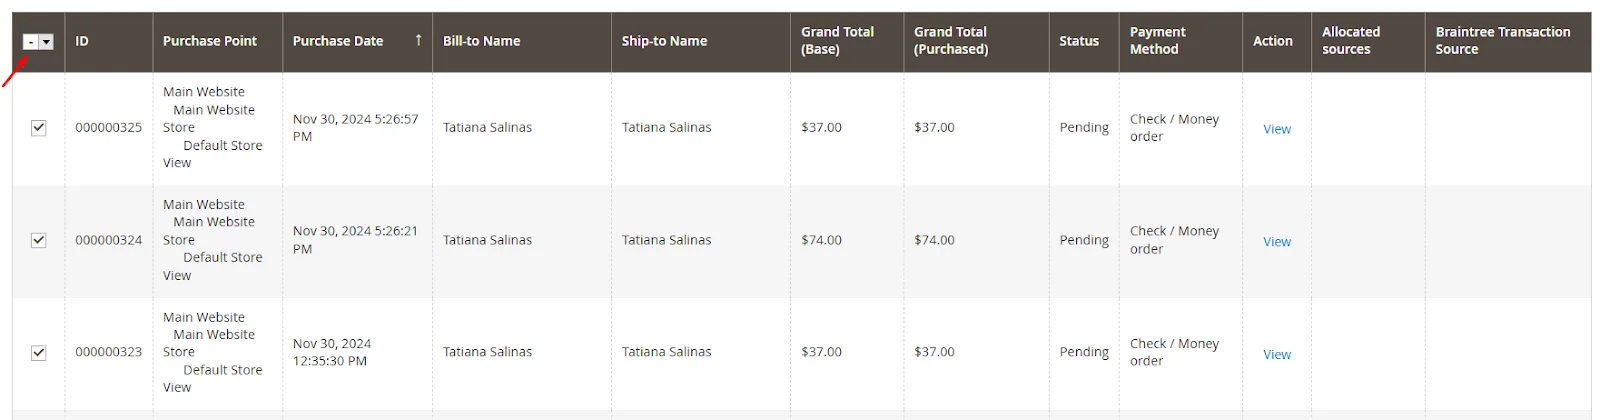
#3. To select specific orders for export, click on the checkboxes next to the order IDs. If you want to export all orders, tick the checkbox in the header row to mark all visible orders.
#4. With the desired orders selected, click on the Export located above the orders list to expand the menu options.
#5. Select the file format (CSV or XML).
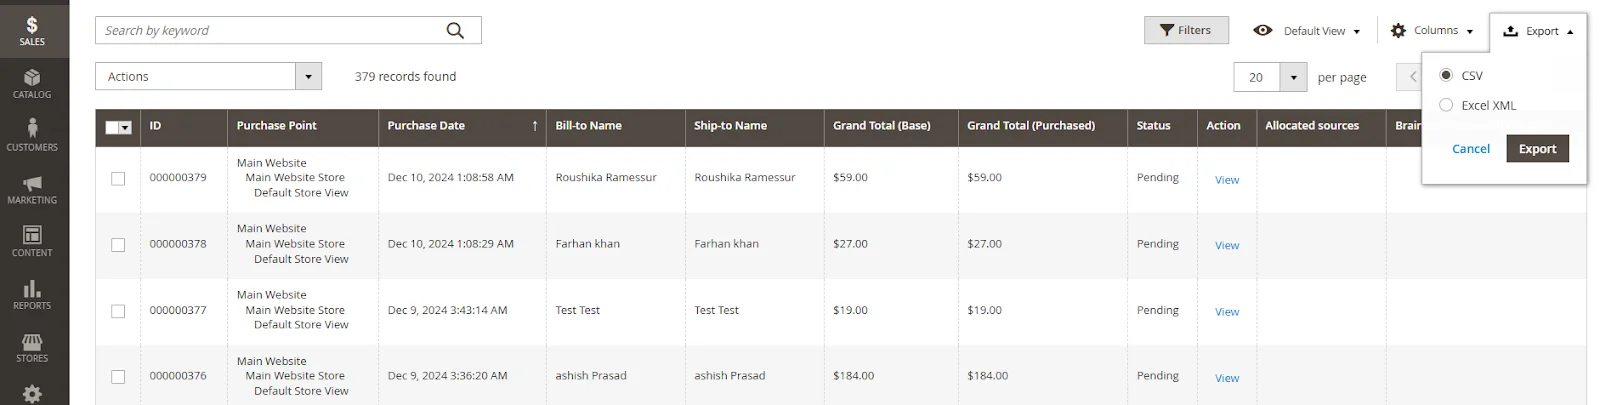
#6. Press on the Export button to begin the export process, and the resulting CSV file will contain your order data as seen in the default view.
Method 2: Export orders programmatically using custom data
To export orders programmatically using custom data in Magento 2, you need to follow these steps:
#1. Create file db_schema.xml in your module
<schema xmlns:xsi="http://www.w3.org/2001/XMLSchema-instance" xsi:noNamespaceSchemaLocation="urn:magento:framework:Setup/Declaration/Schema/etc/schema.xsd">
    <table name="sales_order_grid" resource="sales" comment="Sales Flat Order Grid">
        <column xsi:type="varchar" name="coupon_code" nullable="true" length="255"/>
        <column xsi:type="longtext" name="items" nullable="true"/>
        <column xsi:type="varchar" name="shipping_region" nullable="true" length="255"/>
        <column xsi:type="varchar" name="shipping_postcode" nullable="true" length="255"/>
        <column xsi:type="varchar" name="shipping_city" nullable="true" length="255"/>
        <column xsi:type="varchar" name="shipping_street" nullable="true" length="255"/>
        <column xsi:type="varchar" name="shipping_fax" nullable="true" length="255"/>
        <column xsi:type="varchar" name="shipping_telephone" nullable="true" length="255"/>
        <column xsi:type="varchar" name="shipping_company" nullable="true" length="255"/>
        <column xsi:type="varchar" name="shipping_country" nullable="true" length="255"/>
        <column xsi:type="varchar" name="shipping_vat" nullable="true" length="255"/>

        <column xsi:type="varchar" name="billing_region" nullable="true" length="255"/>
        <column xsi:type="varchar" name="billing_postcode" nullable="true" length="255"/>
        <column xsi:type="varchar" name="billing_city" nullable="true" length="255"/>
        <column xsi:type="varchar" name="billing_street" nullable="true" length="255"/>
        <column xsi:type="varchar" name="billing_fax" nullable="true" length="255"/>
        <column xsi:type="varchar" name="billing_telephone" nullable="true" length="255"/>
        <column xsi:type="varchar" name="billing_company" nullable="true" length="255"/>
        <column xsi:type="varchar" name="billing_country" nullable="true" length="255"/>
        <column xsi:type="varchar" name="billing_vat" nullable="true" length="255"/>
    </table>
</schema>
#2. Create file di.xml
<config xmlns:xsi="http://www.w3.org/2001/XMLSchema-instance" xsi:noNamespaceSchemaLocation="urn:magento:framework:ObjectManager/etc/config.xsd">
    <preference for="Magento\Ui\Model\Export\ConvertToCsv" type="Mageplaza\BetterOrderGrid\Model\Export\ConvertToCsv"/>
</config>
#3. Create the Plugin:
<?php
/**
 * Mageplaza
 *
 * NOTICE OF LICENSE
 *
 * This source file is subject to the Mageplaza.com license that is
 * available through the world-wide-web at this URL:
 * https://www.mageplaza.com/LICENSE.txt
 *
 * DISCLAIMER
 *
 * Do not edit or add to this file if you wish to upgrade this extension to newer
 * version in the future.
 *
 * @category  Mageplaza
 * @package   Mageplaza_BetterOrderGrid
 * @copyright Copyright (c) Mageplaza (https://www.mageplaza.com/)
 * @license   https://www.mageplaza.com/LICENSE.txt
 */

namespace Mageplaza\BetterOrderGrid\Model\Export;

use Magento\Framework\Exception\FileSystemException;
use Magento\Framework\Exception\LocalizedException;
use Magento\Framework\Filesystem;
use Magento\Ui\Component\MassAction\Filter;
use Magento\Ui\Model\Export\ConvertToCsv as UiConvertToCsv;
use Magento\Ui\Model\Export\MetadataProvider;
use Mageplaza\BetterOrderGrid\Helper\Data;

/**
 * Class ConvertToCsv
 *
 * @package Mageplaza\BetterOrderGrid\Model\Export
 */
class ConvertToCsv extends UiConvertToCsv
{
    /**
     * @var Data
     */
    protected $helperData;

    /**
     * ConvertToCsv constructor.
     *
     * @param Filesystem $filesystem
     * @param Filter $filter
     * @param MetadataProvider $metadataProvider
     * @param Data $helperData
     * @param int $pageSize
     *
     * @throws FileSystemException
     */
    public function __construct(
        Filesystem $filesystem,
        Filter $filter,
        MetadataProvider $metadataProvider,
        Data $helperData,
        $pageSize = 200
    ) {
        $this->helperData = $helperData;

        parent::__construct($filesystem, $filter, $metadataProvider, $pageSize);
    }

    /**
     * Returns CSV file
     *
     * @return array
     * @throws FileSystemException
     * @throws LocalizedException
     */
    public function getCsvFile()
    {
        $component = $this->filter->getComponent();

        $name = hash('md5', microtime());
        $file = 'export/' . $component->getName() . $name . '.csv';

        $this->filter->prepareComponent($component);
        $this->filter->applySelectionOnTargetProvider();
        $dataProvider = $component->getContext()->getDataProvider();
        $fields       = $this->metadataProvider->getFields($component);
        $options      = $this->metadataProvider->getOptions();

        $this->directory->create('export');
        $stream = $this->directory->openFile($file, 'w+');
        $stream->lock();
        $stream->writeCsv($this->metadataProvider->getHeaders($component));
        $i              = 1;
        $searchCriteria = $dataProvider->getSearchCriteria()
            ->setCurrentPage($i)
            ->setPageSize($this->pageSize);
        $totalCount     = (int) $dataProvider->getSearchResult()->getTotalCount();

        while ($totalCount > 0) {
            $items = $dataProvider->getSearchResult()->getItems();
            foreach ($items as $item) {
                if ($component->getName() === 'sales_order_grid' && $this->helperData->isEnabled()) {
                    $productArr  = $this->helperData->convertOrderData($item->getEntityId());
                    $export_data = implode(' | ', $productArr);
                    $item->setProducts($export_data);
                    unset($productArr);
                }

                $this->metadataProvider->convertDate($item, $component->getName());
                $stream->writeCsv($this->metadataProvider->getRowData($item, $fields, $options));
            }

            $searchCriteria->setCurrentPage(++$i);
            $totalCount -= $this->pageSize;
        }
        $stream->unlock();
        $stream->close();

        return [
            'type'  => 'filename',
            'value' => $file,
            'rm'    => true  // can delete file after use
        ];
    }
}
#4. Insert data into custom order columns.
Customize the code to insert data into your custom order columns as needed.
#5. Run setup upgrade
php bin/magento setup:upgrade
Then, click on the Export button again to generate the file.
Method 3: Export orders via Magento 2 Export Order extension
First, start by downloading the Magento 2 Order Export extension by Mageplaza.
Step 1: General configuration
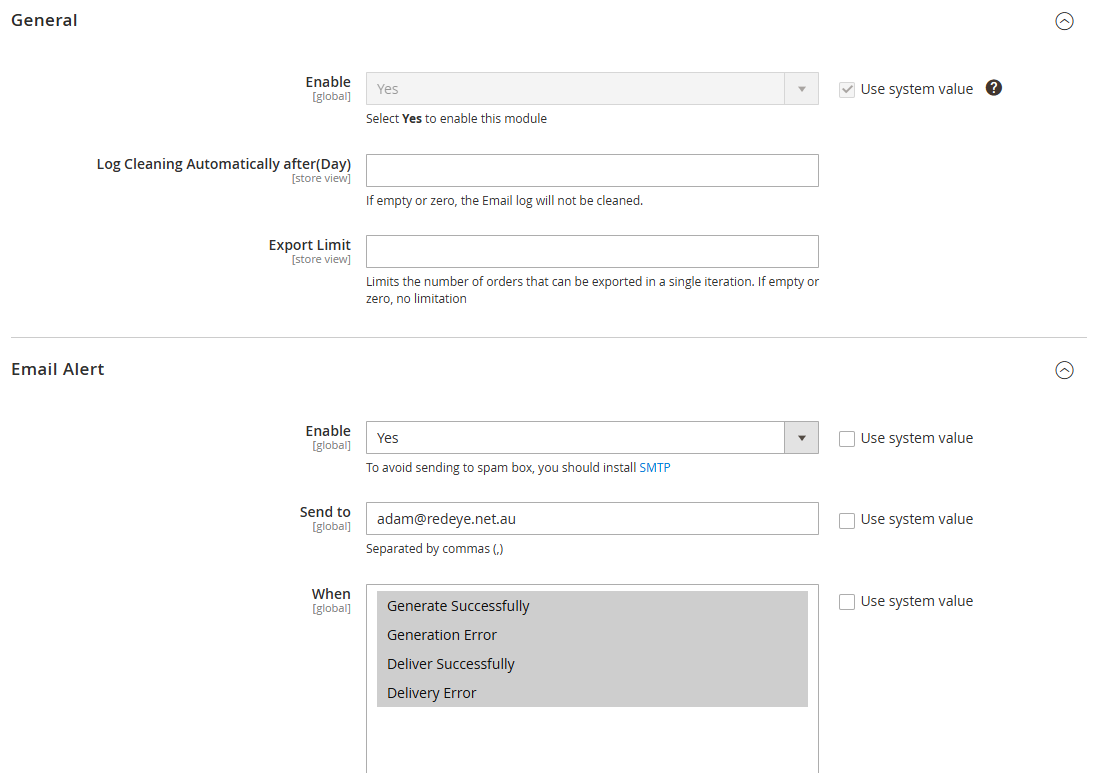
- Enable the extension
- Enable auto log cleaning: automatically delete old logs after X days.
- Set export limit: maximum number of orders per iteration (default in max: 1000).
- Enable email alerts to get notified if the export succeeds or fails.
Step 2: Create a New Export Profile
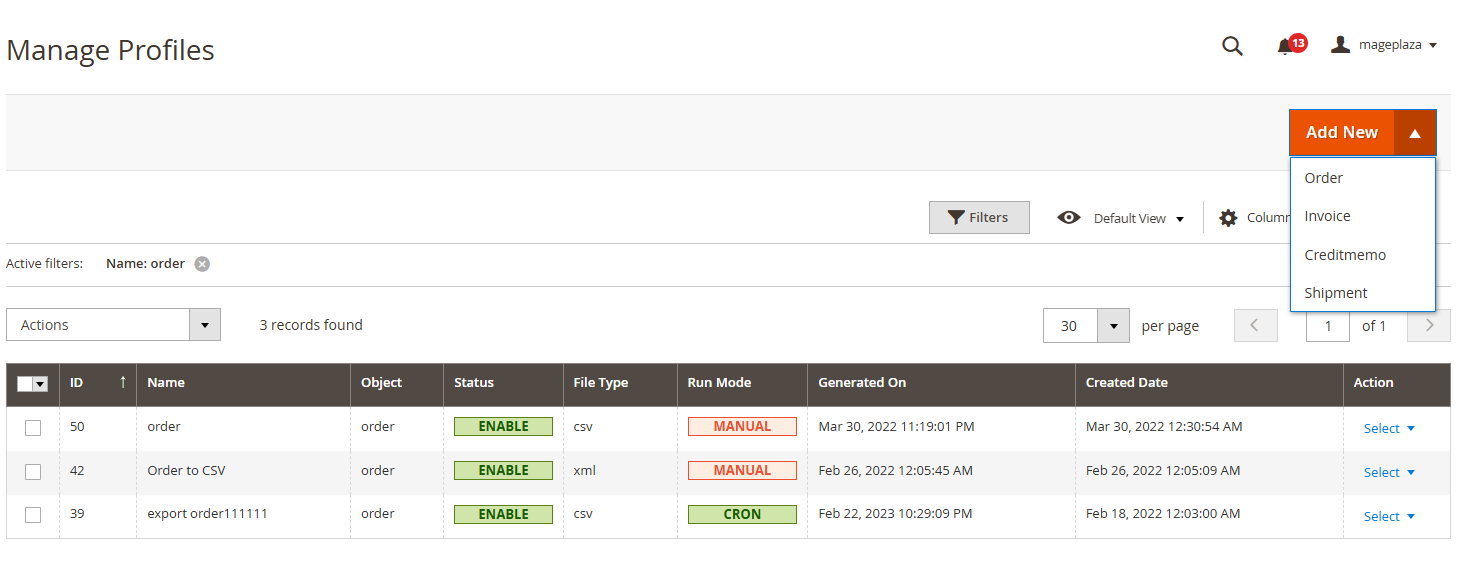
- Navigate to:
Mageplaza > Order Export > Manage Export Profiles. - Click Add New Profile.
- Select the export type: Orders, Invoices, Shipments, or Credit Memos.
- Give your profile a name with a timestamp for easy identification.
- If desired, schedule automatic exports via cron jobs.
- Choose the frequency: every minute, daily, weekly, or custom interval.
Step 3: Select Export Format and Fields
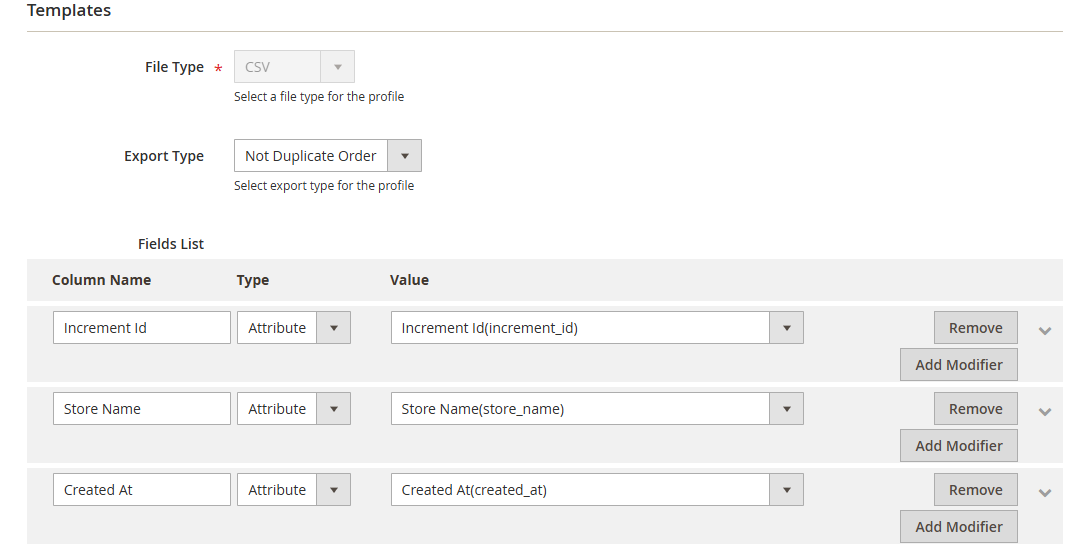
- Choose your preferred export format: CSV, TXT, XML, Excel XML, TSV, JSON, ODS, XLSX
- Load Template, then edit the template, or Insert Variable as needed
- Optionally, reorder columns or rename headers for clarity.
- Download the first 5 orders for testing
Step 4: Configure Filters
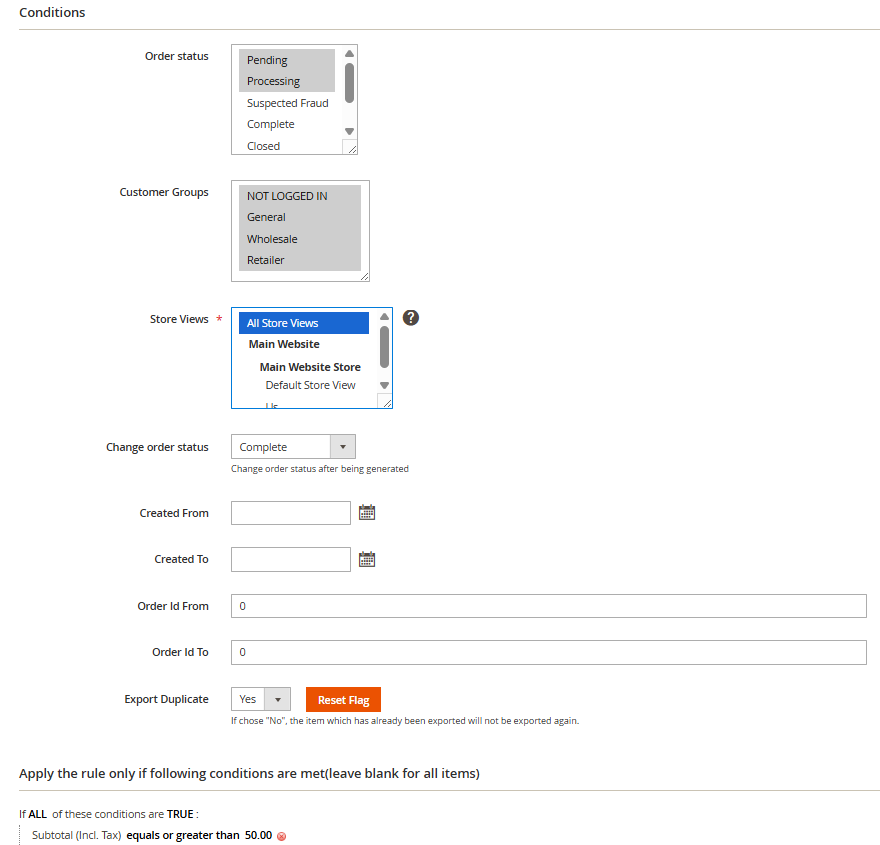
- Set filters to choose which orders to export:
- Order ID
- Order status (e.g., complete, pending)
- Customer groups & Store views
-
Date range
- Set when to apply the rule
Step 5: Set Export Delivery
Decide where the exported file should go:
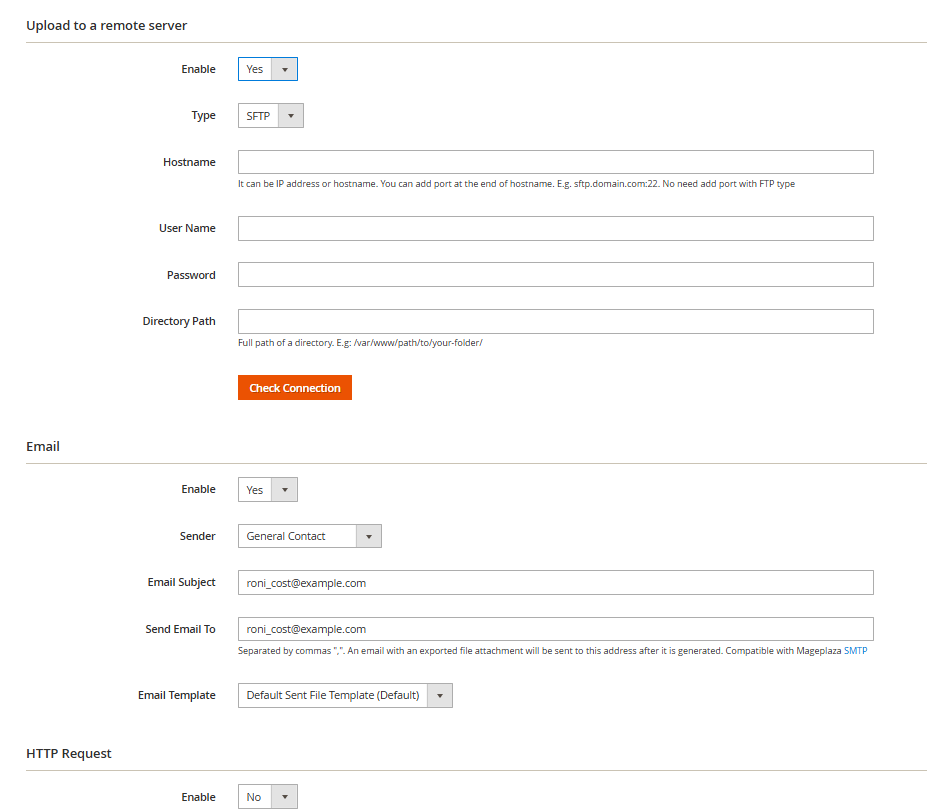
- Email: send directly to recipients
- FTP/SFTP: upload automatically to a server
- Local storage: download manually
Step 6: Save & Run
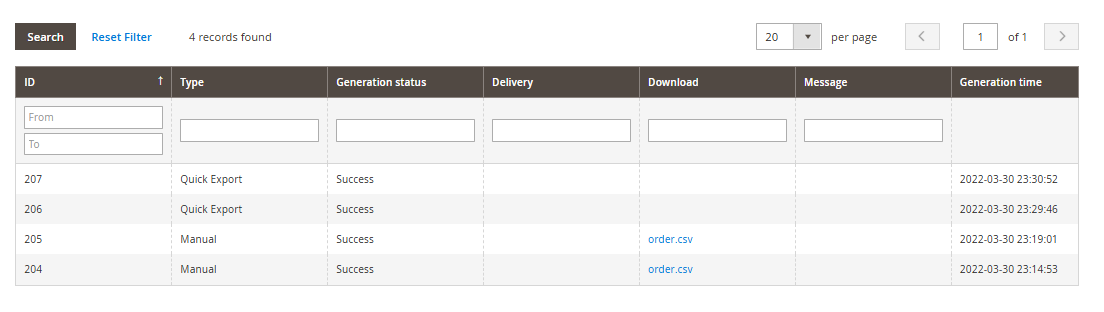
- Save your profile.
- Run the export immediately or let it run according to the schedule.
- Check the Export History for logs, errors, or completed files.
💡Tip:
For other advanced features such as log management & quick export, go to Mageplaza Order Export user guide to learn detailed steps.
How to Import Orders in Magento 2
First, you need to prepare order data for import:
- Check IDs: Ensure
entity_id(internal ID) andincrement_id(order number) are unique to avoid conflicts. - Verify SKUs: Make sure all products exist in your store; imported orders will reference SKUs even if products are missing.
- Confirm Customer Info: Ensure customer emails match existing accounts; unmatched emails will create guest orders.
Here is the step-by-step guide to help you import orders successfully:
1. From the Admin panel, select System and click Import
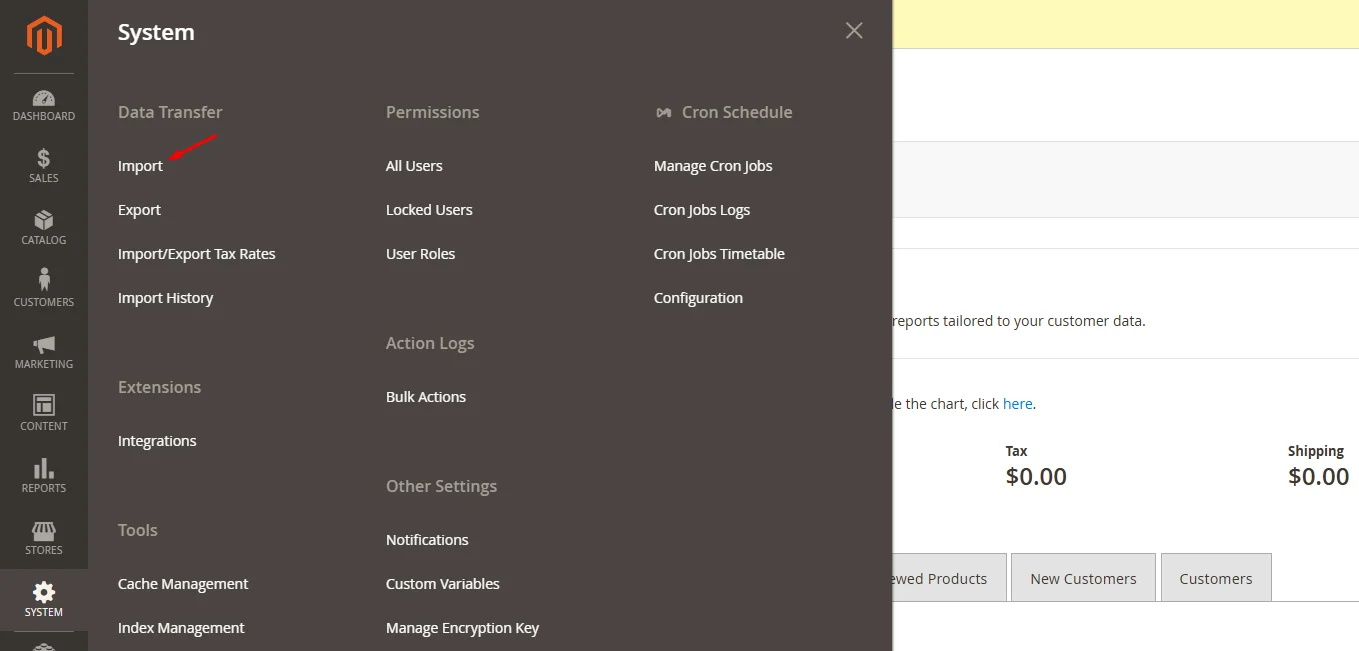
2. Choose the data type you want to import.

3. Configure Import Behavior with the following options:
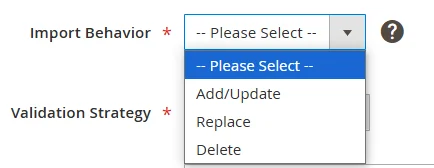
- Add/Update: Insert new orders into the Magento 2 database or modify existing orders with new information from your CSV file.
- Replace: Replace outdated or incorrect information with the most current data.
- Delete: Identify orders by entity_id in the CSV file and remove matching entries.
4. Set the Validation Strategy to determine how the system handles errors during the import process:

- Stop on Error: Halt the import when errors occur
- Skip Error Entries: Bypass errors and continue importing
5. Set the error threshold in Allowed Errors Count. The system will stop importing if the errors exceed this number.

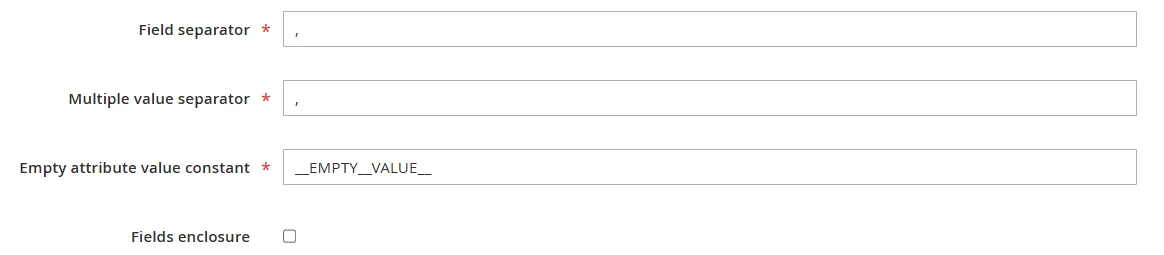
6. Specify the character for Multiple Value separators. It’s set to a comma (,) by default, but ensure it matches your CSV data format.
7. Click Download Sample next to the Entity Type field to download a sample template.

8. After preparing your CSV file, click the Choose File button to choose the file for import.

9. Press Check Data to validate the file for any mistakes

- If there are errors, resolve them in your CSV file and recheck
- If the file is error-free, proceed to the next step
10. Click on the Import button to start the import process.

Troubleshooting Common Issues
During the import and export of orders, unexpected errors may occur. These errors can cause performance bottlenecks and operational delays. Below are some common issues and effective ways to tackle these challenges.
“Invalid Data Format” Error
This typically occurs when the uploaded file does not meet Magento’s required format.
Solution: Make sure the file is in the correct CSV/XML format and follows Magento’s data schema. Refer to sample files provided by Magento or extensions for guidance.
“Required Field Missing” Error
Some mandatory fields (e.g., Order ID, Customer Email) are absent or incomplete.
Solution: Check the data file for missing columns or blank fields. Fill in the necessary information before re-importing.
Data corruption from manual edits
Altering order files manually may break relationships between tables.
Solution: Always use validated files and proper import tools.
“Incorrect Date/Time” Error
Default export uses UTC, causing discrepancies in local time.
Solution: Add a custom column or convert timestamps to your timezone.
Incorrect amount of products shown
Exported product counts may reflect filtered views, not totals.
Solution: Ignore filters and verify the complete export list.
“SKU Not Found” Error
The product SKUs in the order file do not exist in the Magento catalog.
Solution: Verify that all SKUs in the file match the products in Magento. Import missing products before reattempting to import the order.
“Export File Not Generated” Error
The export process is complete, but no file is generated.
Solution: Check server logs for errors. Ensure the selected export entity contains data and that file permissions are correctly configured.
FAQs about Importing and Exporting Orders in Magento 2
What formats can I use to export orders in Magento 2?
You can export orders in CSV (Comma-Separated Values) or XML (eXtensible Markup Language) formats.
What are the benefits of using Magento 2 Order Export extensions?
The Magento 2 Export Orders extensions provide several benefits for eCommerce businesses:
- Detailed Order Data: Export comprehensive details, including customer information, order items, billing and shipping addresses, and payment methods
- Automation: Support for automated exports at scheduled times using cron jobs
- Customization: Filter orders by date range, order number, or status
- Data Backup: Create backups of your order data for future needs by regularly exporting orders
What should I do before importing orders?
Before importing, ensure your CSV file is in the correct format and click Check Data to validate it for any errors or inconsistencies.
Can I export orders by date range or order status?
Yes, you can apply filters such as date range or order status to export specific orders.
Can I clear import and export history manually or automatically?
Yes, you can clear import and export history manually or set it to clear automatically after a specified time.
What should I do to fix common errors when importing orders?
Common order import issues include incorrect data formatting, missing data fields, and extension-related conflicts. To fix these issues, you need to check error logs, review field mappings, and handle conflicts.
Can I use Magento 2 to export orders to third-party applications?
By using the Magento 2 Order Export extension from Mageplza, you can export orders to third-party applications. This tool integrates with external systems, making data sharing and management easy.
Conclusion
To sum up, importing and exporting orders in Magento 2 is a useful feature that helps businesses seamlessly manage order data, enhance productivity, and ensure smooth transactions. By following this guide and taking advantage of Magento 2’s powerful tool, you can manage the store’s data management effectively and keep your business running seamlessly.
Table of content

Jacker is the Chief Technology Officer (CTO) at Mageplaza, bringing over 10 years of experience in Magento, Shopify, and other eCommerce platforms. With deep technical expertise, he has led numerous successful projects, optimizing and scaling online stores for global brands. Beyond his work in eCommerce development, he is passionate about running and swimming.
Related Post

Magento 2.4.9 Beta Release: What's New?
Magento 2.4.9 beta is here. Stay up to date with every release milestone with this regularly updated guide.
11 mins read
|
03-17-2026

Google Analytics Website Traffic: The A–Z Guide for Magento 2 Store Owners
Learn how to analyze website traffic in Google Analytics 4, identify high-quality traffic sources, and grow your Magento 2 store with data-driven insights.
18 mins read
|
03-17-2026

The Complete Guide to UTM Parameters & Google Analytics for Magento website
Master UTM parameters and Google Analytics for Magento. Track traffic sources, measure campaign performance, and practical tips to use it for better business decisions.
9 mins read
|
10-05-2025

How to implement Cookie Consent for GTM & Google Analytics in Magento Under GDPR?
Implement cookie consent for GTM & GA4 in Magento under GDPR. Step-by-step guide using Google Consent Mode v2 to avoid fines and maintain analytics.
15 mins read
|
02-27-2026

Speed vs. Sales: Comparing Hyvä Checkout and Mageplaza One Step Checkout
Learn how Hyvä Checkout and Mageplaza One Step Checkout impact order completion rates and revenue growth.
8 mins read
|
02-25-2026
1 min read
|
03-30-2026
Magento 2.4.9 Beta Release: What's New?
Magento 2.4.9 beta is here. Stay up to date with every release milestone with this regularly updated guide.
11 mins read
|
03-17-2026
Google Analytics Website Traffic: The A–Z Guide for Magento 2 Store Owners
Learn how to analyze website traffic in Google Analytics 4, identify high-quality traffic sources, and grow your Magento 2 store with data-driven insights.
18 mins read
|
03-17-2026
The Complete Guide to UTM Parameters & Google Analytics for Magento website
Master UTM parameters and Google Analytics for Magento. Track traffic sources, measure campaign performance, and practical tips to use it for better business decisions.
9 mins read
|
10-05-2025
How to implement Cookie Consent for GTM & Google Analytics in Magento Under GDPR?
Implement cookie consent for GTM & GA4 in Magento under GDPR. Step-by-step guide using Google Consent Mode v2 to avoid fines and maintain analytics.
15 mins read
|
02-27-2026
Speed vs. Sales: Comparing Hyvä Checkout and Mageplaza One Step Checkout
Learn how Hyvä Checkout and Mageplaza One Step Checkout impact order completion rates and revenue growth.
8 mins read
|
02-25-2026