Hyvä Theme is Now Open Source: What This Means for Magento Community - Mageplaza
Hyvä is now Open Source and free. Discover what changed, what remains commercial, how it impacts the Magento ecosystem, and how to maximize its full potential.
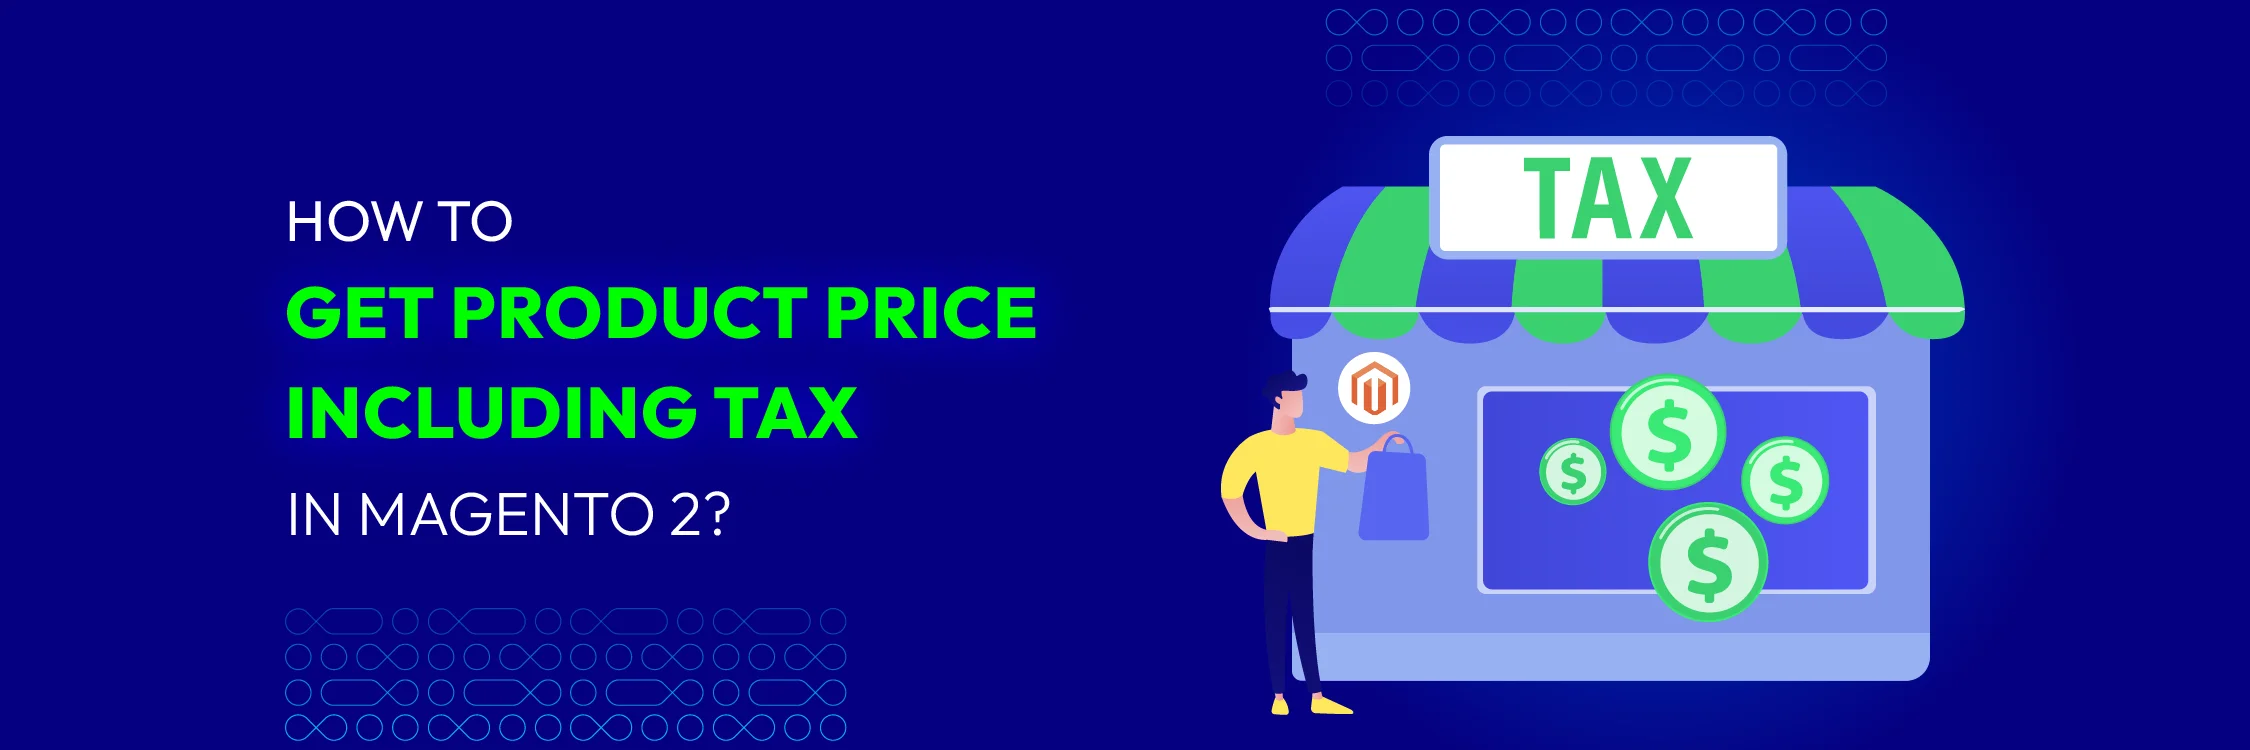
According to a Statista survey, the average shopping abandonment rate in 2024 is 70.19%, which means nearly 3 out of 4 customers abandon their cart without making any purchase. Consequently, businesses are increasingly focusing on shopping carts, which serve as the crucial stage between potential and actual buyers.
To prevent cart abandonment in Magento and enhance the shopping experience, it’s essential to carefully consider and configure various shopping cart options. Magento offers easy configuration options for various types of shopping carts. You can customize the display of information to customers, aiming to improve conversion rates.
The Magento 2 shopping cart configuration outlines the various activities and functions available for store customers. Magento allows you to easily set up multiple options such as redirecting to the cart, setting quote lifetime, displaying cart thumbnails, and more.
This activity occurs when a customer adds an item to their Magento shopping cart, encouraging them to proceed to checkout.
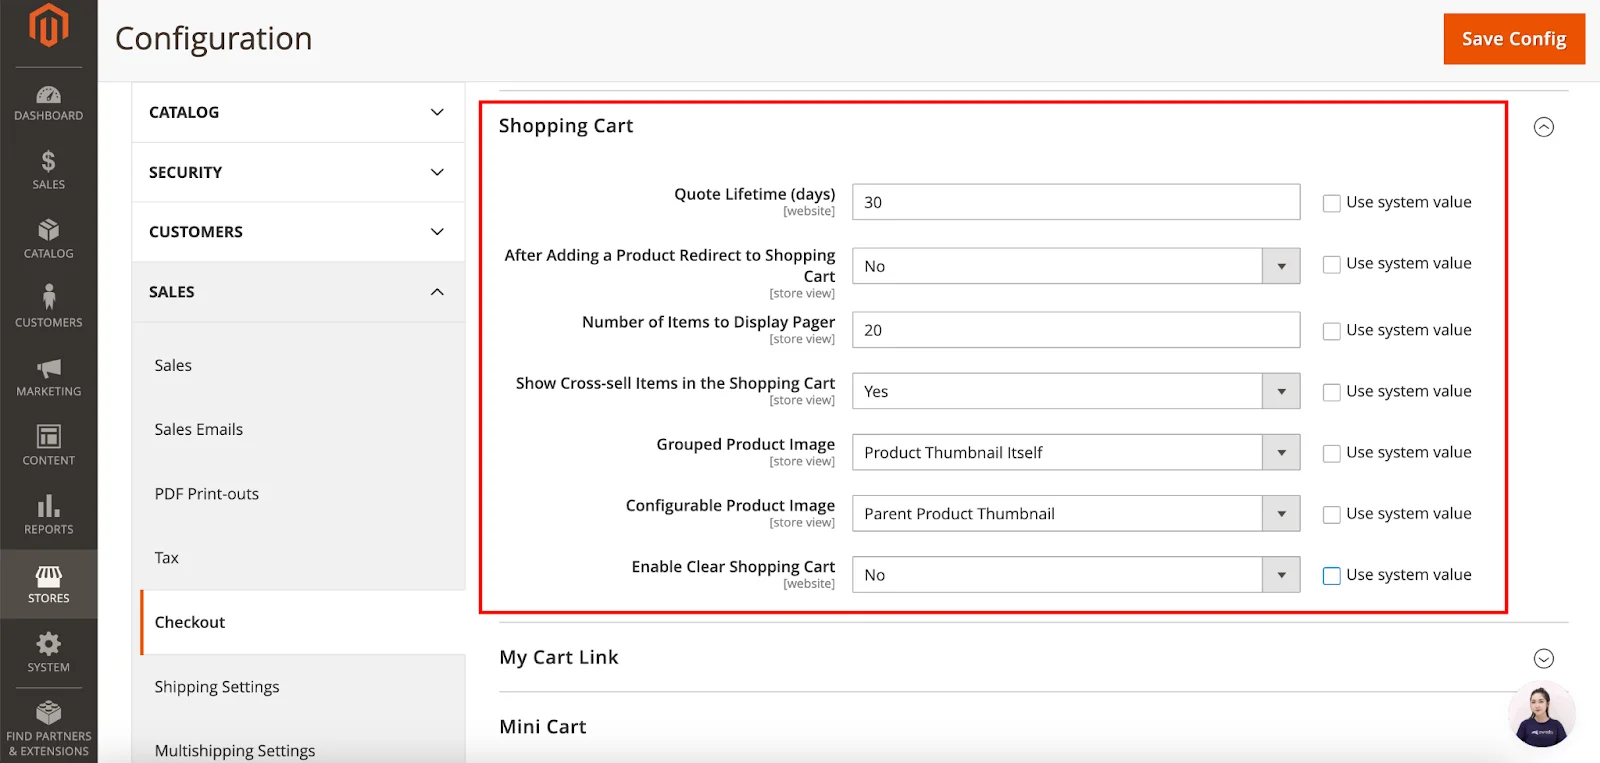
To configure this:
Go to your Magento admin panel. Navigate to Stores > Configuration > Sales > Checkout.
Expand the Shopping Cart section.
Adjust the settings according to your store’s needs, including the Number of Items to Display Pager for cross-sell items and the addition of images for Grouped and Configurable products.
Once done, click on Save Config.
The mini sidebar cart appears at the top-right corner when hovered over, showing a summary of your Magento shopping cart.

To enable it:
Go to Stores > Configuration > Sales > Checkout.
Next, expand the Mini Cart section.
Enable to Display Mini Cart. Edit the Number of Items to Display Scrollbar and Maximum Number of Items to Display.
Click Save Config.
You can configure this option to decide if the cart icon displays the number of different products (or SKUs).

Navigate to the Cart Link section under the Checkout section.
Expand My Cart Link and choose your preferred option.
Click Save Config.
Sometimes customers leave their shopping carts for a while but return later to make a purchase. However, the price of the products might change during that time.
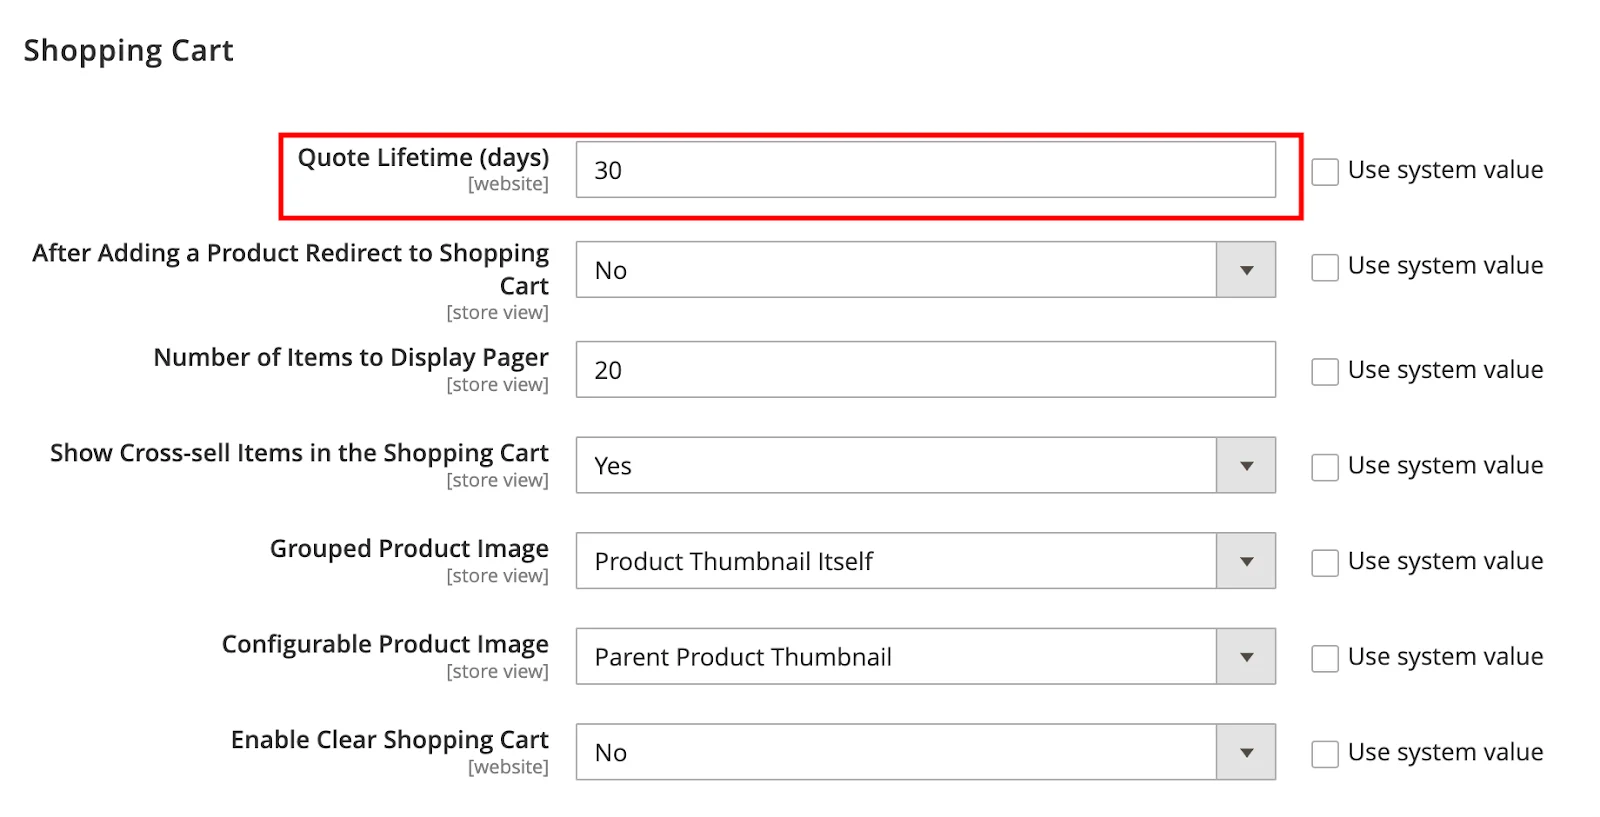
In the Shopping Cart box, complete the Quote Lifetime (days) option to indicate the number of days the quoted price is valid.
Thumbnails assist customers in seeing which products they’ve added to their cart. Typically, these thumbnails reflect the selected product. However, if the products have variations, the thumbnails in the cart may not match the specific items added.
For configurable and grouped products, the images can either correspond to the product variation or the parent product image.
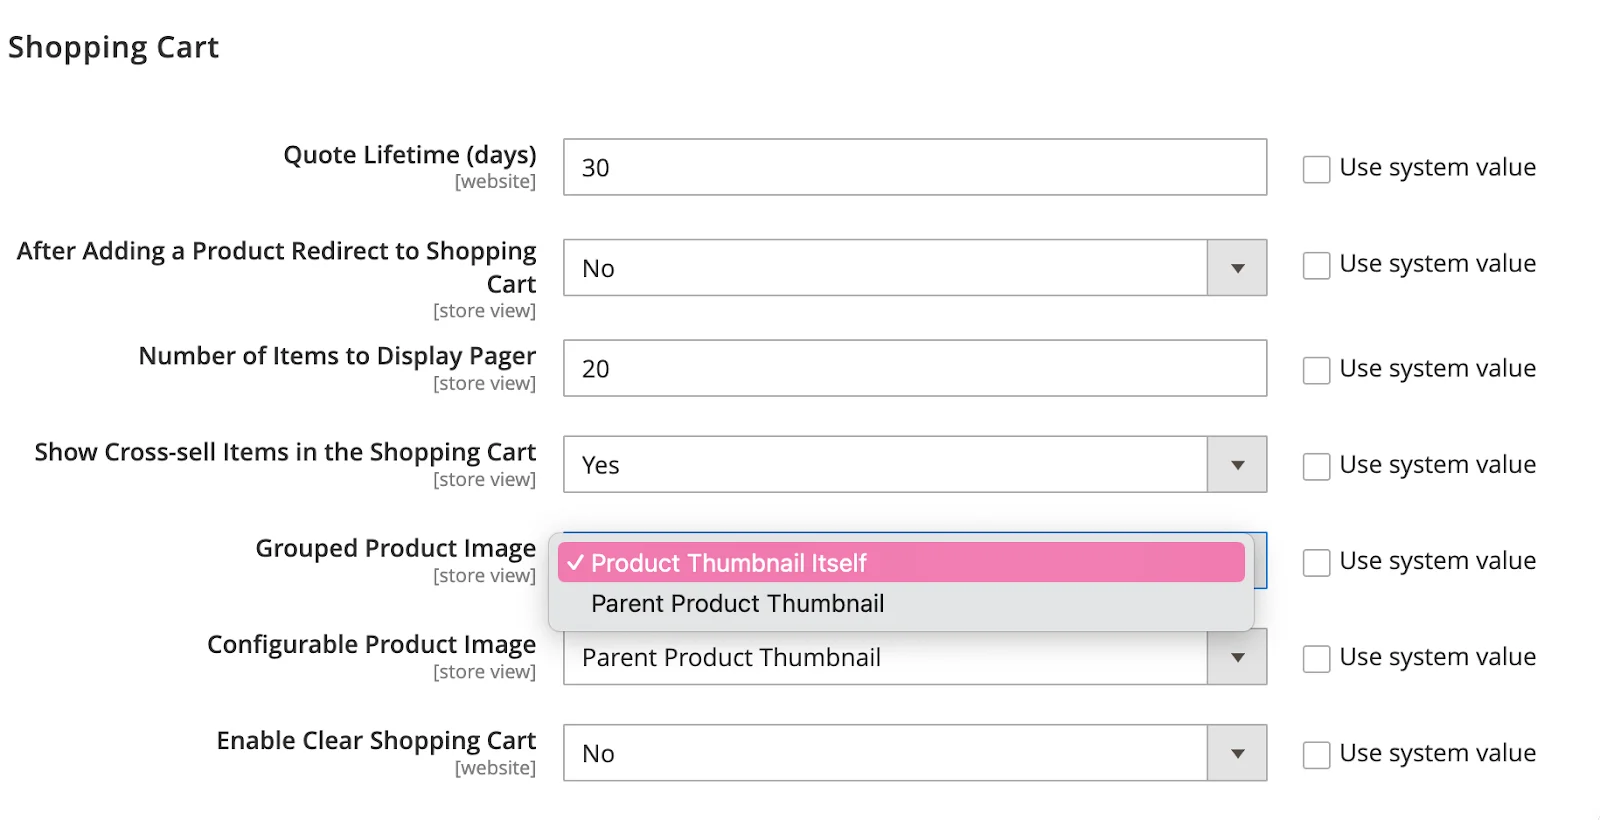
You can configure the Grouped and Configurable Product Images in the Shopping Cart section with these options:
Product Thumbnail Itself — displays the thumbnail of the specific product added to the cart.
Parent Product Thumbnail — shows the thumbnail of the parent product.
To boost purchases or guarantee a set quantity for specific customer groups, you can set the Minimum Quantity Allowed in Shopping Cart option.
Go to Stores > Configuration > Catalog > Inventory > Product Stock Options to set it up.
Adjust the Minimum Qty Allowed in Shopping Cart for each customer group.
Different groups of customers will then see the minimum quantity they need to select to add items to the cart.
Note: Be careful not to overdo it, unless you have a specific reason. People don’t like being forced to purchase more than they need.
Another Magento shopping cart option that encourages purchases is the Minimum Order Amount. According to this setting, customers must meet a certain subtotal to proceed to checkout. If the minimum amount is not met, the checkout button will not be available.

Log in to your Magento 2 admin panel. Navigate to** Stores > Settings > Configuration. Under the **Sales section, click on Sales to expand it.
Locate the Minimum Order Amount area.
Set the toggle switch to Yes to enable the minimum order amount feature.
In the Minimum Order Amount field, enter the minimum amount allowed for an order.
Click Save Config to apply the changes.
You can also set a minimum order amount requirement for each address when shipping to multiple locations.
Enable your clients to personalize their carts with a note or greeting card.

Go to Stores > Configuration. Select the Sales section, choose Sales
Expand the Gift Options tab.
Enable the following permissions and select Yes.
Click Save Config to apply the new changes.
Lastly, Magento shopping cart price rules enable you to configure discounts by setting up specific conditions and providing coupons that customers can use in the shopping cart or at checkout.
You can also apply coupons automatically to simplify the discount process for your customers.
Read more: How to Enable Persistent Shopping Cart in Magento 2
Magento 2 shopping cart offers various functionalities for your store’s customers. You can configure settings such as redirect behavior, quote lifetime, cart thumbnails, and more to optimize the shopping experience.
Configuring these options enables users to navigate the purchase funnel smoothly, ultimately enhancing the overall customer experience.