


1 min read
|
03-30-2026
Ultimate Instruction to Build a NextJs Theme in Magento 2
Vinh Jacker
|
03-17-2025


Having a modern, fast, and user-friendly interface will set you apart, helping you attract and retain customers successfully.
NextJS, with its powerful optimization capabilities, when combined with the Magento (Adobe Commerce) platform, offers a perfect solution for businesses aiming to enhance user experience and optimize website performance.
This article will guide you step-by-step on building a NextJs theme in Magento 2, helping you create an outstanding and efficient online store.
Learn more: How to Reduce Unused JavaScript in Next.js
Introduction about NextJs
NextJs is a framework built on top of React, known for its SEO optimization capabilities, fast page loading performance, and smooth user experience. NextJs enables developers to easily build static and dynamic web applications thanks to features like SSR (Server-Side Rendering) and SSG (Static Site Generation).
Therefore, NextJs not only helps you create fast and efficient websites but also provides powerful tools and features to manage and optimize your website.
When combined with Magento 2, you’ll have a robust e-commerce platform that is easy to manage and optimize, delivering the best experience for users.
What is Magento 2 Next.js Theme?
A Magento 2 Next.js Theme is a headless frontend solution that uses Next.js. This React-based framework helps build a fast, modern, and scalable eCommerce storefront. Unlike Magento’s traditional frontend (Luma or PWA Studio), the Next.js theme uses Next.js with Magento 2’s GraphQL API to create a separate, high-performance user experience.
3 Main Benefits of Magento 2 GraphQL API
The GraphQL API in Magento 2 plays a crucial role when integrated with Next.js. This popular React-based framework. Here are 3 key benefits of Magento 2 GraphQL AP:
- Efficient data fetching: By leveraging GraphQL, Next.js retrieves only the necessary data from Magento 2. This process avoids unnecessary data transfers. As a result, pages load more quickly and improve performance.
- Optimized API requests: Unlike REST APIs, which often over-fetch or under-fetch data, GraphQL APIs ensure that only the required information is requested. This minimizes payload size, speeds up data retrieval, and enhances the user experience.
- Flexibility and scalability: The headless architecture of Next.js allows the frontend to operate independently from the backend. This separation makes it easier to scale and update the application for improved performance and flexibility.
- Improved User Interaction: With GraphQL, Next.js components can access reusable data on each request, accelerating page updates and enhancing interactivity. This capability is especially useful when user actions trigger data changes. By eliminating the need for full-page reloads, GraphQL ensures a smoother and more seamless user experience.
How to Build a NextJs Theme in Magento 2
To create a NextJS project within Magento 2, let’s delve into the detailed 6 steps below!
Step 1: Setup NextJs
First, you need to install NextJs and set up a new project. Open the terminal and run the following commands:
npx create-next-app my-magento-theme
cd my-magento-theme
npm run dev
Step 2: Setup Axios
Axios is a Promise-based HTTP client library for both Node.js and browsers. It offers codebase consistency, meaning the same codebase can run seamlessly in both environments.
Essentially, Axios is a powerful library that helps you easily connect to and query data from Magento 2’s GraphQL API. It’s used to fetch, cache, store, and modify application data.
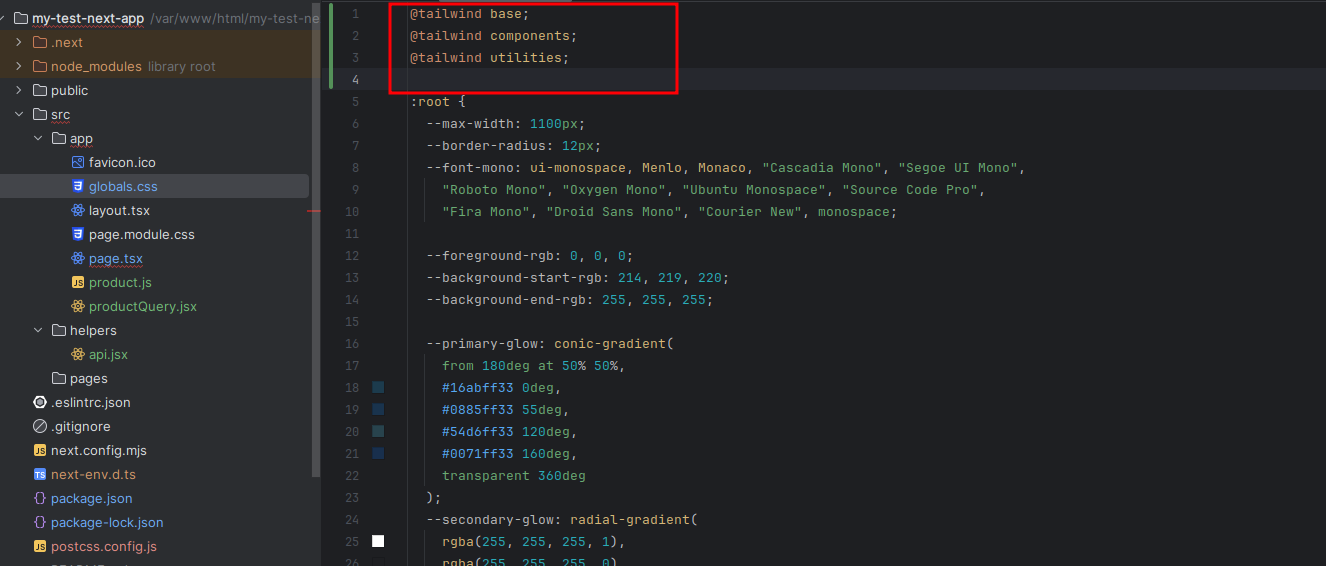
Step 3: Add css to globals.css
@tailwind base;
@tailwind components;
@tailwind utilities;
Step 4: Create GraphQL file
You need to create an additional file productQuery.jsx to create a graphql query. Therefore, the following code will help you:
export const productQuery = `query ProductQuery($filters: ProductAttributeFilterInput) {
 products(filter: $filters) {
   items {
     id
     name
     sku
     description{
       html
     }
     short_description{
       html
     }
     image {
       disabled
       label
       position
       url
     }
     rating_summary
     media_gallery{
       url
       position
       label
       disabled
     }
   }
 }
}`

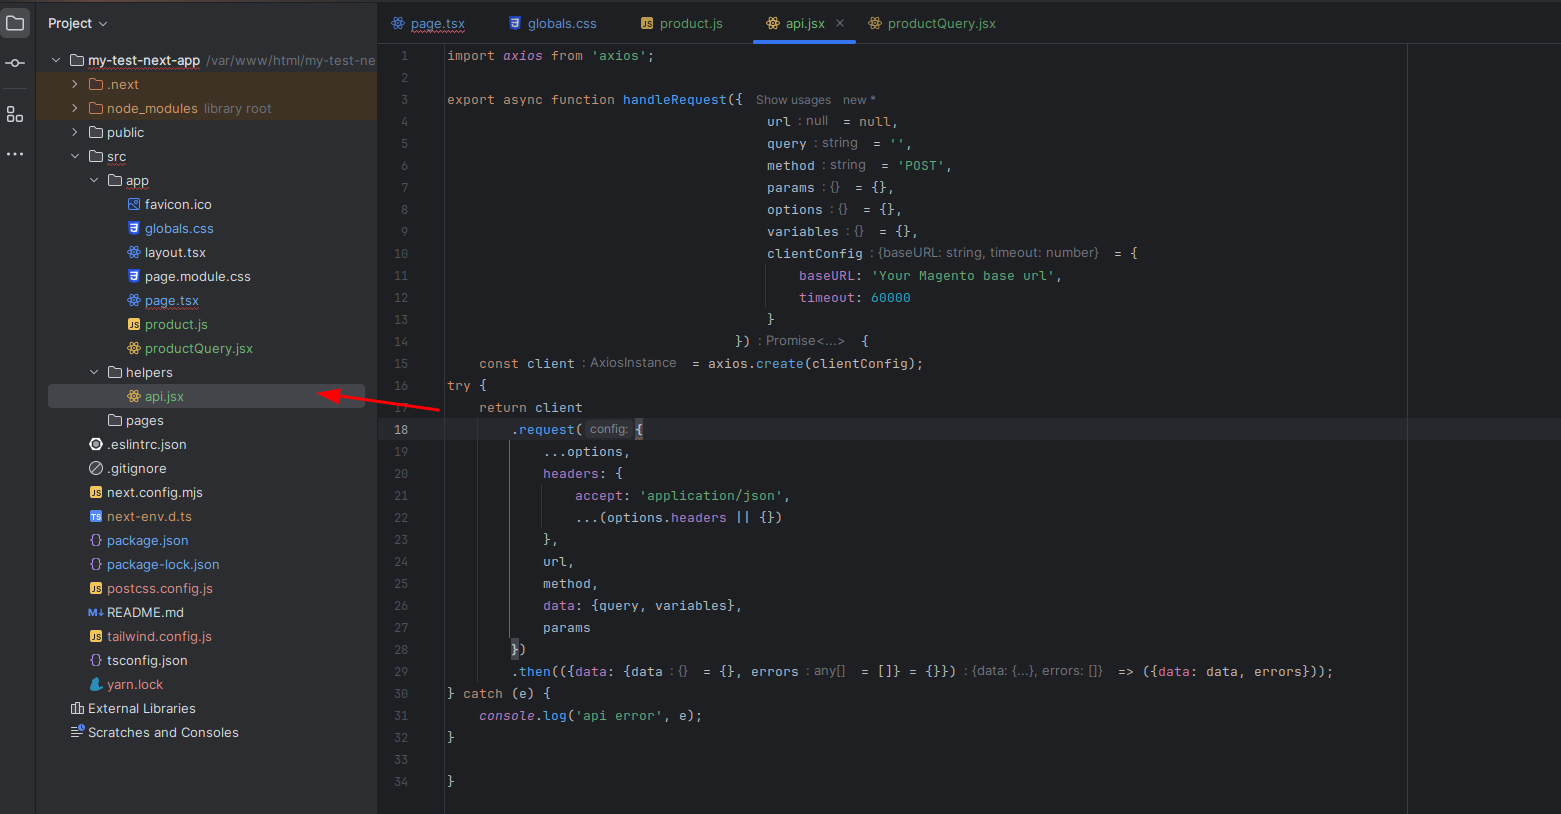
Step 5: Create API file to get data
Create a file helpers/api.jsx to get data from your Magento site.
import axios from 'axios';


export async function handleRequest({
                                       url = null,
                                       query = '',
                                       method = 'POST',
                                       params = {},
                                       options = {},
                                       variables = {},
                                       clientConfig = {
                                           baseURL: 'Your Magento base url',
                                           timeout: 60000
                                       }
                                   }) {
   const client = axios.create(clientConfig);
try {
   return client
       .request({
           ...options,
           headers: {
               accept: 'application/json',
               ...(options.headers || {})
           },
           url,
           method,
           data: {query, variables},
           params
       })
       .then(({data: {data = {}, errors = []} = {}}) => ({data: data, errors}));
} catch (e) {
   console.log('api error', e);
}


}
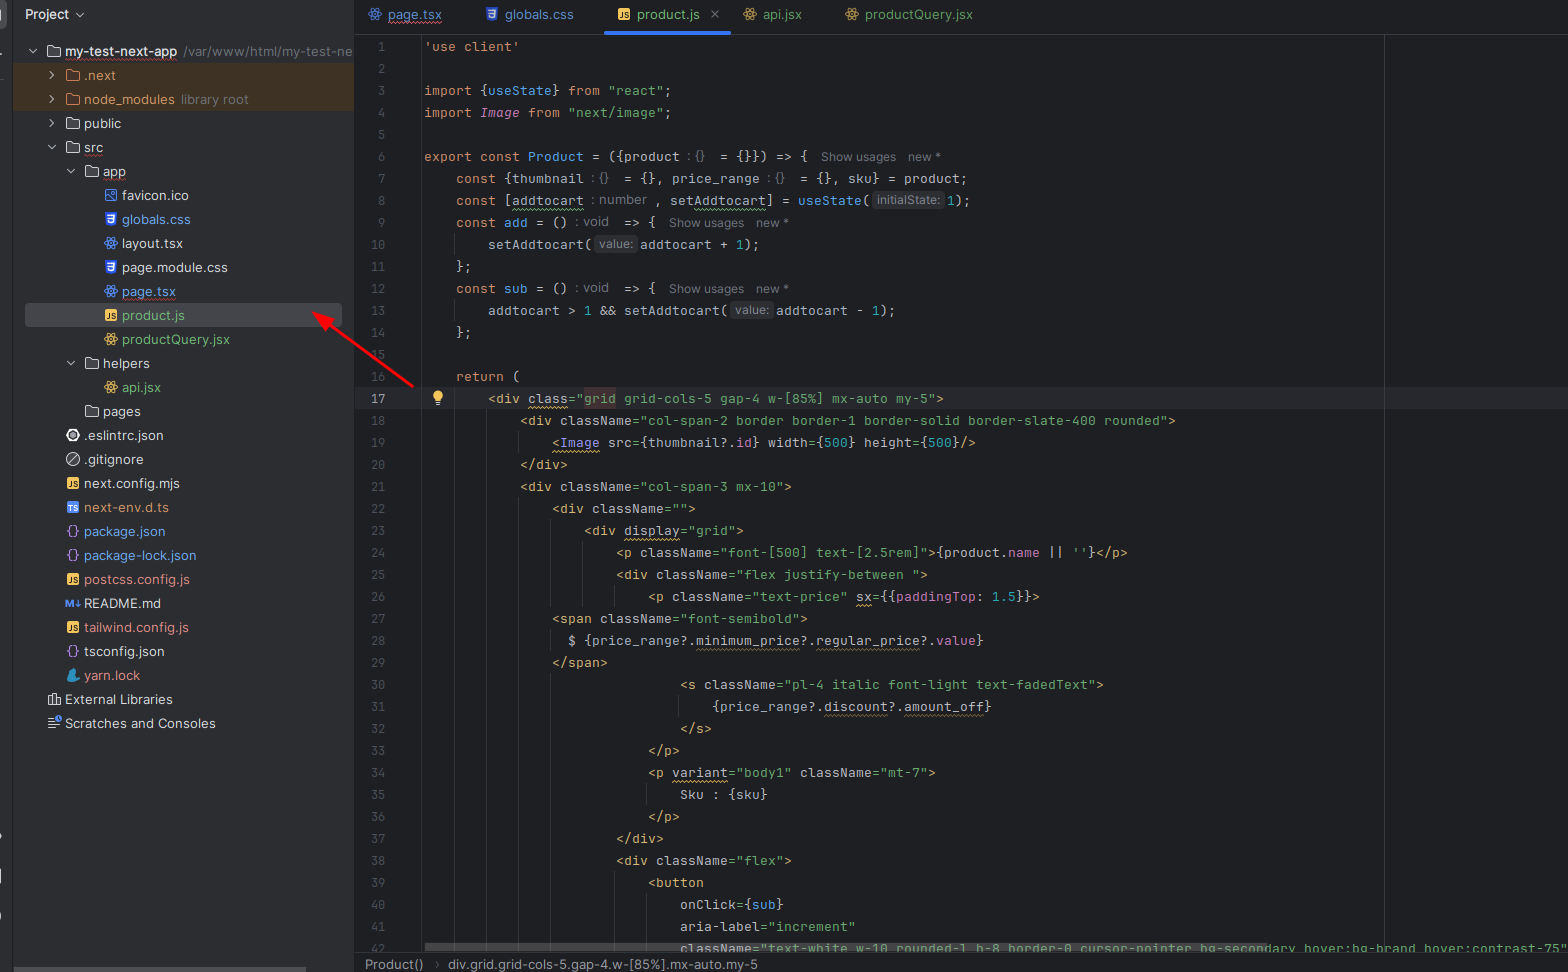
Step 6: To display the Product
Create a file named product.js in app
In this case, we’ll utilize the Static Site Generation (SSG) feature in Next.js, which is a powerful feature. It means that the HTML page will be generated at build time and reused on each request.
To pre-generate the paths based on the products, we use the asynchronous function Product.
Final Code and UI Design According to the API Response.
'use client'


import {useState} from "react";
import Image from "next/image";


export const Product = ({product = {}}) => {
   const {thumbnail = {}, price_range = {}, sku} = product;
   const [addtocart, setAddtocart] = useState(1);
   const add = () => {
       setAddtocart(addtocart + 1);
   };
   const sub = () => {
       addtocart > 1 && setAddtocart(addtocart - 1);
   };


   return (
       <div class="grid grid-cols-5 gap-4 w-[85%] mx-auto my-5">
           <div className="col-span-2 border border-1 border-solid border-slate-400 rounded">
               <Image src={thumbnail?.id} width={500} height={500}/>
           </div>
           <div className="col-span-3 mx-10">
               <div className="">
                   <div display="grid">
                       <p className="font-[500] text-[2.5rem]">{product.name || ''}</p>
                       <div className="flex justify-between ">
                           <p className="text-price" sx=>
               <span className="font-semibold">
                 $ {price_range?.minimum_price?.regular_price?.value}
               </span>
                               <s className="pl-4 italic font-light text-fadedText">
                                   {price_range?.discount?.amount_off}
                               </s>
                           </p>
                           <p variant="body1" className="mt-7">
                               Sku : {sku}
                           </p>
                       </div>
                       <div className="flex">
                           <button
                               onClick={sub}
                               aria-label="increment"
                               className="text-white w-10 rounded-l h-8 border-0 cursor-pointer bg-secondary hover:bg-brand hover:contrast-75"
                           >
                               -
                           </button>
                           <input
                               max={6}
                               type="text"
                               className="relative w-14 border-[1px] border-gray flex items-center px-3 font-semibold text-center text-gray-700   outline-none cursor-default -z-10 readonly focus:outline-none text-md hover:text-black focus:text-black md:text-base"
                               min={1}
                               value={addtocart}
                               id="quantity"
                               placeholder="0"
                           />
                           <button
                               aria-label="increment"
                               className="text-white w-10 h-8 rounded-r border-0 cursor-pointer bg-secondary hover:bg-brand hover:contrast-75"
                               onClick={add}
                           >
                               +
                           </button>
                       </div>
                       <p className="pt-3 text-hoverEffect text-[16px] ">
                           {product.short_description?.html ||
                               ''}
                       </p>
                   </div>
                   <button
                       color="secondary"
                       variant="contained"
                       className="w-full py-4 mx-auto"
                       type="submit"
                   >
                       Add to cart
                   </button>
               </div>
           </div>
       </div>
   );
};
Afterwards, call the Product in the page.tsx file to fetch data onto the page.
import styles from "./page.module.css";
import {Product} from "@/app/product";
import {handleRequest} from "@/helpers/api";
import {productQuery} from "@/app/productQuery";


async function Home() {
   const {data: {products: {items}}} = await getProducts({urlKey: 'fusion-backpack'});
 return (
   <main className={styles.main}>
     <Product product={items[0]} />
   </main>
 );
}


export default Home


export async function getProducts({urlKey = ''}) {
   const data = await handleRequest({query: productQuery, variables: {filters: {url_key: {eq: urlKey}}},})


   return data;
}
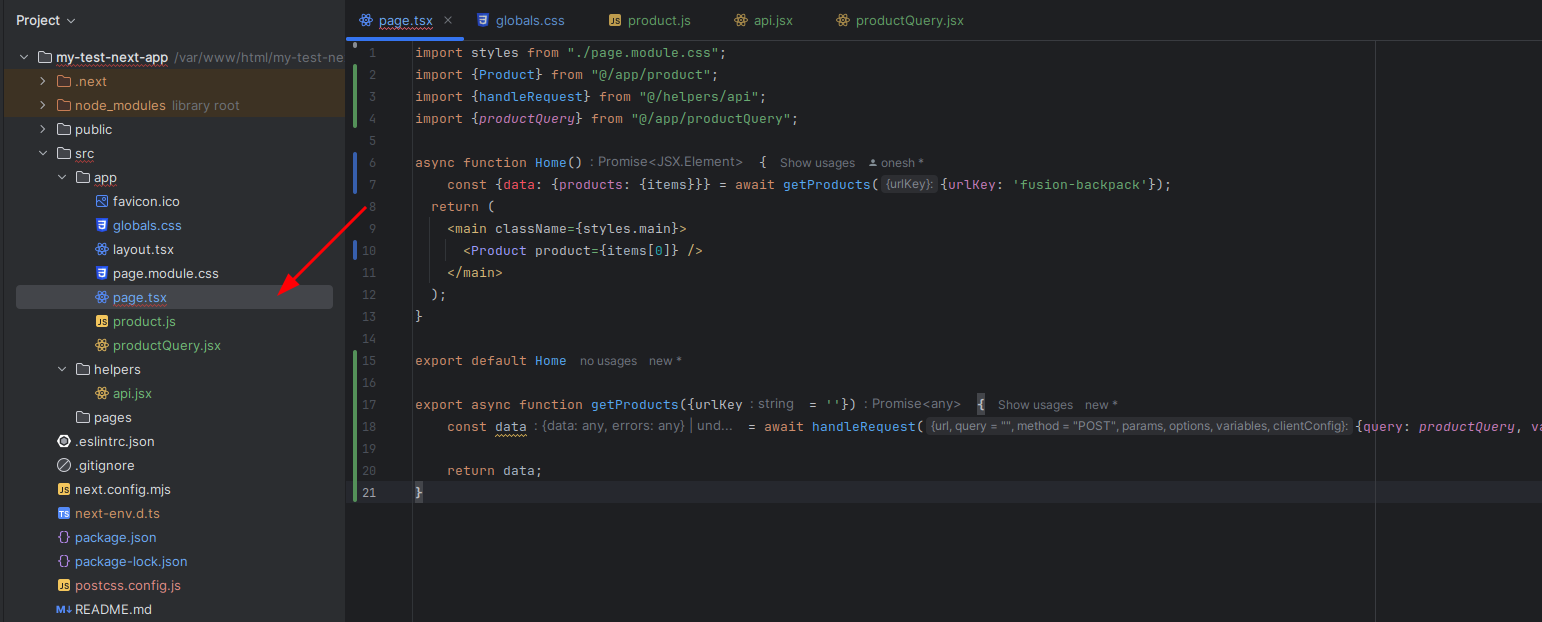
You can see the result on http://localhost:3000
Platforms support the deployment of Next.js
Vercel

As the creator of Next.js, Vercel delivers a smooth platform for deploying Next.js applications. Its serverless system helps websites and apps scale easily, improves workflows, and ensures fast performance.
Deploying a Next.js project with Vercel is highly efficient, thanks to its seamless Git integration. Once a repository is linked, every push to the main branch automatically triggers a new build and deployment. Thus, you can eliminate manual intervention.
Beyond deployment, Vercel excels in handling both server-side rendering (SSR) and static site generation (SSG). This platform allows developers to build fast and dynamic web applications. Vercel is excellent at handling server-side rendering (SSR) and static site generation (SSG). These features help developers create fast and interactive applications, leading to quicker page load times, better SEO rankings, and an improved user experience.
Key features:
- Enable automatic scaling with a global CDN for faster load times
- Utilize serverless functions to handle backend logic
- Integrate with GitHub, GitLab, and Bitbucket for continuous deployment
- Allow for easy custom domain setup and HTTPS
Netlify
Netlify provides a robust solution for deploying Next.js applications. It provides an intuitive interface and advanced features for seamless continuous integration and deployment (CI/CD). Primarily used for hosting static websites, it also supports dynamic content through serverless functions. This versatility is ideal for modern web development. The deployment process is simple. You can integrate with a Git repository. Netlify automates builds and ensures that each update triggers a fresh deployment. This streamlined workflow reduces manual intervention, enhancing both scalability and maintainability for developers.
Key features:
- Optimize content delivery with global edge network (CDN)
- Trigger deployments automatically by code pushes
- Offer serverless functions for handling API requests
- Control real-time rollback and version for better stability
- Compare different versions of the website through split testing
AWS (Amazon Web Services)
AWS offers customized Next.js deployments across various cloud services, including EC2, Lambda, Amplify, and S3. It provides the flexibility to meet diverse business and performance needs. With enterprise-grade security, auto-scaling, and a global infrastructure, AWS is an excellent choice for high-performance and large-scale applications.
Key Features:
- Deploy applications on EC2, Lambda, or AWS Amplify based on needs
- Ensure availability and reliability with global infrastructure
- Handle spikes with auto-scaling and load-balancing
- Support rendering (SSR) and static site generation (SSG)
FAQs
1, Can I use Next.js with Magento 2 without GraphQL?
Yes, you can use Next.js with Magento 2 instead of GraphQL. While GraphQL is commonly used for headless Magento setups, it’s not strictly necessary. You can use REST APIs or other methods to connect Next.js with Magento 2 for your frontend development.
2, Do I need a headless CMS for this integration?
No, Magento 2 provides API endpoints, but a headless CMS can improve content management flexibility.
3, Can I use Magento’s default themes alongside Next.js?
Yes, you can use Magento’s default themes with Next.js. While Next.js is great for custom themes, it can also integrate with Magento’s default themes for frontend development. With this approach, you can utilize Next.js features like server-side rendering and static site generation alongside Magento’s current design and layout.
4, What are the benefits of using server-side rendering (SSR) with Next.js in Magento 2?
SSR improves performance by rendering pages on the server before sending them to the client. Thus, load times are quicker, SEO is better, and the user experience is enhanced.
5, How do I ensure SEO optimization with Next.js in Magento 2?
To optimize SEO with Next.js in Magento 2, you need to adhere to these recommendations:
- Use SSR to render pages server-side
- Set up proper meta tags and structured data
- Create user-friendly URLs
- Ensure fast page load times
- Update and optimize content regularly
6, What open-source tools can I use to build a Next.js theme for Magento 2?
You can build a Next.js theme for Magento 2 using open-source tools by leveraging frameworks like Next.js and libraries like React. Community resources such as PWA Studio can assist as well. Thanks to these tools, you can leverage a flexible and customizable development process.
7, What obstacles might arise when developing a headless theme with Magento 2 and Next.js?
Developing a headless theme using Magento 2 and Next.js comes with several challenges:
- Complex Integration: Connect Magento 2’s backend with Next.js frontend requires careful API management and can be complex.
- Performance Optimization: Achieve fast load times and smooth performance requires optimizing both the backend and frontend, which can be challenging.
- SEO Configuration: Properly configure server-side rendering (SSR) and static site generation (SSG) to improve SEO can be tricky.
- State Management: Manage the state across the application, especially with dynamic content, requires robust solutions like Redux or Context API.
Conclusion
Building a Next.js interface within Magento 2 (Adobe Commerce) brings numerous benefits in terms of performance, user experience, and SEO optimization. By utilizing Next.js alongside Magento 2’s GraphQL API, you can create modern, fast, and efficient e-commerce websites.
Hopefully, this guide has helped you understand the process of building and applying it to your project.
If you encounter any difficulties while building a NextJs theme in Magento 2, don’t hesitate to contact our experts for the best support.
Wishing you success!
Table of content

Jacker is the Chief Technology Officer (CTO) at Mageplaza, bringing over 10 years of experience in Magento, Shopify, and other eCommerce platforms. With deep technical expertise, he has led numerous successful projects, optimizing and scaling online stores for global brands. Beyond his work in eCommerce development, he is passionate about running and swimming.
Related Post


Magento 2.4.9 Beta Release: What's New?
Magento 2.4.9 beta is here. Stay up to date with every release milestone with this regularly updated guide.
11 mins read
|
03-17-2026
Google Analytics Website Traffic: The A–Z Guide for Magento 2 Store Owners
Learn how to analyze website traffic in Google Analytics 4, identify high-quality traffic sources, and grow your Magento 2 store with data-driven insights.
18 mins read
|
03-17-2026

The Complete Guide to UTM Parameters & Google Analytics for Magento website
Master UTM parameters and Google Analytics for Magento. Track traffic sources, measure campaign performance, and practical tips to use it for better business decisions.
9 mins read
|
10-05-2025

How to implement Cookie Consent for GTM & Google Analytics in Magento Under GDPR?
Implement cookie consent for GTM & GA4 in Magento under GDPR. Step-by-step guide using Google Consent Mode v2 to avoid fines and maintain analytics.
15 mins read
|
02-27-2026

Speed vs. Sales: Comparing Hyvä Checkout and Mageplaza One Step Checkout
Learn how Hyvä Checkout and Mageplaza One Step Checkout impact order completion rates and revenue growth.
8 mins read
|
02-25-2026
1 min read
|
03-30-2026
Magento 2.4.9 Beta Release: What's New?
Magento 2.4.9 beta is here. Stay up to date with every release milestone with this regularly updated guide.
11 mins read
|
03-17-2026
Google Analytics Website Traffic: The A–Z Guide for Magento 2 Store Owners
Learn how to analyze website traffic in Google Analytics 4, identify high-quality traffic sources, and grow your Magento 2 store with data-driven insights.
18 mins read
|
03-17-2026
The Complete Guide to UTM Parameters & Google Analytics for Magento website
Master UTM parameters and Google Analytics for Magento. Track traffic sources, measure campaign performance, and practical tips to use it for better business decisions.
9 mins read
|
10-05-2025
How to implement Cookie Consent for GTM & Google Analytics in Magento Under GDPR?
Implement cookie consent for GTM & GA4 in Magento under GDPR. Step-by-step guide using Google Consent Mode v2 to avoid fines and maintain analytics.
15 mins read
|
02-27-2026
Speed vs. Sales: Comparing Hyvä Checkout and Mageplaza One Step Checkout
Learn how Hyvä Checkout and Mageplaza One Step Checkout impact order completion rates and revenue growth.
8 mins read
|
02-25-2026