Hyvä Theme is Now Open Source: What This Means for Magento Community - Mageplaza
Hyvä is now Open Source and free. Discover what changed, what remains commercial, how it impacts the Magento ecosystem, and how to maximize its full potential.
Vinh Jacker | 03-17-2025
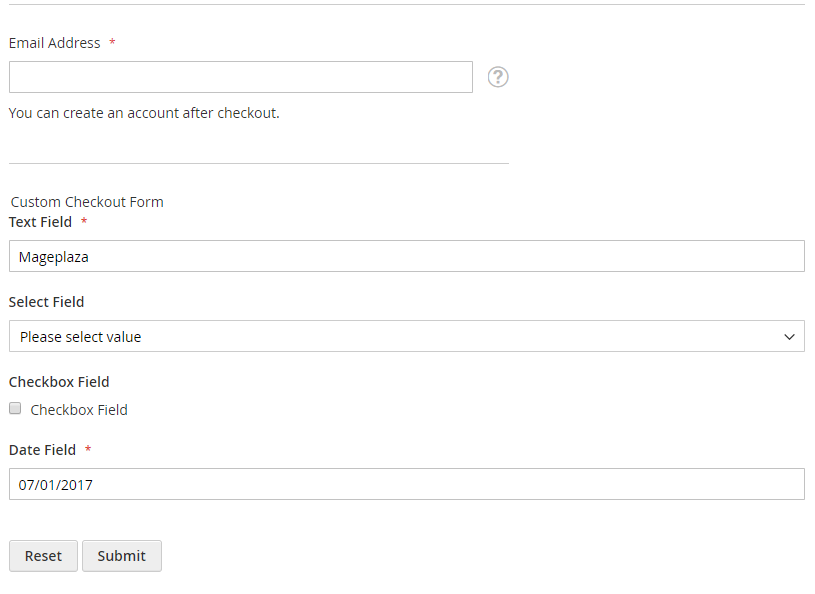
This topic describes how to add a new input form to the Checkout page.
Magento provides the ability to add a custom form to any of the checkout steps: Shipping Information, Review and Payment Information, or custom.
In this article, we will demonstrate how to add the new form before the Shipping Address form.
You should know how to create a create module in magento 2. All of customized files will be inside this module.
Let’s begin.
First of all, create custom-checkout-form in Mageplaza/HelloWorld/view/frontend/web/js/view directory.
/*global define*/
define([
    'Magento_Ui/js/form/form'
], function(Component) {
    'use strict';
    return Component.extend({
        initialize: function () {
            this._super();
            // component initialization logic
            return this;
        },

        /**
         * Form submit handler
         *
         * This method can have any name.
         */
        onSubmit: function() {
            // trigger form validation
            this.source.set('params.invalid', false);
            this.source.trigger('customCheckoutForm.data.validate');

            // verify that form data is valid
            if (!this.source.get('params.invalid')) {
                // data is retrieved from data provider by value of the customScope property
                var formData = this.source.get('customCheckoutForm');
                // do something with form data
                console.dir(formData);
            }
        }
    });
});
Add the knockout.js HTML template custom-checkout-form.html for the form component under the Mageplaza/HelloWorld/view/frontend/web/template directory.
<div>
    <form id="custom-checkout-form" class="form" data-bind="attr: {'data-hasrequired': $t('* Required Fields')}">
        <fieldset class="fieldset">
            <legend data-bind="i18n: 'Custom Checkout Form'"></legend>
            <!-- ko foreach: getRegion('custom-checkout-form-fields') -->
            <!-- ko template: getTemplate() --><!-- /ko -->
            <!--/ko-->
        </fieldset>
        <button type="reset">
            <span data-bind="i18n: 'Reset'"></span>
        </button>
        <button type="button" data-bind="click: onSubmit" class="action">
            <span data-bind="i18n: 'Submit'"></span>
        </button>
    </form>
</div>
We will add the new form before the shipping form.
Comparing to our last “Newsletter” component, this form is quite the similar

Except for the fact that the template and the whole form is in the xml itself (children node).
The reason we don’t write a normal html form is because of the way it (the form) declared. Normal html form cannot know how to communicate with the form component (the js file).
<page xmlns:xsi="http://www.w3.org/2001/XMLSchema-instance" layout="1column" xsi:noNamespaceSchemaLocation="urn:magento:framework:View/Layout/etc/page_configuration.xsd">
<body>
<referenceBlock name="checkout.root">
<arguments>
<argument name="jsLayout" xsi:type="array">
<item name="components" xsi:type="array">
<item name="checkout" xsi:type="array">
<item name="children" xsi:type="array">
<item name="steps" xsi:type="array">
<item name="children" xsi:type="array">
<item name="shipping-step" xsi:type="array">
<item name="children" xsi:type="array">
<item name="shippingAddress" xsi:type="array">
<item name="children" xsi:type="array">
<item name="before-form" xsi:type="array">
<item name="children" xsi:type="array">
<!-- newsletter component -->
<item name="newsletter" xsi:type="array">
<item name="component" xsi:type="string">Mageplaza_HelloWorld/js/view/newsletter</item>
<item name="config" xsi:type="array">
<item name="componentDisabled" xsi:type="boolean">true</item>
</item>
</item>
<!-- new form -->
<item name="custom-checkout-form-container" xsi:type="array">
<!--links to our js file in step 1-->
<item name="component" xsi:type="string">Mageplaza_HelloWorld/js/view/custom-checkout-form</item>
<item name="provider" xsi:type="string">checkoutProvider</item>
<item name="config" xsi:type="array">
<!--links to our html file in step 2-->
<item name="template" xsi:type="string">Mageplaza_HelloWorld/custom-checkout-form</item>
</item>
<!-- new element -->
<item name="children" xsi:type="array">
<item name="custom-checkout-form-fieldset" xsi:type="array">
<!-- uiComponent is used as a wrapper for form fields (its template will render all children as a list) -->
<item name="component" xsi:type="string">uiComponent</item>
<!-- the following display area is used in template (see below) -->
<item name="displayArea" xsi:type="string">custom-checkout-form-fields</item>
<item name="children" xsi:type="array">
<item name="text_field" xsi:type="array">
<item name="component" xsi:type="string">Magento_Ui/js/form/element/abstract</item>
<item name="config" xsi:type="array">
<!-- customScope is used to group elements within a single form (e.g. they can be validated separately) -->
<item name="customScope" xsi:type="string">customCheckoutForm</item>
<item name="template" xsi:type="string">ui/form/field</item>
<item name="elementTmpl" xsi:type="string">ui/form/element/input</item>
</item>
<item name="provider" xsi:type="string">checkoutProvider</item>
<item name="dataScope" xsi:type="string">customCheckoutForm.text_field</item>
<item name="label" xsi:type="string">Text Field</item>
<item name="sortOrder" xsi:type="string">1</item>
<item name="validation" xsi:type="array">
<item name="required-entry" xsi:type="string">true</item>
</item>
</item>
<item name="checkbox_field" xsi:type="array">
<item name="component" xsi:type="string">Magento_Ui/js/form/element/boolean</item>
<item name="config" xsi:type="array">
<!--customScope is used to group elements within a single form (e.g. they can be validated separately)-->
<item name="customScope" xsi:type="string">customCheckoutForm</item>
<item name="template" xsi:type="string">ui/form/field</item>
<item name="elementTmpl" xsi:type="string">ui/form/element/checkbox</item>
</item>
<item name="provider" xsi:type="string">checkoutProvider</item>
<item name="dataScope" xsi:type="string">customCheckoutForm.checkbox_field</item>
<item name="label" xsi:type="string">Checkbox Field</item>
<item name="sortOrder" xsi:type="string">3</item>
</item>
<item name="select_field" xsi:type="array">
<item name="component" xsi:type="string">Magento_Ui/js/form/element/select</item>
<item name="config" xsi:type="array">
<!--customScope is used to group elements within a single form (e.g. they can be validated separately)-->
<item name="customScope" xsi:type="string">customCheckoutForm</item>
<item name="template" xsi:type="string">ui/form/field</item>
<item name="elementTmpl" xsi:type="string">ui/form/element/select</item>
</item>
<item name="options" xsi:type="array">
<item name="0" xsi:type="array">
<item name="label" xsi:type="string">Please select value</item>
<item name="value" xsi:type="string"></item>
</item>
<item name="1" xsi:type="array">
<item name="label" xsi:type="string">Value 1</item>
<item name="value" xsi:type="string">value_1</item>
</item>
<item name="2" xsi:type="array">
<item name="label" xsi:type="string">Value 2</item>
<item name="value" xsi:type="string">value_2</item>
</item>
</item>
<!-- value element allows to specify default value of the form field -->
<item name="value" xsi:type="string">value_2</item>
<item name="provider" xsi:type="string">checkoutProvider</item>
<item name="dataScope" xsi:type="string">customCheckoutForm.select_field</item>
<item name="label" xsi:type="string">Select Field</item>
<item name="sortOrder" xsi:type="string">2</item>
</item>
<item name="date_field" xsi:type="array">
<item name="component" xsi:type="string">Magento_Ui/js/form/element/date</item>
<item name="config" xsi:type="array">
<!--customScope is used to group elements within a single form (e.g. they can be validated separately)-->
<item name="customScope" xsi:type="string">customCheckoutForm</item>
<item name="template" xsi:type="string">ui/form/field</item>
<item name="elementTmpl" xsi:type="string">ui/form/element/date</item>
</item>
<item name="provider" xsi:type="string">checkoutProvider</item>
<item name="dataScope" xsi:type="string">customCheckoutForm.date_field</item>
<item name="label" xsi:type="string">Date Field</item>
<item name="validation" xsi:type="array">
<item name="required-entry" xsi:type="string">true</item>
</item>
</item>
</item>
</item>
</item>
</item>
</item>
</item>
</item>
</item>
</item>
</item>
</item>
</item>
</item>
</item>
</item>
</argument>
</arguments>
</referenceBlock>
</body>
</page>
Now time to flush cache and test your result. If you have any issue, feel free to leave a comment below, Mageplaza and Magento community are willing to help.

Related posts