Hyvä Theme is Now Open Source: What This Means for Magento Community - Mageplaza
Hyvä is now Open Source and free. Discover what changed, what remains commercial, how it impacts the Magento ecosystem, and how to maximize its full potential.
Vinh Jacker | 03-17-2025

Online store owners always try to enhance the convenience of their e-commerce platforms, making them more appealing than traditional brick-and-mortar stores. A small improvement can significantly impact customer satisfaction and conversion rates. One such enhancement is to add quantity increment buttons to your Magento 2 store. These buttons allow customers to adjust product quantities in their shopping cart easily.
In this guide, we’ll show you how to add quantity increment buttons to the product page in Magento 2. Let’s discover now!
Add the code below:
<?php
use Magento\Framework\Component\ComponentRegistrar;
ComponentRegistrar::register(
   ComponentRegistrar::MODULE,
   'Mageplaza_Customize',
   __DIR__
);
Create a module.xml file in app/code/Mageplaza/Customize/etc/ with the following code:
<?xml version="1.0"?>
<config xmlns:xsi="http://www.w3.org/2001/XMLSchema-instance" xsi:noNamespaceSchemaLocation="urn:magento:framework:Module/etc/module.xsd">
   <module name="Mageplaza_Customize" setup_version="1.0.0">
       <sequence>
           <module name="Mageplaza_Core"/>
       </sequence>
   </module>
</config>
Generating a layout file catalog_product_view.xml in app/code/Mageplaza/Customize/view/frontend/layout/
to override the new template in the add-to-cart reference block.
<?xml version="1.0"?>
<page layout="1column" xmlns:xsi="http://www.w3.org/2001/XMLSchema-instance" xsi:noNamespaceSchemaLocation="urn:magento:framework:View/Layout/etc/page_configuration.xsd">
   <body>
       <referenceBlock name="product.info.addtocart">
           <action method="setTemplate">
               <argument name="template" xsi:type="string">Mageplaza_Customize::product/view/add-to-cart.phtml</argument>
           </action>
       </referenceBlock>
       <referenceBlock name="product.info.addtocart.additional">
           <action method="setTemplate">
               <argument name="template" xsi:type="string">Mageplaza_Customize::product/view/add-to-cart.phtml</argument>
           </action>
       </referenceBlock>
   </body>
</page>
add-to-cart.phtml file templateMake a file called in app/code/Mageplaza/Customize/view/frontend/templates/product/view/ with this code
<?php
/** @var $block \Magento\Catalog\Block\Product\View */
?>
<?php $_product    = $block->getProduct(); ?>
<?php $buttonTitle = __('Add to Cart'); ?>
<?php if ($_product->isSaleable()): ?>
   <div class="box-tocart">
       <div class="fieldset">
           <?php if ($block->shouldRenderQuantity()): ?>
               <div class="field qty">
                   <label class="label" for="qty"><span><?= /* @noEscape */ __('Qty') ?></span></label>
                   <script type="text/x-magento-init">
                       {
                          "*": {
                              "Magento_Ui/js/core/app": {
                                  "components": {
                                      "change_qty": {
                                          "component": "Mageplaza_Customize/js/product/qty",
                                          "defaultQty": <?= /* @noEscape */ $block->getProductDefaultQty() * 1 ?>
                                      }
                                  }
                              }
                          }
                       }
                   </script>
                   <div class="control" data-bind="scope: 'change_qty'">
                       <button data-bind="click: decreaseQty">-</button>
                       <input  data-bind="value: qty()"
                               type="number"
                               name="qty"
                               id="qty"
                               maxlength="10"
                               title="<?= /* @noEscape */ __('Qty') ?>"
                               class="input-text qty"
                               data-validate="<<?= /* @noEscape */ $block->escapeHtml(json_encode($block->getQuantityValidators())) ?>"
                       />
                       <button data-bind="click: increaseQty">+</button>
                   </div>
               </div>
           <?php endif; ?>
           <div class="actions">
               <button type="submit"
                       title="<?= /* @noEscape */ $buttonTitle ?>"
                       class="action primary tocart"
                       id="product-addtocart-button">
                   <span><?= /* @noEscape */ $buttonTitle ?></span>
               </button>
               <?= $block->getChildHtml('', true) ?>
           </div>
       </div>
   </div>
<?php endif; ?>
   <script type="text/x-magento-init">
       {
           "#product_addtocart_form": {
               "Magento_Catalog/product/view/validation": {
                   "radioCheckboxClosest": ".nested"
               }
           }
       }
   </script>
<?php if (!$block->isRedirectToCartEnabled()) : ?>
   <script type="text/x-magento-init">
       {
           "#product_addtocart_form": {
               "catalogAddToCart": {
                   "bindSubmit": false
               }
           }
       }
   </script>
<?php endif; ?>
Execute the following commands in your Magento 2 root directory:
php bin/magento setup:upgrade

php bin/magento setup:di:compile

php bin/magento setup:static-content:deploy -f

php bin/magento cache:clean

php bin/magento cache:flush
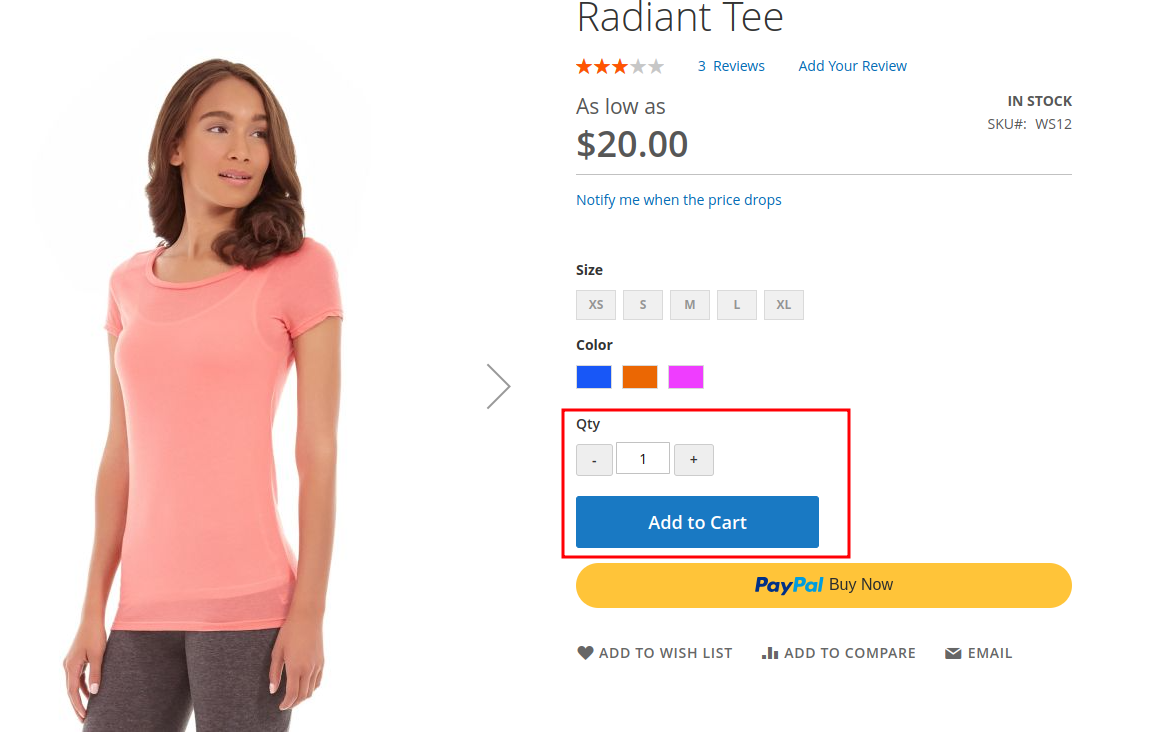
The result when you follow the steps
That’s all steps to add quantity increment buttons to the product page in Magento 2. It’s shown in the frontend:

Through the detailed 7 steps above, you can add quantity increment buttons to your Magento 2 store, enhancing user experience and simplifying the shopping process. Customers will appreciate the convenience, leading to improved conversion rates.
If you have any further questions or need additional details, feel free to ask.