Hyvä Theme is Now Open Source: What This Means for Magento Community - Mageplaza
Hyvä is now Open Source and free. Discover what changed, what remains commercial, how it impacts the Magento ecosystem, and how to maximize its full potential.
Cookies help us enhance your experience on our site by storing information about your preferences and interactions. You can customize your cookie settings by choosing which cookies to allow. Please note that disabling certain cookies might impact the functionality and features of our services, such as personalized content and suggestions. Cookie Policy
Cookie PolicyThese cookies are strictly necessary for the site to work and may not be disabled.
InformationThese cookies are strictly necessary for the site to work and may not be disabled.
| Cookie name | Description | Lifetime | Provider |
|---|---|---|---|
| _ce.clock_data | Store the difference in time from the server's time and the current browser. | 1 day | Crazy Egg |
| _ce.clock_event | Prevent repeated requests to the Clock API. | 1 day | Crazy Egg |
| _ce.irv | Store isReturning value during the session | Session | Crazy Egg |
| _ce.s | Track a recording visitor session unique ID, tracking host and start time | 1 year | Crazy Egg |
| _hjSessionUser_2909345 | Store a unique user identifier to track user sessions and interactions for analytics purposes. | 1 year | HotJar |
| _hjSession_2909345 | Store session data to identify and analyze individual user sessions. | 1 day | HotJar |
| apt.uid | Store a unique user identifier for tracking and personalization. | 1 year | Mageplaza |
| cebs | Store user preferences and settings. | Session | Mageplaza |
| cf_clearance | Store a token that indicates a user has passed a Cloudflare security challenge. | 1 year | Cloudflare |
| crisp-client | The crisp-client/session cookie is used to identify and maintain a user session within the Crisp platform. It allows the live chat system to recognize returning users, maintain chat history, and ensure continuity in customer service interactions. | Session | Crisp |
| _ga | Store a unique client identifier (Client ID) for tracking user interactions on the | 2 years | |
| _ga_7B0PZZW26Z | Store session state information for Google Analytics 4. | 2 years | |
| _ga_JTRV42NV3L | Store session state information for Google Analytics 4. | 2 years | |
| _ga_R3HWQ50MM4 | Store a unique client identifier (Client ID) for tracking user interactions on the website. | 2 years | |
| _gid | Store a unique client identifier (Client ID) for tracking user interactions on the website. | 1 day | |
| _gat_UA-76130628-1 | Throttle the request rate to Google Analytics servers. | 1 day |
Advertising cookies deliver ads relevant to your interests, limit ad frequency, and measure ad effectiveness.
InformationAdvertising cookies deliver ads relevant to your interests, limit ad frequency, and measure ad effectiveness.
| Cookie name | Description | Lifetime | Provider |
|---|---|---|---|
| _gcl_au | The cookie is used by Google to track and store conversions. | 1 day | |
| __Secure-3PAPISID | This cookie is used for targeting purposes to build a profile of the website visitor's interests in order to show relevant and personalized Google advertising. | 2 years | |
| HSID | This security cookie is used by Google to confirm visitor authenticity, prevent fraudulent use of login data and protect visitor data from unauthorized access. | 2 years | |
| __Secure-1PSID | This cookie is used for targeting purposes to build a profile of the website visitor's interests in order to show relevant and personalized Google advertising. | 2 years | |
| SID | This security cookie is used by Google to confirm visitor authenticity, prevent fraudulent use of login data and protect visitor data from unauthorized access. | 2 years | |
| APISID | This cookie is used by Google to display personalized advertisements on Google sites, based on recent searches and previous interactions. | 2 years | |
| __Secure-1PAPISID | This cookie is used for targeting purposes to build a profile of the website visitor's interests in order to show relevant and personalized Google advertising. | 2 years | |
| __Secure-3PSID | This cookie is used for targeting purposes to build a profile of the website visitor's interests in order to show relevant and personalized Google advertising. | 2 years | |
| SSID | This cookie is used by Google to display personalized advertisements on Google sites, based on recent searches and previous interactions. | 2 years | |
| SAPISID | This cookie is used by Google to display personalized advertisements on Google sites, based on recent searches and previous interactions. | 2 years | |
| __Secure-3PSIDTS | This cookie collects information about visitor's interactions with Google services and ads. It is used to measure advertising effectiveness and deliver personalised content based on interests. The cookie contains a unique identifier. | 2 years | |
| __Secure-1PSIDTS | This cookie collects information about visitor's interactions with Google services and ads. It is used to measure advertising effectiveness and deliver personalised content based on interests. The cookie contains a unique identifier. | 2 years | |
| SIDCC | This security cookie is used by Google to confirm visitor authenticity, prevent fraudulent use of login data, and protect visitor data from unauthorized access. | 3 months | |
| __Secure-1PSIDCC | This cookie is used for targeting purposes to build a profile of the website visitor's interests in order to show relevant and personalized Google advertising. | 1 year | |
| __Secure-3PSIDCC | This cookie is used for targeting purposes to build a profile of the website visitor's interests in order to show relevant and personalized Google advertising. | 1 year | |
| 1P_JAR | This cookie is a Google Analytics Cookie created by Google DoubleClick and used to show personalized advertisements (ads) based on previous visits to the website. | 1 month | |
| NID | Show Google ads in Google services for signed-out users. | 6 months |
Analytics cookies collect information and report website usage statistics without personally identifying individual visitors to Google.
InformationAnalytics cookies collect information and report website usage statistics without personally identifying individual visitors to Google.
| Cookie name | Description | Lifetime | Provider |
|---|---|---|---|
| _dc_gtm | Manage and deploy marketing tags through Google Tag Manager. | 1 year | |
| 1P_JAR | Gather website statistics and track conversion rates for Google AdWords campaigns. | 1 month | |
| AEC | 1 month | ||
| ar_debug | Debugging purposes related to augmented reality (AR) functionalities. | 1 month | Doubleclick |
| IDE | The IDE cookie is used by Google DoubleClick to register and report the user's actions after viewing or clicking on one of the advertiser's ads with the purpose of measuring the effectiveness of an ad and to present targeted ads to the user. | 1 year | Doubleclick |
| ad_storage | Enables storage, such as cookies (web) or device identifiers (apps), related to advertising. | 1 year | |
| ad_user_data | Sets consent for sending user data to Google for online advertising purposes. | 1 year | |
| ad_personalization | Sets consent for personalized advertising. | 1 year | |
| analytics_storage | Enables storage, such as cookies (web) or device identifiers (apps), related to analytics, for example, visit duration. | 1 year |

When developing PHP applications, debugging is essential for identifying and fixing issues. Xdebug will be a useful tool that helps you to debug your PHP code effectively.
In this article, we’ll explore how to install Xdebug and set up PHPStorm via CLI without Apache. Let’s dive in now!
sudo apt update
sudo apt install php8.3
sudo apt-get install php{php_version}-xdebug
Ex: sudo apt-get install php8.3-xdebug
php -v

xdebug.ini file for editingxdebug file.
sudo gedit /etc/php/8.3/mods-available/xdebug.ini
or
sudo nano /etc/php/8.3/mods-available/xdebug.ini
[Xdebug]
zend_extension="xdebug.so"
xdebug.mode=debug,develop
xdebug.start_with_request=default
xdebug.idekey=PHPSTORM
xdebug.client_port=9000 #run on port 9000
xdebug.file_link_format=phpstorm://open?%f:%l
#zend_extension=/usr/lib/php/20151012/xdebug.so
xdebug.remote_autostart = 1
xdebug.remote_enable = 1
xdebug.remote_handler = dbgp
xdebug.remote_host = 127.0.0.1
xdebug.remote_log = /tmp/xdebug_remote.log
xdebug.remote_mode = req
xdebug.remote_port = 9000  #run on port 9000
Save the file.
sudo service apache2 restart
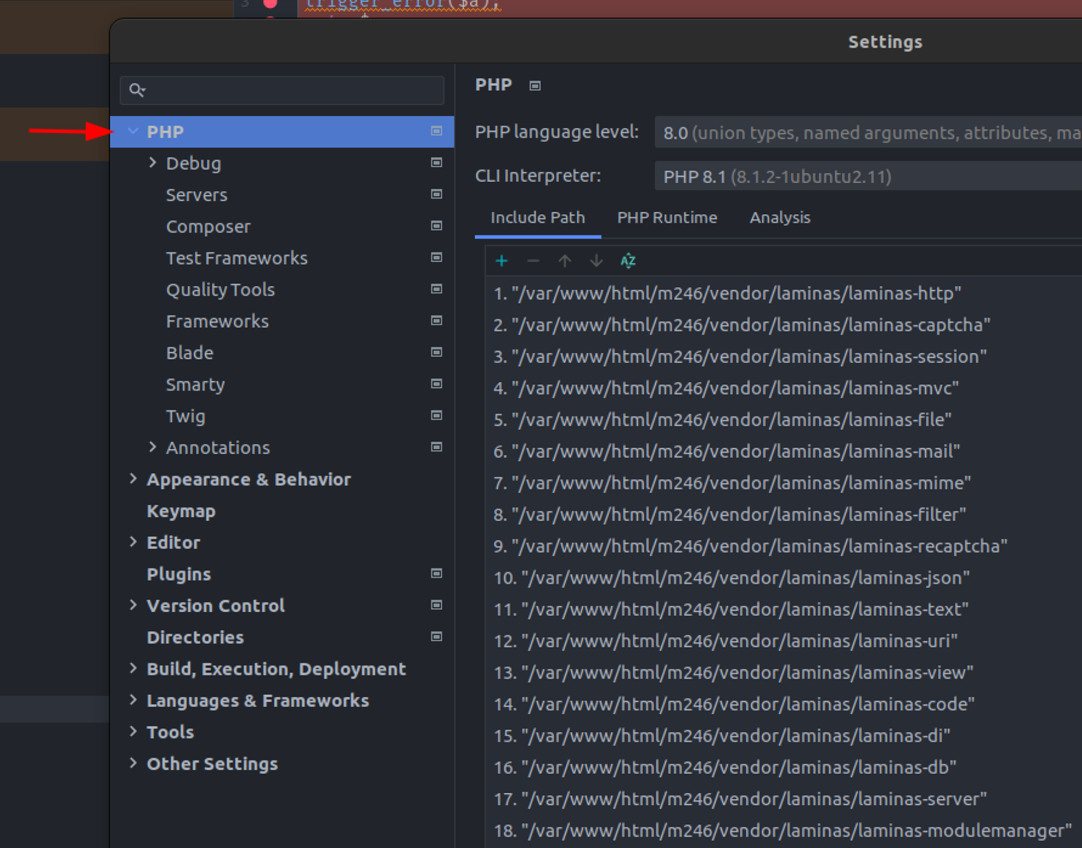
Open PhpStorm and navigate to Settings
Click on PHP.
Debug section and set the Xdebug port to 9000 (as specified in xdebug.ini).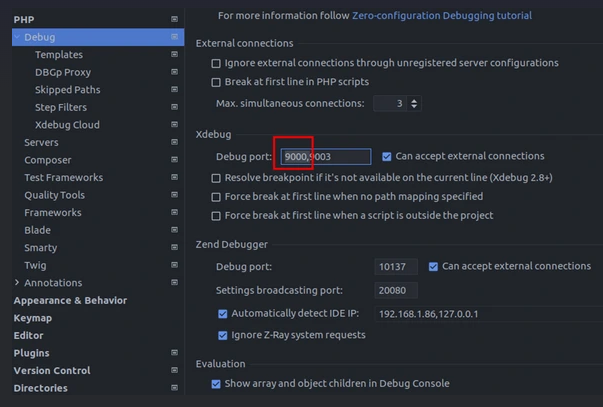

For example test.php. Be careful with name files.
<?php
$a = 1;
trigger_error($a);
echo $a;

Run the newly created php file when there is XDEBUG_SESSION_START=”PHPSTORM”, the PHP server will receive this variable and send data through the configured port:
XDEBUG_SESSION_START="PHPSTORM" php test.php
Other way to use with Magento CLI
XDEBUG_SESSION_START="PHPSTORM" php bin/magento se:up
The result is right when the screen appears the content below:
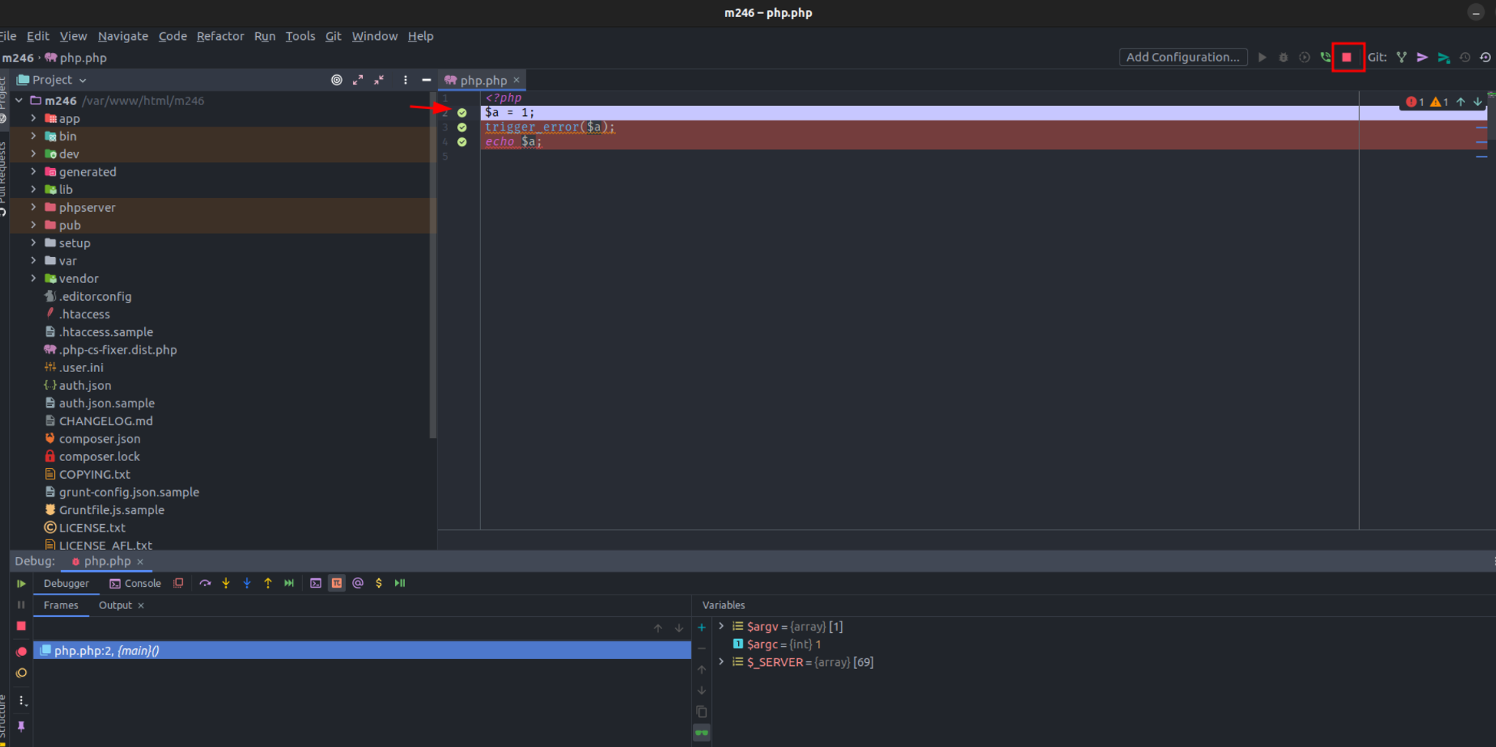
Note: Possible Error Encountered
If Xdebug doesn’t run, use the command to check it first because the error will have a Message to check.
Xdebug: [Step Debug] Could not connect to debugging client. Tried: localhost:9000 (through xdebug.client_host/xdebug.client_port).

Looking at the message above, the issue lies in debugging the client, which is related to PHPStorm. The IDE is not responding to PHP at this time.
How to fix this issue:
Check PHPStorm Options: Explore the options in PHPStorm related to debugging such as resolve breakpoint if it is not available on the current line (Xdebug 2.8+), force break at first line when no path mapping specified, and force break at first line when a script is outside the project and try to turn on these options.
Restart PHPStorm: After making any changes, restart PHPStorm to see if the issue is resolved.
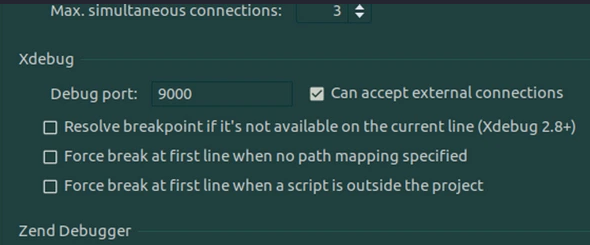
By following these detailed 4 steps, you can install Xdebug and set up PHPStorm for CLI debugging without relying on Apache. Enjoy effective PHP debugging directly from the command line.
If you have any questions while following this tutorial, feel free to ask!

Jacker is the Chief Technology Officer (CTO) at Mageplaza, bringing over 10 years of experience in Magento, Shopify, and other eCommerce platforms. With deep technical expertise, he has led numerous successful projects, optimizing and scaling online stores for global brands. Beyond his work in eCommerce development, he is passionate about running and swimming.
Related Post

Hyvä Theme is Now Open Source: What This Means for Magento Community - Mageplaza
Hyvä is now Open Source and free. Discover what changed, what remains commercial, how it impacts the Magento ecosystem, and how to maximize its full potential.


Holiday Marketing Hacks 2025 - How to Boost Sales for Magento 2 Stores? - Mageplaza
Discover the best 2025 holiday marketing strategies for Magento 2. Learn key trends, creative campaign ideas, and expert tips to increase seasonal sales.

Hyvä Theme is Now Open Source: What This Means for Magento Community - Mageplaza
Hyvä is now Open Source and free. Discover what changed, what remains commercial, how it impacts the Magento ecosystem, and how to maximize its full potential.


Holiday Marketing Hacks 2025 - How to Boost Sales for Magento 2 Stores? - Mageplaza
Discover the best 2025 holiday marketing strategies for Magento 2. Learn key trends, creative campaign ideas, and expert tips to increase seasonal sales.
