


1 min read
|
03-30-2026
How to Add Customer Attribute Programmatically in Magento 2?
Vinh Jacker | 03-17-2025
This article will guide you on how to add customer attributes in Magento 2 programmatically. Please follow our previous article to create a simple module that we will use to demo coding for this lesson and how to create the setup script classes. In this article, we will use the sample module Mageplaza_HelloWorld and the InstallDataclass.
Recommend:
Use Magento 2 Customer Attributes to add extra attribute fields to collect valuable customer information on the registration or account page.
Overview of Adding Customer Attribute Programmatically
- Step 1: Create setup file InstallData.php
- Step 2: Define the install() method
- Step 3: Create custom attribute
Step 1: Create setup file InstallData.php
Firstly, we will create the InstallData.php file:
File: app/code/Mageplaza/HelloWorld/Setup/InstallData.php
<?php
namespace Mageplaza\HelloWorld\Setup;

use Magento\Eav\Setup\EavSetup;
use Magento\Eav\Setup\EavSetupFactory;
use Magento\Framework\Setup\InstallDataInterface;
use Magento\Framework\Setup\ModuleContextInterface;
use Magento\Framework\Setup\ModuleDataSetupInterface;

class InstallData implements InstallDataInterface
{
	private $eavSetupFactory;

	public function __construct(EavSetupFactory $eavSetupFactory)
	{
		$this->eavSetupFactory = $eavSetupFactory;
	}

}
In this class, we define the EAV setup model which will be used to interact with the Magento 2 attribute.
Step 2: Define the install() method
After that, we have to define the install() method and create eav setup model:
public function install(ModuleDataSetupInterface $setup, ModuleContextInterface $context)
	{
		$eavSetup = $this->eavSetupFactory->create(['setup' => $setup]);
	}
	Next, we will use eavSetup object to add attribute:
public function install(ModuleDataSetupInterface $setup, ModuleContextInterface $context)
	{
		$eavSetup = $this->eavSetupFactory->create(['setup' => $setup]);
		$eavSetup->addAttribute(
			\Magento\Customer\Model\Customer::ENTITY,
			'sample_attribute',
			[
				'type'         => 'varchar',
				'label'        => 'Sample Attribute',
				'input'        => 'text',
				'required'     => false,
				'visible'      => true,
				'user_defined' => true,
				'position'     => 999,
				'system'       => 0,
			]
		);
}
Step 3: Create custom attribute
Finally, we need to set the forms in which the attributes will be used. In this step, we need to define the eavConfig object which allows us to call the attribute back and set the data for it. And the full code to create customer attributes is:
File: app/code/Mageplaza/HelloWorld/Setup/InstallData.php
<?php

namespace Mageplaza\HelloWorld\Setup;

use Magento\Eav\Setup\EavSetup;
use Magento\Eav\Setup\EavSetupFactory;
use Magento\Framework\Setup\InstallDataInterface;
use Magento\Framework\Setup\ModuleContextInterface;
use Magento\Framework\Setup\ModuleDataSetupInterface;
use Magento\Eav\Model\Config;
use Magento\Customer\Model\Customer;

class InstallData implements InstallDataInterface
{
	private $eavSetupFactory;

	public function __construct(EavSetupFactory $eavSetupFactory, Config $eavConfig)
	{
		$this->eavSetupFactory = $eavSetupFactory;
		$this->eavConfig       = $eavConfig;
	}

	public function install(ModuleDataSetupInterface $setup, ModuleContextInterface $context)
	{
		$eavSetup = $this->eavSetupFactory->create(['setup' => $setup]);
		$eavSetup->addAttribute(
			\Magento\Customer\Model\Customer::ENTITY,
			'sample_attribute',
			[
				'type'         => 'varchar',
				'label'        => 'Sample Attribute',
				'input'        => 'text',
				'required'     => false,
				'visible'      => true,
				'user_defined' => true,
				'position'     => 999,
				'system'       => 0,
			]
		);
		$sampleAttribute = $this->eavConfig->getAttribute(Customer::ENTITY, 'sample_attribute');

		// more used_in_forms ['adminhtml_checkout','adminhtml_customer','adminhtml_customer_address','customer_account_edit','customer_address_edit','customer_register_address']
		$sampleAttribute->setData(
			'used_in_forms',
			['adminhtml_customer']

		);
		$sampleAttribute->save();
	}
}
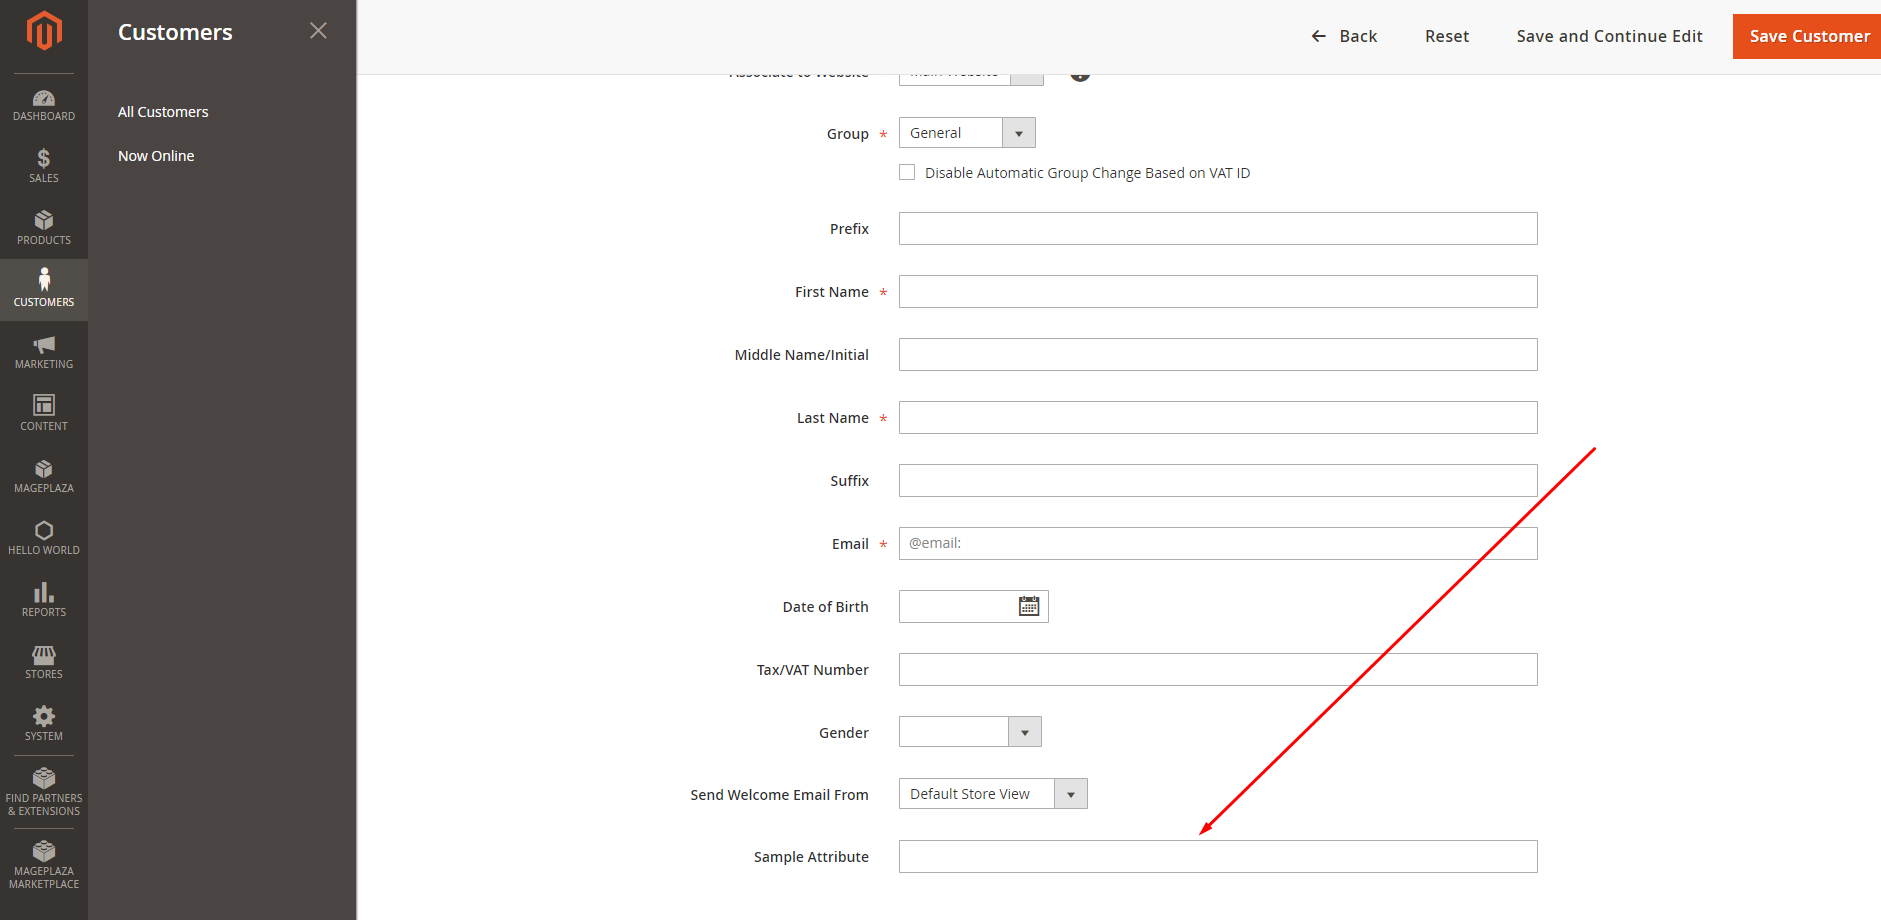
Now, let’s run a command line to install the module: php magento setup:upgrade and php bin/magento setup:static-content:deploy Then check the result. It will show like this:
Related Topics
x

Jacker is the Chief Technology Officer (CTO) at Mageplaza, bringing over 10 years of experience in Magento, Shopify, and other eCommerce platforms. With deep technical expertise, he has led numerous successful projects, optimizing and scaling online stores for global brands. Beyond his work in eCommerce development, he is passionate about running and swimming.
Related Post


Magento 2.4.9 Beta Release: What's New?
Magento 2.4.9 beta is here. Stay up to date with every release milestone with this regularly updated guide.
11 mins read
|
03-17-2026

Google Analytics Website Traffic: The A–Z Guide for Magento 2 Store Owners
Learn how to analyze website traffic in Google Analytics 4, identify high-quality traffic sources, and grow your Magento 2 store with data-driven insights.
18 mins read
|
03-17-2026

The Complete Guide to UTM Parameters & Google Analytics for Magento website
Master UTM parameters and Google Analytics for Magento. Track traffic sources, measure campaign performance, and practical tips to use it for better business decisions.
10 mins read
|
10-05-2025

How to implement Cookie Consent for GTM & Google Analytics in Magento Under GDPR?
Implement cookie consent for GTM & GA4 in Magento under GDPR. Step-by-step guide using Google Consent Mode v2 to avoid fines and maintain analytics.
15 mins read
|
02-27-2026

Speed vs. Sales: Comparing Hyvä Checkout and Mageplaza One Step Checkout
Learn how Hyvä Checkout and Mageplaza One Step Checkout impact order completion rates and revenue growth.
8 mins read
|
02-25-2026
1 min read
|
03-30-2026
Magento 2.4.9 Beta Release: What's New?
Magento 2.4.9 beta is here. Stay up to date with every release milestone with this regularly updated guide.
11 mins read
|
03-17-2026
Google Analytics Website Traffic: The A–Z Guide for Magento 2 Store Owners
Learn how to analyze website traffic in Google Analytics 4, identify high-quality traffic sources, and grow your Magento 2 store with data-driven insights.
18 mins read
|
03-17-2026
The Complete Guide to UTM Parameters & Google Analytics for Magento website
Master UTM parameters and Google Analytics for Magento. Track traffic sources, measure campaign performance, and practical tips to use it for better business decisions.
10 mins read
|
10-05-2025
How to implement Cookie Consent for GTM & Google Analytics in Magento Under GDPR?
Implement cookie consent for GTM & GA4 in Magento under GDPR. Step-by-step guide using Google Consent Mode v2 to avoid fines and maintain analytics.
15 mins read
|
02-27-2026
Speed vs. Sales: Comparing Hyvä Checkout and Mageplaza One Step Checkout
Learn how Hyvä Checkout and Mageplaza One Step Checkout impact order completion rates and revenue growth.
8 mins read
|
02-25-2026