Cron jobs play a crucial role in automating and managing tasks in Magento 2, enabling your store to perform actions on a scheduled basis without manual intervention. From updating inventory to sending order emails and generating reports, these automated tasks streamline operations and improve store performance. Knowing how to create and configure cron jobs in Magento 2 ensures that routine tasks are handled efficiently, keeping your store running smoothly and allowing you to focus on more strategic areas of your business.
In this guide, we’ll walk you through the steps to set up and manage cron jobs effectively in Magento 2, enhancing both functionality and user experience.
What is a Cron Job in Magento 2?
A cron job is a scheduled task that runs automatically at specified intervals. In the context of Magento 2, cron jobs are used to handle background tasks such as indexing, sending emails, and generating reports. These jobs run based on a predefined schedule, ensuring that your store performs optimally without manual intervention.
Note
Cron configuration is very important in Magento to set the schedule for many system activities such as reindexing Magento 2, auto-update of currency rates, Magento emails, etc. Only when the configuration is correct, the cron job is active. In case there is an error, this means Magento won’t function as expected.
Why Are Cron Jobs Essential in Magento 2?
Cron jobs are vital because they automate many routine tasks that would otherwise take up valuable time. They help in:
- Automating tasks such as sending abandoned cart emails, generating newsletters, and processing orders.
- Improving performance by running tasks in the background without disrupting the customer experience.
- Reducing human error, as everything is automated and tasks are performed on time.
How Cron Jobs Work in Magento 2
Magento 2 uses a scheduling system where jobs are defined in XML configuration files and scheduled to run at specific intervals. These jobs are executed using the cron service on your server. The Magento cron system ensures that tasks are handled in the correct order based on their priority and timing.
When to Use Magento Cron Jobs?
In a standard Magento store, automated cron jobs efficiently handle numerous repetitive tasks for maintenance and operation. This way will help developers focus on more complex tasks. Here are some specific tasks when you should use Magento Cron Jobs:
-
Sending Newsletter Emails: Schedule cron jobs to send out newsletters to your subscribers.
-
Indexing and Caching: Automate the indexing process to update your store data and cache management for optimal performance.
-
Sitemap Generation: Regularly generate and update your sitemap for search engines.
-
Auto-updates of Currency Rates: Keep your store’s currency rates up to date with automated updates.
-
Catalog Price Rules: Apply catalog price rules at set intervals.
-
Customer Alerts/Notifications: Send out product alerts and stock notifications to customers.
Cron jobs aid ensures these tasks are completed on time without manual intervention, thus saving time and reducing the potential for human error.
How to Create Cron Job in Magento 2
Please follow the guides to start the cron job program as your wish:
-
Create a class within the “Cron” folder
-
Manually setup the cron schedule by using PHP: bin/magento cron:run
-
Find a log in the var/log/system.log after the cron job has run.
-
Login to Magento 2 Admin panel, do as the path: Stores > Configuration > Advanced > System, then change scheduler settings per cron group.
-
Finally, run cron from the command line:
magento cron:run [--group="<cron group name>"]
Now, We will add a custom cron in the HelloWorld module.
Create crontab.xml
File: app/code/Mageplaza/HelloWorld/etc/crontab.xml
Content would be
<?xml version="1.0" ?>
<config xmlns:xsi="http://www.w3.org/2001/XMLSchema-instance" xsi:noNamespaceSchemaLocation="urn:magento:module:Magento_Cron:etc/crontab.xsd">
	<group id="default">
		<job instance="Mageplaza\HelloWorld\Cron\Test" method="execute" name="mageplaza_helloworld_cron">
			<schedule>* * * * *</schedule>
		</job>
	</group>
</config>
group id is your cron group name. You can run only cron for single group at a time.job instance is a class to be instantiated (classpath).job method is the method in job instance to call.job name is Unique ID for this cron job.schedule is the schedule in cron format. The following graph shows what it consists of:
* * * * * command to be executed
| | | | |
| | | | +----- Day of week
| | | +------- Month
| | +--------- Day of month
| +----------- Hour
+------------- Minute
In particular:
| Variable Position |
Descriptor |
Acceptable Values |
| 1 |
Minute |
0 to 59, or * (no specific value) |
| 2 |
Hour |
0 to 23, or * (no specific value) in UTC time. |
| 3 |
Day of the month |
1 to 31, or * (no specific value) |
| 4 |
Month |
1 to 12, or * (no specific value) |
| 5 |
Day of the week |
0 to 6 (starting from Sunday to Saturday), or * (no specific value) |
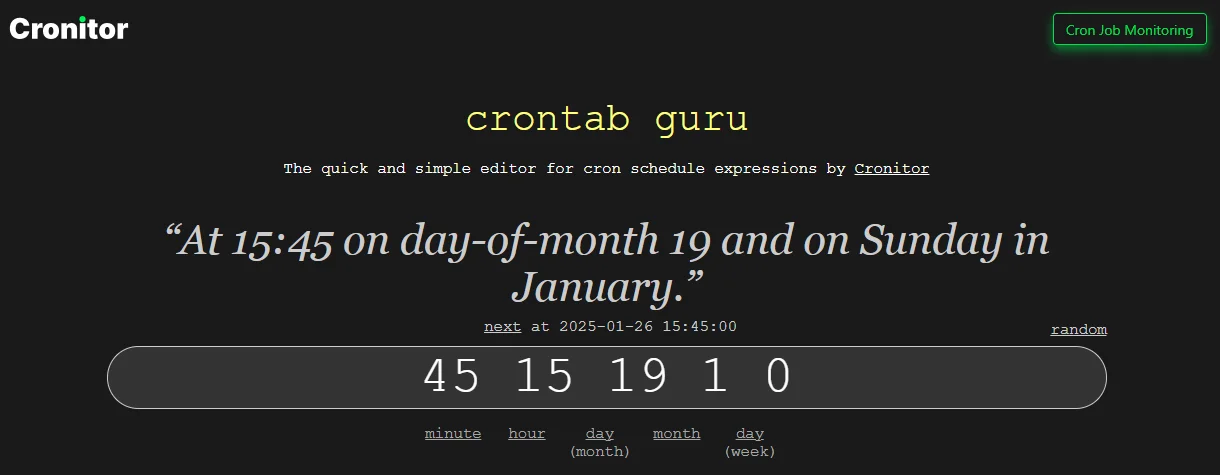
Example of proper schedule in the cron format:
If you want to schedule your cron job at 3:45 PM on Sunday, 19th Jan, here’s how it looks like:
45 15 19 1 0
45 → Minute (45th minute)15 → Hour (15th hour, 3 PM in 24-hour format)19 → Day of the month (19th)1 → Month (January)0 → Day of the week (Sunday; 0 represents Sunday in crontab)
Check available more in https://crontab.guru/

In crontab.xml, we have defined job instance as Mageplaza\HelloWorld\Cron\Test. It should be created now.
Create Test.php
File: app/code/Mageplaza/HelloWorld/Cron/Test.php
Content would be:
<?php

namespace Mageplaza\HelloWorld\Cron;

class Test
{

	public function execute()
	{

		$writer = new \Zend\Log\Writer\Stream(BP . '/var/log/cron.log');
		$logger = new \Zend\Log\Logger();
		$logger->addWriter($writer);
		$logger->info(__METHOD__);

		return $this;

	}
}
All done, now please flush cache and run magento cron:run --group="default" from the command line.
To check whether the Cron is working properly, go to var/log/cron.log of your store and you will see the text Mageplaza\HelloWorld\Cron\Test::execute in it.
This configuration involves several steps to ensure that Magento 2 cron job tasks are scheduled and executed properly. Here’s a guide to help you configure cron jobs in Magento 2:
Magento just temporarily stores cron job data in the cron_schedule table. After a while, this data will be purged. Therefore, it’s necessary to adjust the cron job settings within Magento to preserve this information for a longer duration. Here’s a guide to configuring cron jobs in Magento 2:
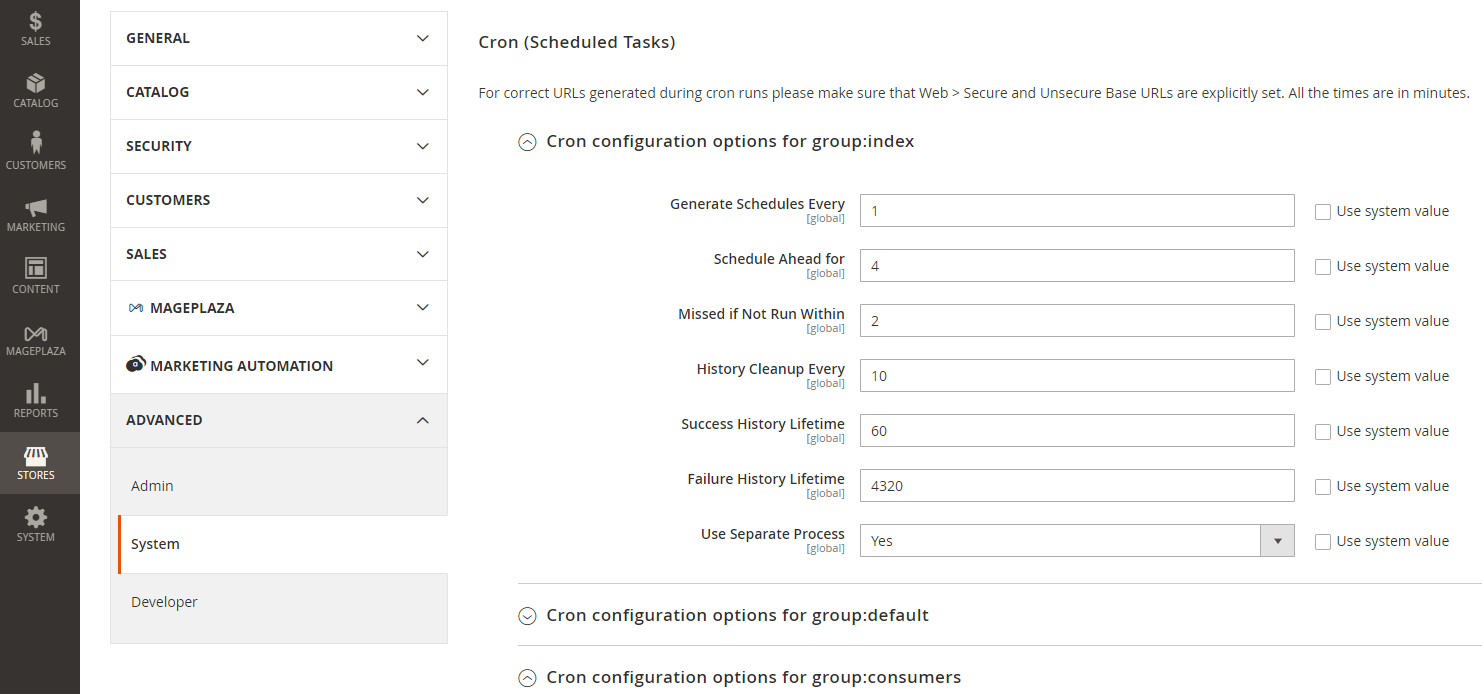
Access Cron Configuration:
Go to Stores > Configuration > Advanced > System > Cron (Scheduled Tasks).
Note: You’ll find the default cron group and any custom cron job groups from Magento 2 extensions in here.
-
Set Cron Options :Fill out the options for each cron job with your preferred values.
-
Schedule Generation: Determine how often you want cron to generate the schedule in the Generate Schedules Every field.
-
Schedule Timing: Use the Schedule Ahead field to specify how far in advance to schedule cron jobs.
-
Missed Job Handling: Set the time after which a cron job is assigned the Missed status in the Missed if not Run Within field.
-
History Cleanup: Determine how long completed task history should be kept in the History Cleanup Every field.
-
Success History Lifetime: Define the duration for which successful cron jobs should remain in the database in the Success History Lifetime field.
-
Failure History Lifetime: Set how much time for cron jobs with the Error status in the Failure History Lifetime field.
-
Separate Process Option: Decide if you want to run all cron jobs from the group separately by setting Use Separate Process to Yes or No.
-
Save Settings: Remember to save your settings and repeat the process for other cron job groups if necessary.
For more advanced configurations, such as rescheduling or disabling specific cron tasks, you will need to make code changes. This might involve creating custom modules or editing existing cron configurations in the codebase.
If you’re looking for a step-by-step tutorial or need to understand the code changes required for more advanced cron job configurations, you can refer to the detailed guides available below.
Execute and Schedule Magento Crons
Suppose you don’t need to be tech-savvy to manually run cron jobs from the admin panel. With the Magento 2 Cron Schedule Extension, the process is simplified, making the management of Magento cron tasks straightforward and user-friendly.
Even without technical expertise, you can manually trigger cron jobs from the admin panel by using the Magento 2 Cron Schedule extension. With the Magento 2 Cron Schedule extension, the process is simplified, making the management of Magento cron tasks straightforward and user-friendly.
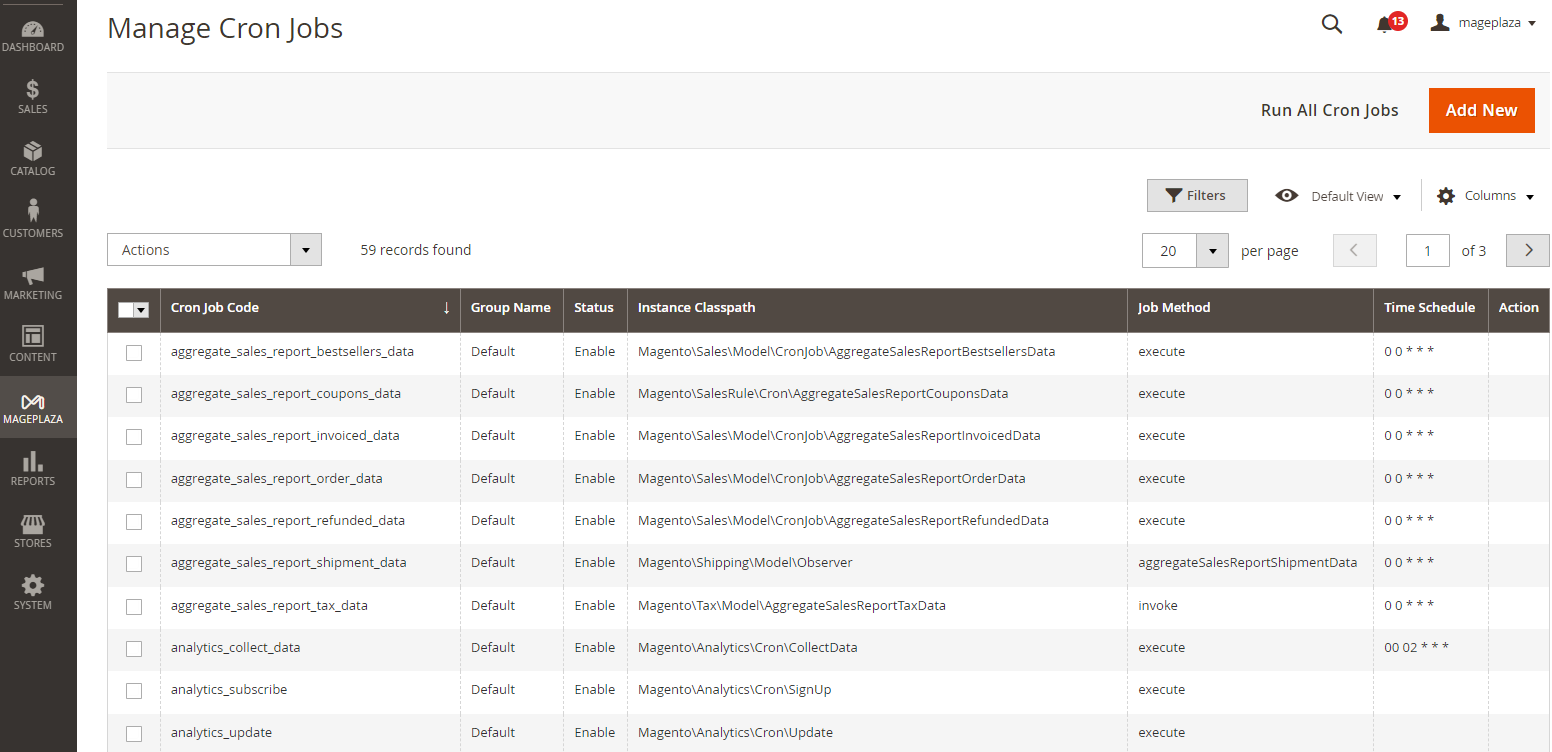
Starting with Cron Jobs :
Editing Cron Jobs :
- Select a cron job to access its editor and adjust the schedule as needed.
Executing Cron Jobs :
Managing Cron Job Status :
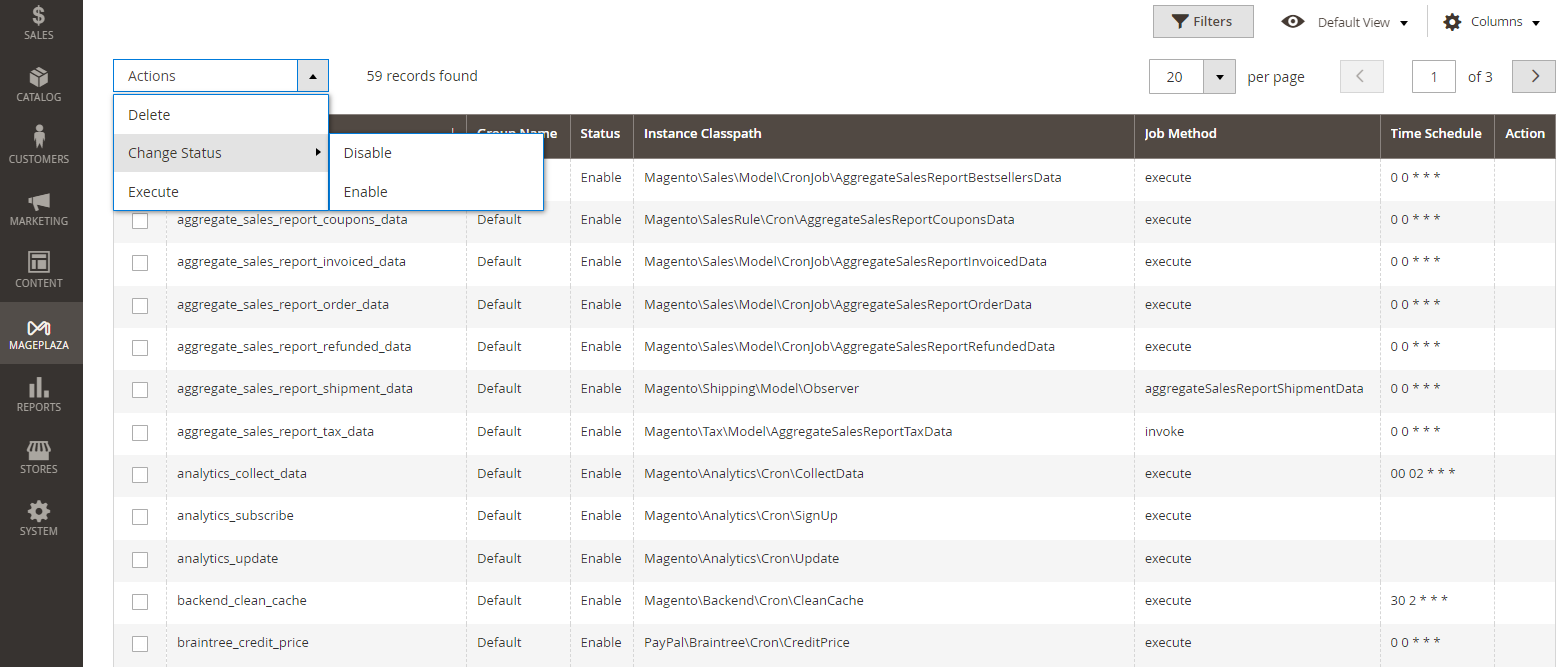
-
To enable or disable cron tasks, select the desired cron jobs.
-
Use the Status > Enable/Disable option from the mass actions.
Magento cron jobs are essential for automating various tasks such as reindexing, updating currency rates, and sending newsletters. Understanding how to configure and run cron jobs benefits developers and store administrators. The process is further streamlined by the ability to monitor the cron job status and set up notifications within the admin panel.
Useful Commands for Cron Jobs
Although Magento 2 cron runs automatically by schedule, there are several helpful commands that you should know about, but they require manual configuration.
| To create crontab: |
bin/magento cron:install |
| To check crontab: |
crontab -l |
| To remove all Magento cron of this user: |
crontab -r |
| To run the cron job: |
bin/magento cron:run |
| To run cron group: |
bin/magento cron:run –group [cron group name]
Example:
bin/magento cron:run –group index
bin/magento cron:run –group default |
| To remove Magento crontab: |
bin/magento cron:remove |
Applications of Cron Job for Magento 2
Several Magento features require at least one Cron Job, which schedules activities to occur in the future. A partial list of these activities follows:
💡 Tip: If your newly created cron jobs involve indexing and they don’t execute as expected, the issue might be a locked reindex process. You can handle Magento 2 reindex issues via CLI
</a> manually using CLI to resolve this issue quickly.
Final words
As you can see, if Cron Jobs are configured programmatically in Magento 2, your management workload can be reduced greatly, and customers can gain a better experience when navigating through your site.
FAQs
Q1: How can I check if a cron job is running in Magento?
There are two methods:
- Look for the file
var/log/cron.log. If you have it, it means there’s a cron job running.
- Run command
crontab -l. You will get something like this if there’s a cron running:
*/5 * * * * php /path/to/magento/root/bin/magento cron:run | grep -v "Ran jobs by schedule" >> /path/to/magento/var/log/magento.cron.log
Q2: How do I create a cron job in Magento?
To create a cron job, run the following command in your terminal:
bin/magento cron:install
Make sure the command is executed by the Magento file system owner with permission to write.
Q3: How do I remove an existing cron job in Magento 2?
To remove a Magento cron job, follow these steps:
- Log in as the Magento file system owner
- Navigate to your Magento installation directory using:
cd/path_to_magento
- Run the command:
php bin/magento cron:remove
Q4: How often should Magento cron jobs run?
Magento recommends running cron jobs every minute for optimal performance. You can configure this in your server’s crontab file. Using a reliable hosting platform can help ensure smooth cron job operations.
Q5: Why is the file system owner important for managing Magento’s cron?
The Magento file system owner is responsible for setting up and managing cron jobs. This is because they have the necessary permissions to modify the Magento file system and execute the required commands.
Q6: What is the purpose of the web server’s cron.php file in Magento?
The cron.php file is used to run Magento’s cron jobs. The server’s crontab triggers this file at set intervals, and it then executes Magento’s scheduled tasks.