


1 min read
|
03-30-2026
How to Create Payment Method in Magento 2
Vinh Jacker | 03-17-2025
What if the existing payment methods in Magento 2 don’t meet your business needs? In this tutorial, you’ll learn step by step how to create a custom payment method in Magento 2 so you can offer flexible options tailored to your customers. Adding new payment methods not only enhances the checkout experience but also reduces cart abandonment and opens the door to global buyers. You’ll also discover how to configure and assign these methods in the Admin panel, ensuring they work smoothly with shipping options for a secure and convenient purchase flow.
Necessary factors that a payment gateway needs
Here are some key points on how a payment gateway should be to secure E-commerce business:
-
Security: 100% secure to protect sensitive customer data during transactions.
-
Compatibility: Compatible with your store platform, whether it’s the online store or POS of the Brick-and-Mortar store.
-
Speedy Process: Deliver quick, hassle-free payments to minimize cart abandonment caused by delays.
-
Fraud Detection: Implement strong fraud detection mechanisms and advanced tools such as risk scoring, 3D Secure, and AI-driven fraud to prevent unauthorized transactions.
-
Invoicing Capabilities: Support invoicing capabilities for seamless billing.
-
Impressive UI: Provide an impressive user interface (UI) to enhance the overall customer experience.
-
Cost-Effective: Offer feasible costs for merchants, considering transaction fees and other charges.
-
International Support: Ensure it provides support for international payments and accepts various currencies.
-
Support Policy: Clear documentation and responsive customer support are essential.
-
Wide Card Types Support: Support various card types (credit, debit, etc.).
-
Recurring Payments: Handle recurring payments efficiently.
-
Hosted/Non-Hosted: Decide whether you want a hosted (redirects to the gateway’s site) or a non-hosted (integrated on your site) solution.
-
Mobile optimization: Work flawlessly on mobile devices, with features like one-click checkout or digital wallets.
-
Analytics & reporting: Provide detailed insights into transactions, settlements, and disputes for better business decisions.
-
Scalability: Capable of handling growth, from a small startup to high-volume enterprise traffic.
When you operate a Magento store, you should identify the essential features your payment gateway needs to meet your business needs. While a perfect payment gateway doesn’t exist, you can create your own payment method within Magento 2.
Or, if you prefer a more scalable and robust setup, consider streamlining your Magento store operations with professional integration support from Mageplaza.
How to Create payment method module
Step 1: Create payment method module
#1. Create file registration.php
<?php
\Magento\Framework\Component\ComponentRegistrar::register(
    \Magento\Framework\Component\ComponentRegistrar::MODULE,
    'Mageplaza_Payment',
    __DIR__
);
#2. Declare module.xml file
<?xml version="1.0"?>
<config xmlns:xsi="http://www.w3.org/2001/XMLSchema-instance" xsi:noNamespaceSchemaLocation="urn:magento:framework:Module/etc/module.xsd">
    <module name="Mageplaza_Payment" setup_version="0.1.0">
        <sequence>
            <module name="Magento_Sales"/>
            <module name="Magento_Payment"/>
            <module name="Magento_Checkout"/>
            <module name="Magento_Directory" />
            <module name="Magento_Config" />
        </sequence>
    </module>
</config>
This module has to run after the Magento_Sales, Magento_Payment, Magento_Checkout, Magento_Directory, and Magento_Config. So we add depends (sequence) them like above block of code.
Step 2: Declare payment method module
#1. Now we create file payment.xml file in etc folder etc/payment.xml
<?xml version="1.0" ?>
<payment xmlns:xsi="http://www.w3.org/2001/XMLSchema-instance"
         xsi:noNamespaceSchemaLocation="urn:magento:module:Magento_Payment:etc/payment.xsd">
    <groups>
        <group id="offline">
            <label>Offline Payment Methods</label>
        </group>
    </groups>
    <methods>
        <method name="simple">
            <allow_multiple_address>1</allow_multiple_address>
        </method>
    </methods>
</payment>
#2. Create config.xml file in etc folder.
<?xml version="1.0" ?>
<config xmlns:xsi="http://www.w3.org/2001/XMLSchema-instance"
        xsi:noNamespaceSchemaLocation="urn:magento:module:Magento_Store:etc/config.xsd">
    <default>
        <payment>
            <simple>
                <active>1</active>
                <model>Mageplaza\Payment\Model\Payment\Simple</model>
                <order_status>pending</order_status>
                <title>Simple</title>
                <allowspecific>0</allowspecific>
                <group>Offline</group>
            </simple>
        </payment>
    </default>
</config>
In this file, we declare Model of this payment method, we call Simple model.
#3. Create Simple model file
Create file Model/Payment/Simple.php
<?php
namespace Mageplaza\Payment\Model\Payment;

use Magento\Payment\Model\Method\AbstractMethod;
use Magento\Framework\Exception\LocalizedException;

class Simple extends AbstractMethod
{
    protected $_isGateway = true;
    protected $_canCapture = true;
    protected $_canCapturePartial = true;
    protected $_canRefund = true;
    protected $_canRefundInvoicePartial = true;
    protected $_stripeApi = false;
    protected $_countryFactory;
    protected $_minAmount = null;
    protected $_maxAmount = null;
    protected $_supportedCurrencyCodes = ['USD'];
    protected $_debugReplacePrivateDataKeys = ['number', 'exp_month', 'exp_year', 'cvc'];

    public function __construct(
        \Magento\Framework\Model\Context $context,
        \Magento\Framework\Registry $registry,
        \Magento\Framework\Api\ExtensionAttributesFactory $extensionFactory,
        \Magento\Framework\Api\AttributeValueFactory $customAttributeFactory,
        \Magento\Payment\Helper\Data $paymentData,
        \Magento\Framework\App\Config\ScopeConfigInterface $scopeConfig,
        \Magento\Payment\Model\Method\Logger $logger,
        \Magento\Framework\Module\ModuleListInterface $moduleList,
        \Magento\Framework\Stdlib\DateTime\TimezoneInterface $localeDate,
        \Magento\Directory\Model\CountryFactory $countryFactory,
        array $data = []
    ) {
        parent::__construct(
            $context,
            $registry,
            $extensionFactory,
            $customAttributeFactory,
            $paymentData,
            $scopeConfig,
            $logger,
            $moduleList,
            $localeDate,
            $data
        );
        $this->_countryFactory = $countryFactory;
        $this->_minAmount = $this->getConfigData('min_order_total');
        $this->_maxAmount = $this->getConfigData('max_order_total');
    }

    /**
     * Authorize payment abstract method
     *
     * @param \Magento\Payment\Model\InfoInterface $payment
     * @param float $amount
     * @return $this
     * @throws LocalizedException
     * @api
     */
    public function authorize(\Magento\Payment\Model\InfoInterface $payment, $amount)
    {
        if (!$this->canAuthorize()) {
            throw new LocalizedException(__('The authorize action is not available.'));
        }
        return $this;
    }

    /**
     * Capture payment abstract method
     *
     * @param \Magento\Payment\Model\InfoInterface $payment
     * @param float $amount
     * @return $this
     * @throws LocalizedException
     * @api
     */
    public function capture(\Magento\Payment\Model\InfoInterface $payment, $amount)
    {
        if (!$this->canCapture()) {
            throw new LocalizedException(__('The capture action is not available.'));
        }
        return $this;
    }

    /**
     * Refund specified amount for payment
     *
     * @param \Magento\Payment\Model\InfoInterface $payment
     * @param float $amount
     * @return $this
     * @throws LocalizedException
     * @api
     */
    public function refund(\Magento\Payment\Model\InfoInterface $payment, $amount)
    {
        if (!$this->canRefund()) {
            throw new LocalizedException(__('The refund action is not available.'));
        }
        return $this;
    }
}
This model includes basic functions such as
authorize(): Authorize the payment e.g: cardcapture(): Capture money from a customerrefund(): Chargeback money to the customer.
Step 3: Display payment method on checkout page
In previous steps, we talked about declaring modules, config and model files. Now we need to display this Simple payment method in checkout page.
#1. Create layout file: view/frontend/layout/checkout_index_index.xml
<?xml version="1.0" ?>
<pagepage layout="1column" xmlns:xsi="http://www.w3.org/2001/XMLSchema-instance"
          xsi:noNamespaceSchemaLocation="urn:magento:framework:View/Layout/etc/page_configuration.xsd">
    <body>
        <referenceBlock name="checkout.root">
            <arguments>
                <argument name="jsLayout" xsi:type="array">
                    <item name="components" xsi:type="array">
                        <item name="checkout" xsi:type="array">
                            <item name="children" xsi:type="array">
                                <item name="steps" xsi:type="array">
                                    <item name="children" xsi:type="array">
                                        <item name="billing-step" xsi:type="array">
                                            <item name="children" xsi:type="array">
                                                <item name="payment" xsi:type="array">
                                                    <item name="children" xsi:type="array">
                                                        <item name="renders" xsi:type="array">
                                                            <item name="children" xsi:type="array">
                                                                <item name="offline-payments" xsi:type="array">
                                                                    <item name="component" xsi:type="string">Magento_OfflinePayments/js/view/payment/offline-payments</item>
                                                                    <item name="methods" xsi:type="array">
                                                                        <item name="simple" xsi:type="array">
                                                                            <item name="isBillingAddressRequired" xsi:type="boolean">true</item>
                                                                        </item>
                                                                    </item>
                                                                </item>
                                                            </item>
                                                        </item>
                                                    </item>
                                                </item>
                                            </item>
                                        </item>
                                    </item>
                                </item>
                            </item>
                        </item>
                    </item>
                </argument>
            </arguments>
        </referenceBlock>
    </body>
</pagepage>
#2. Create js files to load KO template on checkout page
define(
    [
        'uiComponent',
        'Magento_Checkout/js/model/payment/renderer-list'
    ],
    function (Component,
              rendererList) {
        'use strict';
        rendererList.push(
            {
                type: 'simple',
                component: 'Mageplaza_Payment/js/view/payment/method-renderer/simple-method'
            }
        );
        return Component.extend({});
    }
);
In this file, it call another component: js/view/payment/method-renderer/simple-method
Now we need to create /view/frontend/web/js/view/payment/method-renderer/simple-method.js
define(
    [
        'Magento_Checkout/js/view/payment/default'
    ],
    function (Component) {
        'use strict';
        return Component.extend({
            defaults: {
                template: 'Mageplaza_Payment/payment/simple'
            },
            getMailingAddress: function () {
                return window.checkoutConfig.payment.checkmo.mailingAddress;
            },
        });
    }
);
#3. Finally, create KO template file /view/frontend/web/template/payment/simple.html
<div class="payment-method" data-bind="css: {'_active': (getCode() == isChecked())}">
    <div class="payment-method-title field choice">
        <input type="radio"
               name="payment[method]"
               class="radio"
               data-bind="attr: {'id': getCode()}, value: getCode(), checked: isChecked, click: selectPaymentMethod, visible: isRadioButtonVisible()"/>
        <label data-bind="attr: {'for': getCode()}" class="label"><span data-bind="text: getTitle()"></span></label>
    </div>
    <div class="payment-method-content">
        <!-- ko foreach: getRegion('messages') -->
        <!-- ko template: getTemplate() --><!-- /ko -->
        <!--/ko-->
        <div class="payment-method-billing-address">
            <!-- ko foreach: $parent.getRegion(getBillingAddressFormName()) -->
            <!-- ko template: getTemplate() --><!-- /ko -->
            <!--/ko-->
        </div>
        <div class="checkout-agreements-block">
            <!-- ko foreach: $parent.getRegion('before-place-order') -->
            <!-- ko template: getTemplate() --><!-- /ko -->
            <!--/ko-->
        </div>
        <div class="actions-toolbar">
            <div class="primary">
                <button class="action primary checkout"
                        type="submit"
                        data-bind="
                        click: placeOrder,
                        attr: {title: $t('Place Order')},
                        css: {disabled: !isPlaceOrderActionAllowed()},
                        enable: (getCode() == isChecked())
                        "
                        disabled>
                    <span data-bind="i18n: 'Place Order'"></span>
                </button>
            </div>
        </div>
    </div>
</div>
When you follow these steps above, the extension will configure backend settings to activate the payment method and set a title for it.
Configure Sample Payment method module
After installing the sample payment method module, you can see the configuration in Admin panel > Stores > Settings > Configuration > Sales > Payment Methods
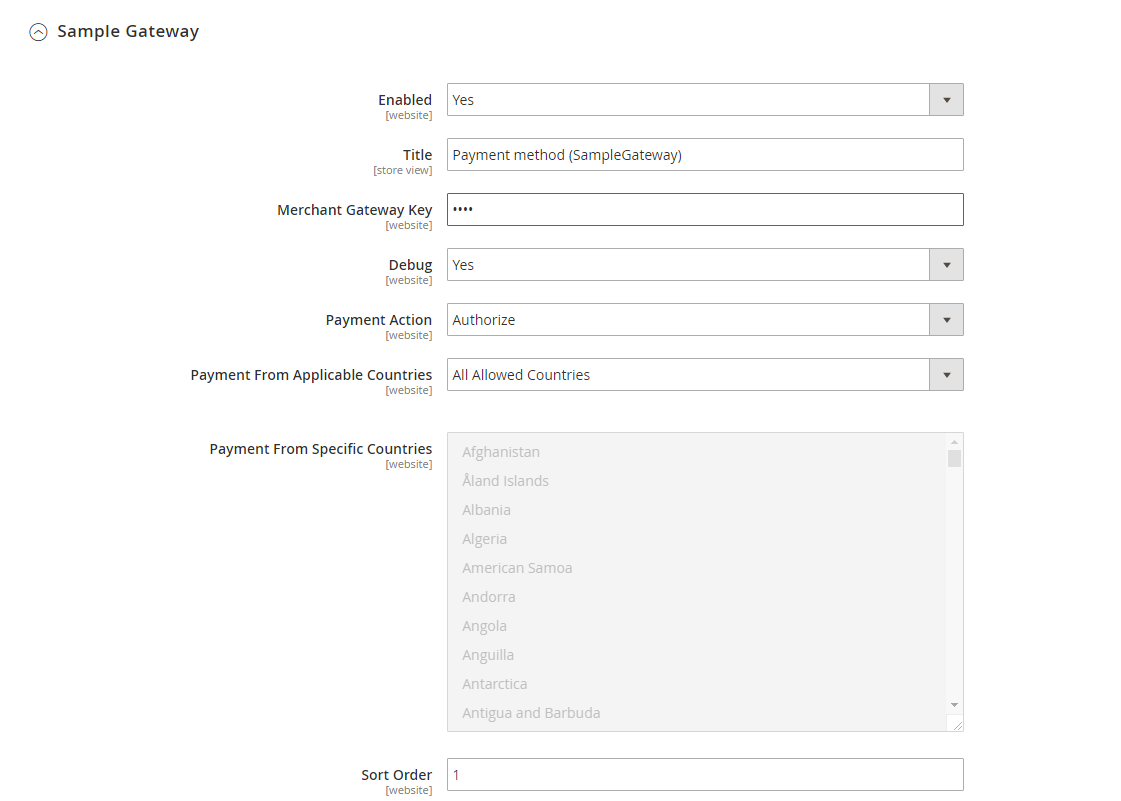
In this part, you can enable the payment method, set a title, as well as configure other features:
- Debug: Set this to Yes if you want Magento to log payment requests and responses in
var/log/. Turn it off once you finish testing to avoid big log files. - Payment Action: Choose Authorize if you only want to place a hold on the customer’s funds and capture later, or Authorize and Capture if you want to charge right away.
- Payment From Applicable Countries: Select All Allowed Countries to make the method available everywhere, or Specific Countries if you only want to allow it in certain regions.
- Payment From Specific Countries: Tick the boxes for the countries where this payment method should appear at checkout.
- Sort Order: Enter a number (e.g., 0, 1, 2…). Lower numbers make the method appear higher in the list at checkout. Use this to highlight your preferred option.
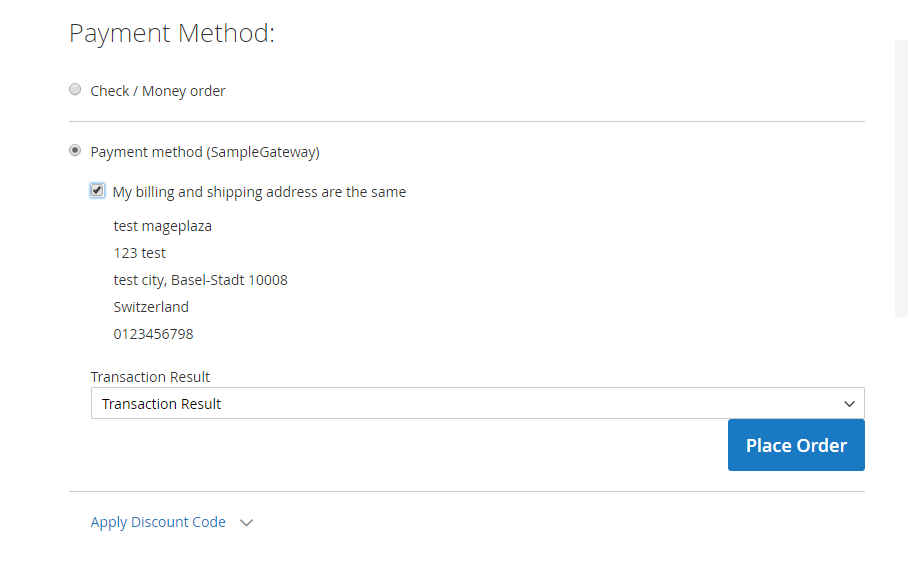
Display new payment method on frontend (Result)
Now, in the checkout step, you can choose new payment method (gateway): SampleGateway
After creating a payment method, admins can assign a payment method to a specific shipping method, which means they will work in pairs when enabled. It allows better security and better experience and may reduce related fees for you and your customers. Find out how to create Magento 2 Shipping Methods to optimize your payment step.
The bottom line
Creating Magento 2 payment methods is an essential step for online businesses to make, as multiple payment options can increase conversion rates and create extra sales, not to mention global reach. That is why you should take this into account now for better business operations. And it is not as difficult as you may think it is, right?
Happy coding and enjoy your extra sales!
Any questions? Feel free to leave a comment.
Related Post
x

Jacker is the Chief Technology Officer (CTO) at Mageplaza, bringing over 10 years of experience in Magento, Shopify, and other eCommerce platforms. With deep technical expertise, he has led numerous successful projects, optimizing and scaling online stores for global brands. Beyond his work in eCommerce development, he is passionate about running and swimming.
Related Post

Magento 2.4.9 Beta Release: What's New?
Magento 2.4.9 beta is here. Stay up to date with every release milestone with this regularly updated guide.
11 mins read
|
03-17-2026

Google Analytics Website Traffic: The A–Z Guide for Magento 2 Store Owners
Learn how to analyze website traffic in Google Analytics 4, identify high-quality traffic sources, and grow your Magento 2 store with data-driven insights.
18 mins read
|
03-17-2026

The Complete Guide to UTM Parameters & Google Analytics for Magento website
Master UTM parameters and Google Analytics for Magento. Track traffic sources, measure campaign performance, and practical tips to use it for better business decisions.
10 mins read
|
10-05-2025
How to implement Cookie Consent for GTM & Google Analytics in Magento Under GDPR?
Implement cookie consent for GTM & GA4 in Magento under GDPR. Step-by-step guide using Google Consent Mode v2 to avoid fines and maintain analytics.
15 mins read
|
02-27-2026

Speed vs. Sales: Comparing Hyvä Checkout and Mageplaza One Step Checkout
Learn how Hyvä Checkout and Mageplaza One Step Checkout impact order completion rates and revenue growth.
8 mins read
|
02-25-2026
1 min read
|
03-30-2026
Magento 2.4.9 Beta Release: What's New?
Magento 2.4.9 beta is here. Stay up to date with every release milestone with this regularly updated guide.
11 mins read
|
03-17-2026
Google Analytics Website Traffic: The A–Z Guide for Magento 2 Store Owners
Learn how to analyze website traffic in Google Analytics 4, identify high-quality traffic sources, and grow your Magento 2 store with data-driven insights.
18 mins read
|
03-17-2026
The Complete Guide to UTM Parameters & Google Analytics for Magento website
Master UTM parameters and Google Analytics for Magento. Track traffic sources, measure campaign performance, and practical tips to use it for better business decisions.
10 mins read
|
10-05-2025
How to implement Cookie Consent for GTM & Google Analytics in Magento Under GDPR?
Implement cookie consent for GTM & GA4 in Magento under GDPR. Step-by-step guide using Google Consent Mode v2 to avoid fines and maintain analytics.
15 mins read
|
02-27-2026
Speed vs. Sales: Comparing Hyvä Checkout and Mageplaza One Step Checkout
Learn how Hyvä Checkout and Mageplaza One Step Checkout impact order completion rates and revenue growth.
8 mins read
|
02-25-2026