


1 min read
|
03-30-2026
How to create a simple Hello World module for Magento 2
Vinh Jacker | 03-17-2025

According to eMarketer’s projections, retail ecommerce sales are anticipated to escalate from $4.938 trillion in 2021 to $7.391 trillion by 2025. To capitalize on this growth, learning to develop a custom module in Magento 2 can significantly boost sales by adding unique functionalities to your online store.
In this guide, we will outline five essential steps to create a custom module in Magento 2. Let’s explore!
Looking for a Trusted Magento Development Company?
137,000 clients can’t be wrong! Ready to become our next success story?
Our Magento experts are willing to help you with any tasks!
Get FREE 1:1 Consultation
What Is a Custom Module in Magento 2?
A custom module in Magento 2 is a package of code designed to add specific features or functionalities to an online store. It allows developers to extend, customize, or modify Magento’s default behavior without altering the core code. Custom modules can introduce new product types, payment gateways, shipping methods, or other features tailored to meet unique business needs, ensuring a flexible and scalable e-commerce platform.
Steps to Create a Custom Module in Magento 2
To create custom modules, you need to complete the following high-level steps:
- Step 1: Create the folder of Hello World module
- Step 2: Create etc/module.xml file
- Step 3: Create etc/registration.php file
- Step 4: Enable the module
Step 1: Create the folder of Hello World module
Name of the module is defined as VendorName_ModuleName. First part is name of the vendor and last part is name of the module:
For example: Magento_HelloWorld, Mageplaza_PdfInvoice. Focus on following guide to create the folders:
app/code/Mageplaza/HelloWorld
Step 2: Create etc/module.xml file.
Then, it is necessary to create etc folder and add the module.xml file
app/code/Mageplaza/HelloWorld/etc/module.xml
Contents would be:
<?xml version="1.0"?>
<config xmlns:xsi="http://www.w3.org/2001/XMLSchema-instance" xsi:noNamespaceSchemaLocation="urn:magento:framework:Module/etc/module.xsd">
    <module name="Mageplaza_HelloWorld" setup_version="1.0.0">
    </module>
</config>
Step 3: Create etc/registration.php file
In this step, we will add registration.php as following guide:
app/code/Mageplaza/HelloWorld/registration.php
Contents would be:
<?php
\Magento\Framework\Component\ComponentRegistrar::register(
	\Magento\Framework\Component\ComponentRegistrar::MODULE,
	'Mageplaza_HelloWorld',
	__DIR__
);
Step 4: Enable the module
Finish the step 3, we have already created the HelloWorld module. And we will enable this module in this step
After create the module if you run the command as:
php bin/magento module:status
You should see the module is disable now:
List of disabled modules:
Mageplaza_HelloWorld
Follow exact guide to enable the module right now, let run the command as:
php bin/magento module:enable Mageplaza_HelloWorld
Or other way, you can access the file:
app/etc/config.php
You will see a long list of modules there, just add your module as well
  ...
  'Mageplaza_HelloWorld' => 1,
  ...
Your module should be available now.
After this step, when you open your website in browser you will get an error saying
Please upgrade your database: Run bin/magento setup:upgrade from the Magento root directory.
Let run the command:
php bin/magento setup:upgrade
If you encounter issues with stuck indexers after enabling your module, you may need to unlock the reindex process in Magento 2 to continue development smoothly.
After complete,when you open your website in browser you will see the layout of the website is broken.
Please run the deloy command line to fix it.
php bin/magento setup:static-content:deploy
After deploy completed, you can also see your module from backend at System Configuration -> Advanced -> Disable Modules Output.
Step 5: Create a Controller
Now, we will create a controller to test module.
Before create a controller, we will create a route for HelloWorld module.
Route’s in magento are divided into 3 parts: Route frontname, controller and action as following example:
http://mageplaza.com/index.php/frontname/controller/action
To add route, it is necessary to create routes.xml file
Step 5.1: Create a routes
app/code/Mageplaza/HelloWorld/etc/frontend/routes.xml
since this is a frontend route, we added it in frontend/ folder else we need to add it to adminhtml/ folder
Content would be:
<?xml version="1.0" ?>
<config xmlns:xsi="http://www.w3.org/2001/XMLSchema-instance" xsi:noNamespaceSchemaLocation="urn:magento:framework:App/etc/routes.xsd">
    <router id="standard">
        <route frontName="helloworld" id="helloworld">
            <module name="Mageplaza_HelloWorld"/>
        </route>
    </router>
</config>
After defining the first part of the route, the URL will be displayed as:
http://<yourhost.com>/helloworld/*
E.g: http://localhost/helloworld/*
Then, we will continue to create the controller and action
Step 5.2: Create a Action in Controller
The folder and file you need to create is:
app/code/Mageplaza/HelloWorld/Controller/Index/Test.php
Contents would be:
<?php
namespace Mageplaza\HelloWorld\Controller\Index;

class Test extends \Magento\Framework\App\Action\Action
{
	protected $_pageFactory;

	public function __construct(
		\Magento\Framework\App\Action\Context $context,
		\Magento\Framework\View\Result\PageFactory $pageFactory)
	{
		$this->_pageFactory = $pageFactory;
		return parent::__construct($context);
	}

	public function execute()
	{
		echo "Hello World";
		exit;
	}
}
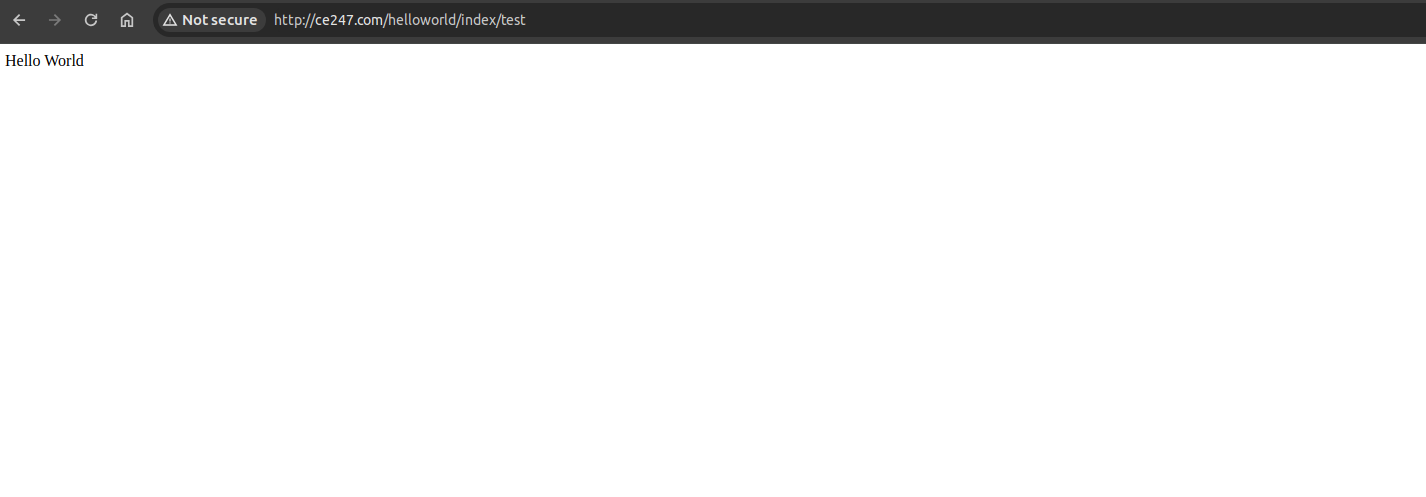
After completed, please run php bin/magento cache:clean to check result.
Your URL now should be as:
http://<yourhost.com>/helloworld/index/test
We hope that the above easy-to-understand guide will help you successfully create a custom module in Magento 2.
Need help building something more advanced? Explore our Custom Magento Development Services and bring your ideas to life with expert support.
FAQ
1. What is module.xml in Magento?
module.xml is a configuration file in Magento that defines the specifics of a Magento module. This file provides crucial information such as the module’s name, version, and dependencies. Magento modules follow a structured folder hierarchy, which includes the vendor (a collection of related modules) and the module itself. The module.xml file, located within this structure, helps Magento identify the module’s properties and requirements, ensuring proper integration and functionality within the Magento framework.
2. How can you call ( activate) a module in Magento 2?
To activate a module in Magento 2:
- Create Module Structure: Place your module under
app/code/VendorName/ModuleName. - Create module.xml: Define module details like name and version in etc/module.xml.
- Create registration.php: Register the module with Magento.
- Enable Module: Use CLI command
php bin/magento module:enable VendorName_ModuleName. - Run Setup Upgrade: Update Magento database and configuration with php bin/magento
setup:upgrade. - Clear Cache: Ensure changes take effect by clearing cache with
php bin/magento cache:clean and php bin/magento cache:flush.
Following these steps will activate your module in Magento 2, making it operational within the system.
3. Can I create multiple modules within the same Magento 2 instance?
Yes, Magento 2 allows you to create and manage multiple modules within the same Magento 2 instance. Modules in Magento are like building blocks that allow you to extend or modify the core system’s functionality.
4. Where are Magento modules stored?
Magento modules are stored in the app/code directory of your Magento installation. Specifically, they are organized into vendor-specific folders within app/code. For example, if the vendor name is VendorName and the module name is ModuleName, the module’s files are located in app/code/VendorName/ModuleName. This directory structure helps Magento manage and organize modules according to their respective vendors and names, facilitating easy customization and extension of the platform’s functionalities.
5. Is it possible to create a module that integrates with third-party APIs?
Yes, it is possible to create a module in Magento 2 that integrates with third-party APIs. Magento 2 provides robust capabilities for developers to build custom modules that interact with external APIs seamlessly. Learn how to expose your module via Magento 2 API if you want your module to expose endpoints and interact via RESTful requests. Here are the general steps:
- Module Setup: Create the module structure in
app/code/VendorName/ModuleName. - Configuration: Set up module files (
module.xmlandregistration.php) and define dependencies. - API Integration: Write PHP classes to manage API requests and responses using Magento’s service contracts or custom classes.
- Authentication: Securely manage access with OAuth tokens or API keys.
- Data Handling: Use models, helpers, or repositories to manage data synchronization and transformation between Magento and the API.
- Automation: Use event observers and cron jobs for automated tasks like data updates and - synchronization.
- Testing and Debugging: Thoroughly test in different environments and use Magento’s debugging tools for problem-solving.
- Security and Performance: Enhance security and optimize performance for efficient API communication.
x

Jacker is the Chief Technology Officer (CTO) at Mageplaza, bringing over 10 years of experience in Magento, Shopify, and other eCommerce platforms. With deep technical expertise, he has led numerous successful projects, optimizing and scaling online stores for global brands. Beyond his work in eCommerce development, he is passionate about running and swimming.
Related Post

Magento 2.4.9 Beta Release: What's New?
Magento 2.4.9 beta is here. Stay up to date with every release milestone with this regularly updated guide.
11 mins read
|
03-17-2026

Google Analytics Website Traffic: The A–Z Guide for Magento 2 Store Owners
Learn how to analyze website traffic in Google Analytics 4, identify high-quality traffic sources, and grow your Magento 2 store with data-driven insights.
18 mins read
|
03-17-2026

The Complete Guide to UTM Parameters & Google Analytics for Magento website
Master UTM parameters and Google Analytics for Magento. Track traffic sources, measure campaign performance, and practical tips to use it for better business decisions.
10 mins read
|
10-05-2025
How to implement Cookie Consent for GTM & Google Analytics in Magento Under GDPR?
Implement cookie consent for GTM & GA4 in Magento under GDPR. Step-by-step guide using Google Consent Mode v2 to avoid fines and maintain analytics.
15 mins read
|
02-27-2026

Speed vs. Sales: Comparing Hyvä Checkout and Mageplaza One Step Checkout
Learn how Hyvä Checkout and Mageplaza One Step Checkout impact order completion rates and revenue growth.
8 mins read
|
02-25-2026
1 min read
|
03-30-2026
Magento 2.4.9 Beta Release: What's New?
Magento 2.4.9 beta is here. Stay up to date with every release milestone with this regularly updated guide.
11 mins read
|
03-17-2026
Google Analytics Website Traffic: The A–Z Guide for Magento 2 Store Owners
Learn how to analyze website traffic in Google Analytics 4, identify high-quality traffic sources, and grow your Magento 2 store with data-driven insights.
18 mins read
|
03-17-2026
The Complete Guide to UTM Parameters & Google Analytics for Magento website
Master UTM parameters and Google Analytics for Magento. Track traffic sources, measure campaign performance, and practical tips to use it for better business decisions.
10 mins read
|
10-05-2025
How to implement Cookie Consent for GTM & Google Analytics in Magento Under GDPR?
Implement cookie consent for GTM & GA4 in Magento under GDPR. Step-by-step guide using Google Consent Mode v2 to avoid fines and maintain analytics.
15 mins read
|
02-27-2026
Speed vs. Sales: Comparing Hyvä Checkout and Mageplaza One Step Checkout
Learn how Hyvä Checkout and Mageplaza One Step Checkout impact order completion rates and revenue growth.
8 mins read
|
02-25-2026