How To Connect Domain To Shopify: A Step-by-step Guide To Follow
Summer Nguyen | 01-31-2024

Just scored the perfect domain name for your Shopify store but feeling stuck on what to do next? You’re not alone! This easy-to-follow tutorial will show you how to connect your domain to Shopify, simplifying the process of launching your store with confidence.
Understanding Shopify Domains
A domain is essentially a unique address that identifies a website on the internet. It is the part of a web address that comes after “www.” and includes the name of the website and the domain extension (.com, .net, etc.).
A Shopify domain is the web address or URL linked to a Shopify online store. When setting up your store on this platform, you have these two options for your domain name:
- Shopify Domain Name: This is the default domain that Shopify provides for your store, typically in the format “yourstorename.myshopify.com.” Using this domain offers the convenience of automatic configuration with your Shopify store.
- Custom Domain Name: This is an independent domain name that you purchase from domain registrars (like GoDaddy, Bulehost, etc.). It allows you to create a unique web address like that aligns with your brand identity and is easier for customers to remember.
While the Shopify domain is a quick and easy solution, most established businesses opt for a custom domain to enhance their branding and create a more memorable online presence.
Read more: How To Choose The Best Domain Name For An Ecommerce Website?
How To Connect Your Domain To Shopify?
Establishing a credible online presence for your e-commerce firm requires connecting your custom domain to your Shopify store. Here is a thorough tutorial on how to connect a domain to Shopify:
Step 1: Purchase A Domain
Start by acquiring a custom domain from the domain registrar of your choice if you still need one. Common domain registrars include Namecheap, GoDaddy, and Google Domains. Take the following actions:
- Go to the domain registrar website of your choice.
- Go through their database and choose a domain name (such as www.yourstorename.com) that best suits your brand.
- Follow the registrar’s instructions to finish the domain purchasing procedure.
Step 2: Access Your Shopify Account And Log In.
To access your Shopify admin panel, you must first sign in to your account. Only then can you connect your custom domain to your Shopify store. After authenticating into your Shopify account, you may access your admin panel.
Step 3: Access the Domains Section
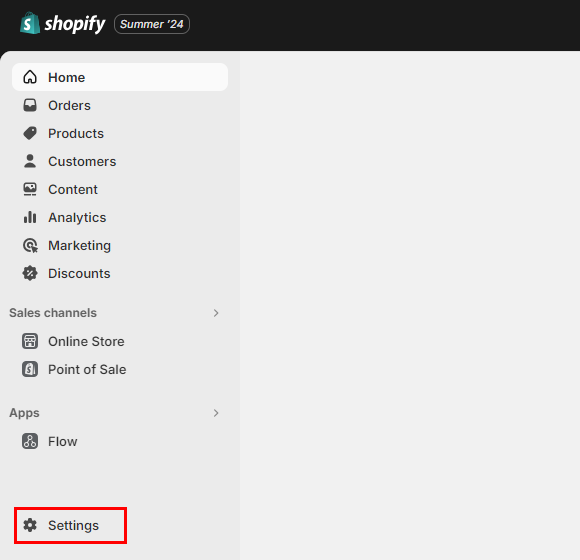
Once you see the Shopify admin panel on the left side, select “Setting”. When the “Setting” window appears, choose “ Domains” to go into the section.


Step 4: Add Your Custom Domain
- If you want to buy a new domain from Shopify, select “Buy new domain” and follow the platform’s instructions to activate it for your store.
- If you’ve already purchased a domain name from a third party, click “Connect existing domain” and follow the steps mentioned in the next section to connect it to Shopify.

Step 5: Enter Your Domain
Enter the custom domain you bought into the “Connect existing domain” area. Shopify will check if the domain is available and assist you with the configuration.

Step 6: Configure Your DNS Settings
You will get DNS settings from your domain registrar, which you must set up to direct your domain to Shopify’s servers. You must specify the DNS settings that your domain registrar will give you:
- Get into the dashboard or control panel of your domain registrar.
- Search for DNS administration or DNS settings. This may be under the “Advanced” or “DNS” section.
- Modify the DNS configuration according to Shopify’s instructions. Two primary records must typically be configured:
- A Record: Set it up with Shopify’s IP address (usually 23.227.38.65) as the destination.
- CNAME Record: Choose yourstorename.myshopify.com as the CNAME record, and replace “yourstorename” with the name of your actual Shopify store.
Consult your domain registrar’s documentation or assistance if necessary, as precise procedures for changing DNS settings may differ based on them.
Step 7: Verify And Finalize
Return to your Shopify admin and wait for the verification procedure to be finished after updating your DNS records with your domain registrar.
Shopify will verify that the domain is linked adequately by running a verification check. It usually takes a few minutes to several hours for this verification procedure to complete, depending on DNS propagation.

Step 8: Set Your Primary Domain
Once your Shopify store and custom domain have connected successfully, you should set your custom domain as the primary domain. This is an essential step in the process because it establishes the domain visitors to your online store will see in the address bar of their web browsers.
For optimal user experience and brand consistency, make your custom domain the primary domain. You may have more than one domain linked to your Shopify store, but only one will function as the primary address for your business if you designate it as such. Other domains can reroute to the main domain, keeping your brand’s web address consistent and uniform.

Step 9: Test Your Domain
After you’ve connected and established your custom domain as the primary domain in Shopify, it’s critical to test it to confirm everything is working properly. There should be no problems loading your Shopify store. You have the option to address and eliminate any issues that come up during testing to make sure your custom domain online business runs properly.
Step 10: SSL Certificate (Optional)
You can enable an SSL (Secure Sockets Layer) certificate when configuring your custom domain in Shopify. An SSL certificate establishes a safe and secure connection between your website and visitors.

This can increase your clients’ sense of confidence and security and is especially crucial for e-commerce businesses. Keeping your SSL certificate up to date and active is essential to maintaining the security of your online store.
Note – You should be patient: It is important to remember that DNS updates may take some time to spread over the internet. Although it frequently happens considerably faster, DNS updates can take up to 48 hours to fully take effect.
Find more information: What Is an SSL Certificate (Secure Sockets Layer)? Definition, Importance & More!
Common Issues When Connecting Domain to Shopify
Connecting a domain to Shopify is generally a straightforward process, but there are some common issues that can arise:
DNS Configuration Errors
- A Record Misconfiguration: This is the #1 culprit! Ensure your A record points directly to Shopify’s IP address (23.227.38.65). If it’s pointing elsewhere, your website won’t load on Shopify. Double-check the IP address for accuracy. A single digit error can cause major issues.
- AAAA Record (IPv6): Similar to the A record, make sure your AAAA record points to Shopify’s IPv6 address. This is important for users with IPv6 connectivity. If your domain registrar doesn’t support IPv6, it’s usually not a critical issue for most visitors.
- CNAME Record for ‘www’: If you want your domain to work with “www” (www.yourstorename.com), your CNAME record for “www” should point to “shops.myshopify.com.” Some registrars automatically add “www” without needing a CNAME record. Check your provider’s instructions.
- Propagation Delay: After updating DNS settings, it can take up to 48 hours for changes to take effect across the internet. You can use online tools to check the DNS propagation status of your domain. Be patient if your site doesn’t appear immediately.
Domain Registration Issues
- Domain Not Registered: Obviously, your domain must be registered with a provider before connecting to Shopify. If you’re unsure, check your domain’s status with your registrar or use a WHOIS lookup tool.
- Domain Locked: Some registrars lock domains for security. Temporarily unlock your domain before connecting it to Shopify. Contact your registrar if you can’t unlock your domain.
- Domain Verification: Shopify might require you to verify domain ownership. This is usually done by adding a specific DNS record or verifying through email. Follow Shopify’s instructions carefully during the verification process.
Shopify-Specific Issues
- Domain Already Connected: Your domain can only be connected to one Shopify store at a time. Check if the domain is connected to an old Shopify store or a different platform.
- Shopify Plan: Some domains, like internationalized domain names (IDNs), might need a specific Shopify plan. If you encounter issues, check Shopify’s documentation or contact their support for assistance.
In addition to the above issues, you should save a few more tips to ensure the process of connecting your domain to your Shopify store goes smoothly and without errors.
- Backup DNS Settings: Before making any changes, always backup your existing DNS settings. This allows you to revert if anything goes wrong.
- SSL Certificates: Shopify provides free SSL certificates, but ensure it’s properly configured for secure connections (https://).
- Email Considerations: If you use email with your domain, update your email settings to match your new DNS configuration.
FAQs
How long does it take to connect a domain?
Connecting can be almost instant if you use Shopify’s automatic connection options. Manual connections can take up to 48 hours to fully update across the internet.
Can I connect multiple domains to my Shopify store?
Yes, you can absolutely connect multiple domains (and subdomains) to your Shopify store! However, Shopify has limits on the number of domains you can connect. The standard plan allows for 20 domains or subdomains, while Shopify Plus allows up to 1000.
What is a primary domain?
In Shopify, your primary domain is the main web address that customers use to access your online store. It’s the URL that appears in the browser’s address bar when someone visits your site.
I have multiple Shopify stores. Can I connect the same domain to more than one?
No, you can only connect a primary domain to a single Shopify store at a time. However, you can connect multiple subdomains to different stores.
Does connecting a domain to Shopify affect my website’s SEO?
Connecting a domain doesn’t directly impact SEO, but it’s important to set up proper redirects from your old website (if you had one) to avoid losing search engine rankings.
Can I connect a domain that has an active SSL certificate with another provider?
Yes, but you’ll need to ensure that your Shopify store has an SSL certificate as well. Shopify automatically provides a free SSL certificate for all stores.
Conclusion
Building a credible online presence for your company requires connecting the domain to Shopify. Customers will find it easier to seek out and remember your website, which not only increases the trustworthiness of your brand.
The instructions and recommendations provided above will guide you through linking your domain to your Shopify store so that you can start experiencing the benefits of having a custom web address. Best wishes on your e-commerce adventure!


![Top 20+ Must-have Shopify Apps for 2025 [Free & Paid] - Mageplaza](https://cdn2.mageplaza.com/media/blog/must-have-shopify-apps/top-must-have-shopify-apps.png)
![[2025 Updates] Top 10+ Upsell Apps for Shopify - Mageplaza](https://cdn2.mageplaza.com/media/blog/best-upsell-shopify-app/cover.png)