

Change Store Email Addresses - Mageplaza
3 mins read
|
04-02-2016

Vinh Jacker | 04-02-2016

The Contact Us link placed at the footer of the Magento 2 store allows customers to send a message directly to you by completing the form. Thanks to this contact method, any requests or concerns can be resolved effectively, which assists customer support better. Hence, online businesses can build close and long-term relationships with customers.
The Contact email address indicates the email recipient to which the forms are sent and the email sender by which the store replies to customers. Magento sets hello@example.com as the default email address, but you may want to change it to your own here. To make sure it is sent to your inbox, you should enable SMTP. In addition, you also can customize the email templates, and upload your brand email logo here.
Contact Us form can:
Rather than using the default email by Magento 2, the contact email address configuration can:
Here is the Contact Us form in the front end; visitors/customers can send you an email via this page.
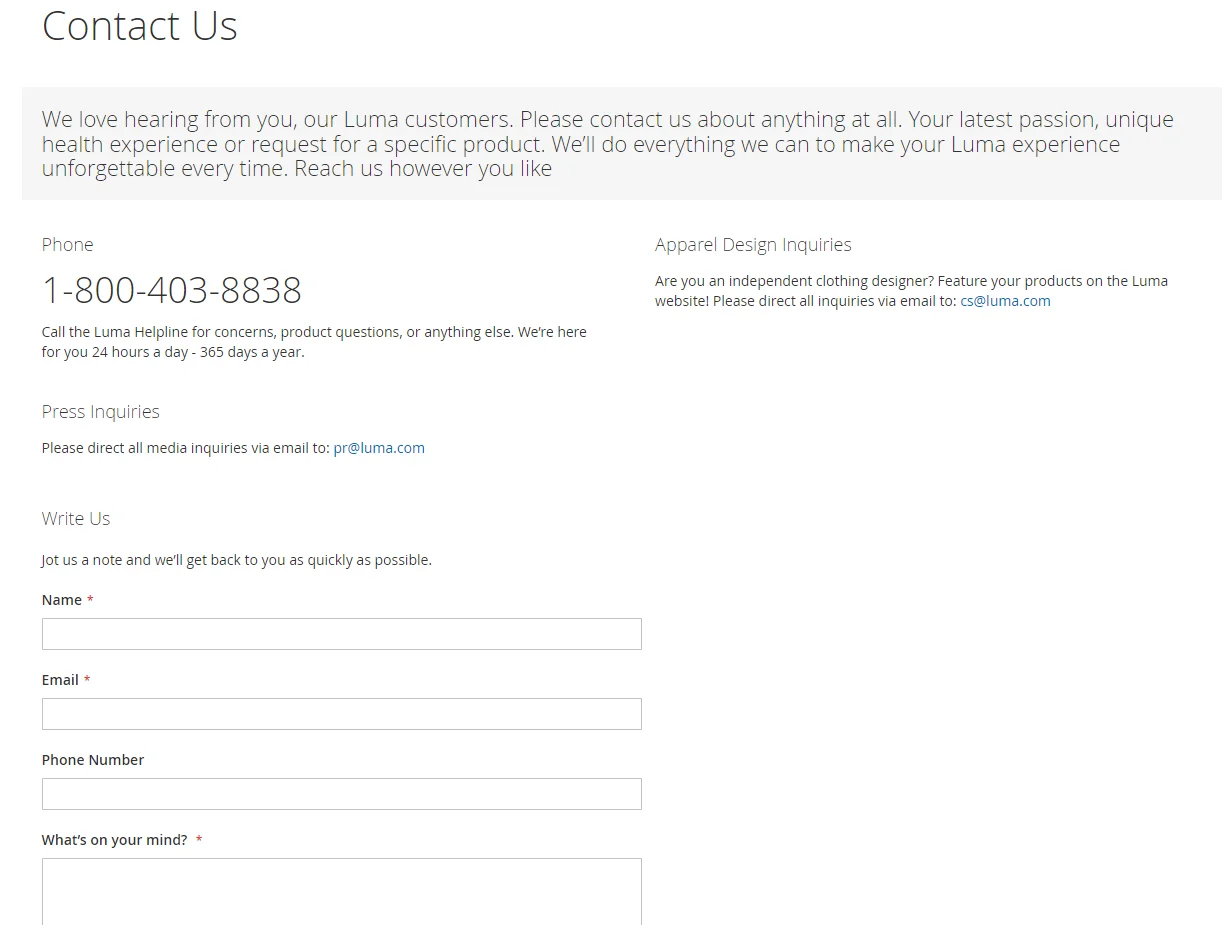
After the form is submitted, a thank-you message appears. The contact-us-info block contains the form and can be easily customized.
This tutorial will guide you through 4 steps to set up the Contact Us form:
Stores. Then under Settings, choose Configuration.General, choose Contacts.After logging in to the backend, you can now set up the Contact Us form, as well as configure the Contact email address as you wish:
Contact Us section. If necessary, set Enable Contact Us to “Yes”
Email Options section. Then, do the following:
Send Emails field, enter the email address where messages from the Contact Us form are sent.Email Sender to the store identity that appears as the sender of the message from the Contact Us form. For example: Custom Email 2.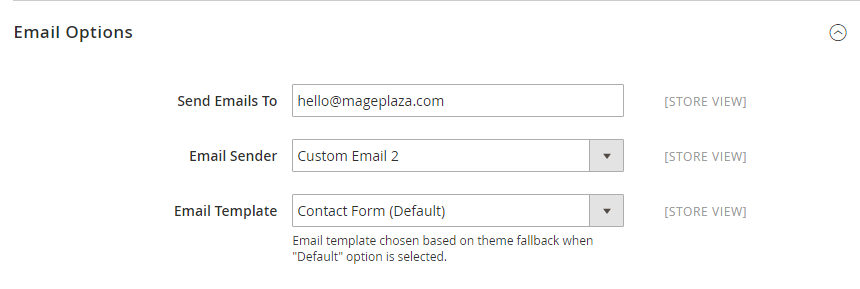
When all the steps aren’t done, click Save Config.
The Contact Us form is also an opportunity for you to provide essential information to your customers. You can include this content with ease after following these steps:
Content. Then under Elements, choose Blocks.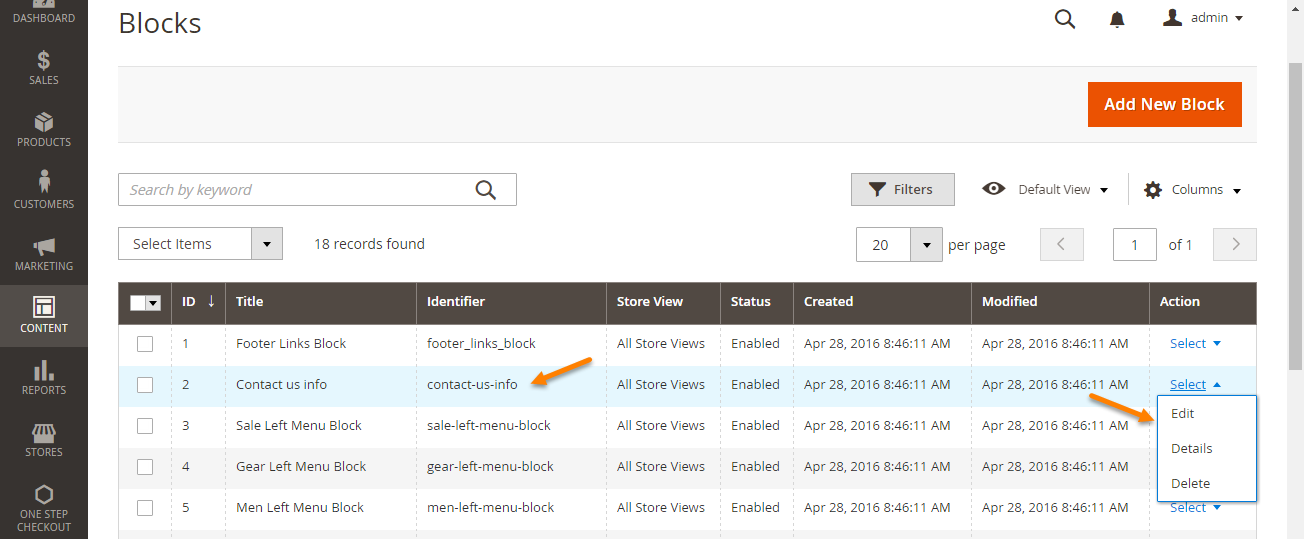
Content field and make any necessary changes.
Show / Hide Editor to work directly with the HTML.
After setting up everything, click on Save Block to get all done.
Let’s add the subject field to the email template as an example. To implement, you need to create a new module.
module.xml in app/code/<Vendor>/<Module>/etc and insert the following code part:<config xmlns:xsi="http://www.w3.org/2001/XMLSchema-instance"
xsi:noNamespaceSchemaLocation="urn:magento:framework:Module/etc/module.xsd">
<module name="Module_Name" setup_version="1.0.1">
</module>
</config>
app/code/<Vendor>/<Module> by creating registration.php. Enter the following code:<?php
\Magento\Framework\Component\ComponentRegistrar::register(
\Magento\Framework\Component\ComponentRegistrar::MODULE,
'Module_Name',
__DIR__
);
form.phtml file from the vendor/magento/module-contact/view/frontend/templates for the below steps. Paste it into app/code/<Vendor>/<Module>/view/frontend/templates. Next, open this file then add the new field into your contact form with this code:<div class="field subject required">
<label class="label" for="subject"><span><?php /*
@escapeNotVerified */ echo __('Subject') ?>
</span></label>
<div class="control">
<input name="subject" id="subject" title="<?php /*
@escapeNotVerified */ echo __('Subject') ?>
" value="" class="input-text" type="text" data-validate="{required:true}"
</div>
</div>
contact_index_index.xml in app/code/<Vendor>/<Module>/view/frontend/layout in order to overrule the former form.phtml file with a new one. To do so, please insert this code path to the file:<?xml version="1.0"?>
<page xmlns:xsi="http://www.w3.org/2001/XMLSchema-instance" layout="1column"
xsi:noNamespaceSchemaLocation="urn:magento:framework:View/Layout/etc/page_configuration.xsd">
<body>
<referenceBlock name="contactForm" remove="true"/>
<referenceContainer name="content">
<block class="Magento\Contact\Block\ContactForm" name="customContactForm"
template="Module_Name::form.phtml" />
</referenceContainer>
</body>
</page>
Marketing > Email Templates > Add New Template.New Template page. Select the Contact Form template and choose Load Template.Template Name field.Template Content field then save it:trans "Subject: %subject" subject=$data.subject
trans "Name: %name" name=$data.name
trans "Email: %email" email=$data.email
trans "Phone Number: %telephone" telephone=$data.telephone
trans "Comment: %comment" comment=$data.comment
Data.subject here is the name of the field you added to form.phtml file. It should be the same in both places.
Stores > Configuration > General > Contacts. Select Email Template in the Email Options. Finally, save your changes.If you’re planning to build completely custom forms for internal use or admin panel management, check out this step-by-step guide to creating a custom admin form in Magento 2 using UI components.
You can add a Contact Us form to the CMS page.
First, you need to change the contact form.
Content > Elements > BlocksContent box then save it Save the blockNow, we will guide you how to add a Contact Us form to other pages. Select the Content block, add this code (where you need it, such as footer, navigation block, and so on).
block type=’core/template’ name=’contactForm’ template=’contacts/form.phtml’
Don’t forget to save your changes.
CAPTCHA is a must-have tool for online stores as it can protect them from being spam. To enable CAPTCHA for custom form, please navigate to Stores > Configuration > Customers > Customers Configuration > CAPTCHA. Choose Yes in the Enable CAPTCHA on Storefront field, save config, and it’s done.
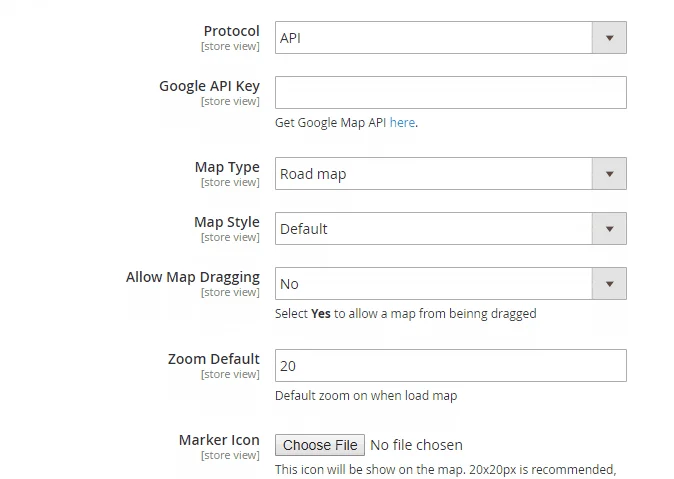
Step 1: Log in to the Magento Admin
Step 2: Choose Store > Settings > Configuration > Mageplaza Extensions > Google Maps
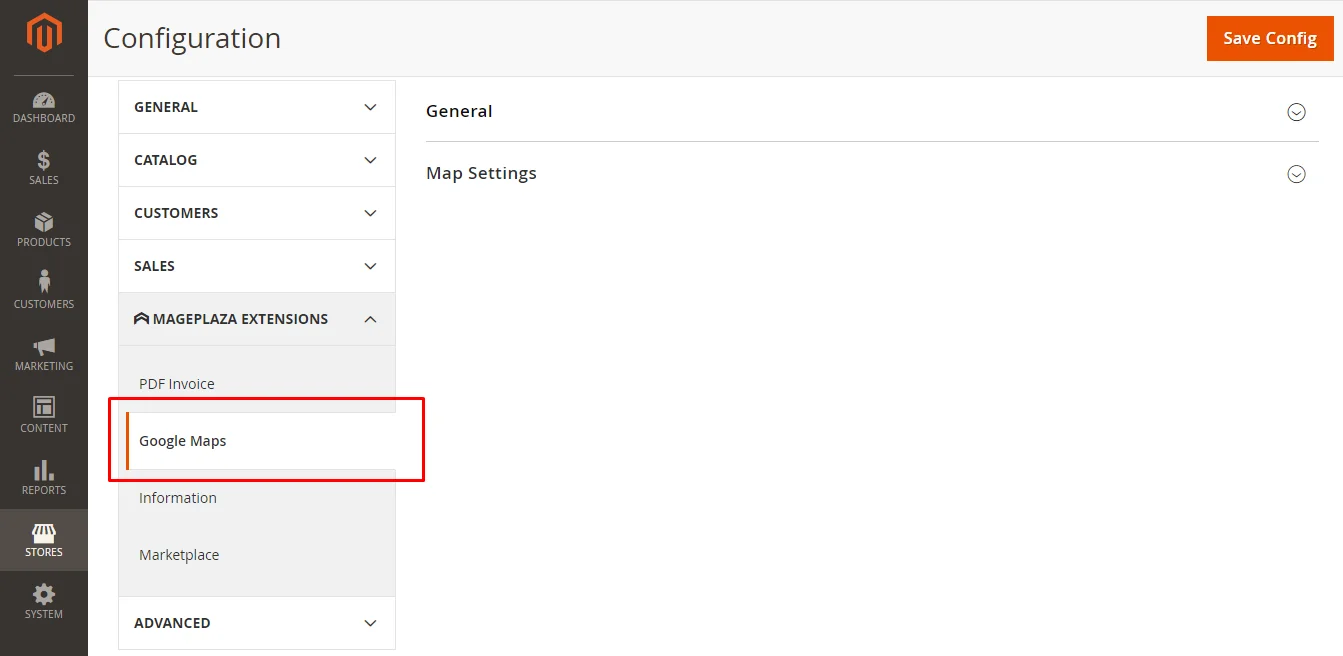
Step 3: Choose Yes to enable the module
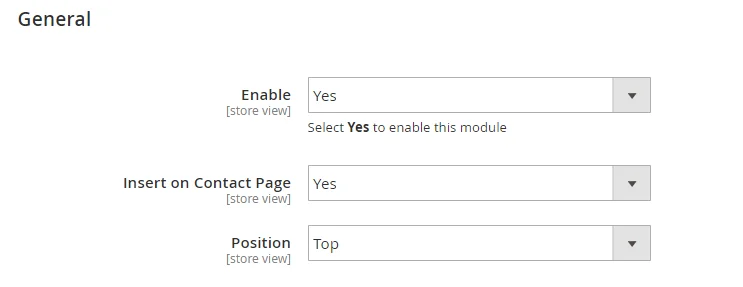
Step 4: Configure the fields as necessary
If your contact form is not working the way you want it to be, check all the settings in the backend one more time.
In case you did everything right but it’s still not working, please navigate to the template/contact/form.phtml file. Find this code part:
getFormAction(); ?>” id=”contactForm” method=”post”>
Replace it with this:
getUrl(‘contacts/index/post’); ?>” id=”contactForm” method=”post”>
1. Is it possible to create multiple Contact Forms in Magento 2?
By default, Magento 2 supports a single Contact Form. For multiple forms, you’ll need to use an extension or custom development.
2. What should I do if the Contact Form is not working?
Please ensure the form is enabled, verify email settings, check for conflicts with other extensions or custom code, and review server logs for errors.
3. Are there security concerns with Contact Us forms?
4. When should I consider using an extension for the Contact Us form?
Consider using a Magento 2 Contact Us form extension if you need more customization options, advanced functionalities, or integration with other services.
That is all you have to do to enable the Contact Us form, edit its content and the Contact email address. Obviously, it is vital for online stores when it comes to business and customer communication. This is general guidance, so if you have more questions, you can leave the comment in the comment box and we will reply as soon as possible.
Related Posts:

Jacker is the Chief Technology Officer (CTO) at Mageplaza, bringing over 10 years of experience in Magento, Shopify, and other eCommerce platforms. With deep technical expertise, he has led numerous successful projects, optimizing and scaling online stores for global brands. Beyond his work in eCommerce development, he is passionate about running and swimming.
Related Post

Change Store Email Addresses - Mageplaza

Change Welcome Message - Mageplaza
Customize the welcome message on your store's homepage to provide a personalized touch for your customers. Improve the user experience with our step-by-step guide.
Configure Magento 2 Contact Form & Email: Detailed Guides - Mageplaza
Configure the email address for your Magento 2 store's contact form and ensure that your customers can easily get in touch with you with this informative guide

How to Install Magento 2 with Sample Data - Mageplaza
How to install Magento 2 with Sample Data. In this topic we will discuss about How to Install Magento 2 Step by Step in Manage Store topic

6 Steps To Stop Brute Force Attacks - Mageplaza
How To Stop Brute Force Attacks in Magento 1, 2. In this topic we will discuss about How To Stop Brute Force Attacks in Manage Store topic

How to set Locale, Language, and Country in Magento 2 - Mageplaza
Setup Locale State Country in Magento 2 provides setup your store information on Locale Options that determines the timezone, language, country and the days.
Change Store Email Addresses - Mageplaza
Change Welcome Message - Mageplaza
Customize the welcome message on your store's homepage to provide a personalized touch for your customers. Improve the user experience with our step-by-step guide.
Configure Magento 2 Contact Form & Email: Detailed Guides - Mageplaza
Configure the email address for your Magento 2 store's contact form and ensure that your customers can easily get in touch with you with this informative guide
How to Install Magento 2 with Sample Data - Mageplaza
How to install Magento 2 with Sample Data. In this topic we will discuss about How to Install Magento 2 Step by Step in Manage Store topic
6 Steps To Stop Brute Force Attacks - Mageplaza
How To Stop Brute Force Attacks in Magento 1, 2. In this topic we will discuss about How To Stop Brute Force Attacks in Manage Store topic
How to set Locale, Language, and Country in Magento 2 - Mageplaza
Setup Locale State Country in Magento 2 provides setup your store information on Locale Options that determines the timezone, language, country and the days.