

Change Store Email Addresses - Mageplaza
3 mins read
|
04-02-2016

Vinh Jacker | 11-05-2018
Customers have their own preferences when it comes to payment methods, either due to convenience, security, or demographic factors. To answer this need, online stores need to offer different payment methods so that customers can choose whichever one they feel most comfortable with.
Commercial customers can be allowed to reference the Purchase Order number to pay instead of a payment method for purchases with pre-existing authorization. This payment method is usually applied for wholesale orders. Noting that before accepting payment by purchase order, you should set the credit worthiness of the commercial customer.
Pros: Streamlines checkout for B2B buyers, supports negotiated contracts, and allows merchants to invoice later.
Cons: Requires strong trust, carries risk of delayed or unpaid invoices, and adds manual admin work.
When to use:
Ideal for wholesale, corporate accounts, or long-term customers with established credit terms.
Follow the below steps to configure Purchase Order payment method in Magento 2:
Step 1: Go to Purchase Order tab
Stores > Settings > Configuration.Sales > Payment Methods > Purchase Order.Step 2: Complete the fields in Purchase Order Section
Enabled field, pick Yes to activate the Purchase Order Payment Method.Title field, enter a new title to change or leave the default of Purchase Order to recognize the Purchase Order Payment Method during checkout.New Order Status field, set Pending for new orders to wait until receipt of payment is authorized by admins.Payment from Applicable Countries field, choose All Allowed Countries to accept Purchase Order Payment Method for customers from all countries specified in your store configuration or Specific Countries to approve this payment method for some definite countries which you select from the Payment from Specific Countries list.Minimum Order Total and Maximum Order Total fields, set the order amounts required to qualify for this payment method.Sort Order field, enter a number to determine the position of Purchase Order Payment in the list of payment methods that is shown during checkout (start from 0).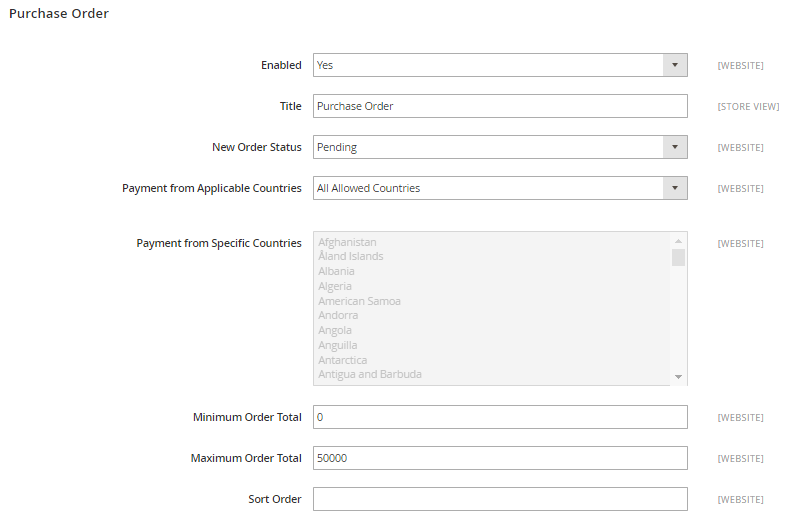
Step 3: Save the configuration
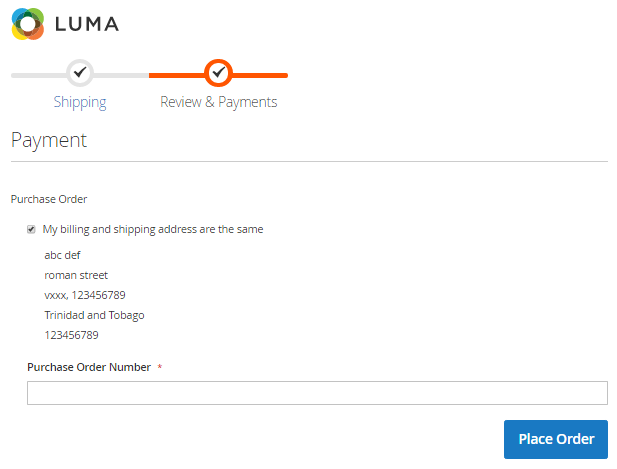
Save Config button in the upper-right corner when you are done.After configuration, you can check the result below:
With the growing demand for secure and reliable transactions, the Bank Transfer payment method has become an essential option for online stores worldwide. To meet this need, Magento 2 gives store owners the flexibility to configure the Bank Transfer Payment Method directly in the admin panel. Merchants can even restrict its availability to specific countries, aligning payment options with their bank location and business requirements.
Pros: No transaction fees for merchants (outside bank fees); secure for large transactions; good for offline or bulk orders.
Cons: Slow processing; requires manual verification; not convenient for everyday shoppers.
When to use:
For B2B, wholesale, or high-value orders where customers prefer direct transfers.
Follow the below steps to configure Bank Transfer payment method in Magento 2:
Step 1: Open the Bank Transfer Payment Section {#step-1-open-bank-transfer-payment-section}
Stores > Settings > Configuration.Sales > Payment Methods > Bank Transfer Payment.Step 2: Set options for Bank Transfer Payment Section {#step-2-set-option-bank-transfer-payment-section}
Enabled field, pick Yes to activate the Bank Transfer Payment Method.Title field, enter a new title to change or leave the default of Bank Transfer Payment to recognize the Bank Transfer Payment Method during checkout.New Order Status field, set Pending for new orders to wait until receipt of payment is authorized by admin.Payment from Applicable Countries field, choose All Allowed Countries to accept Bank Transfer Payment Method for customers from all countries specified in your store configuration or Specific Countries to approve this payment method for some definite countries which you select from the Payment from Specific Countries list.Instructions field, enter guidance for the customer to make a Bank Transfer payment. You had better supply customers with the following information:
Minimum Order Total and Maximum Order Total fields, set the order amounts required to qualify for this payment method.Sort Order field, enter a number to determine the position of Bank Transfer Payment in the list of payment methods that are shown during checkout (start from 0).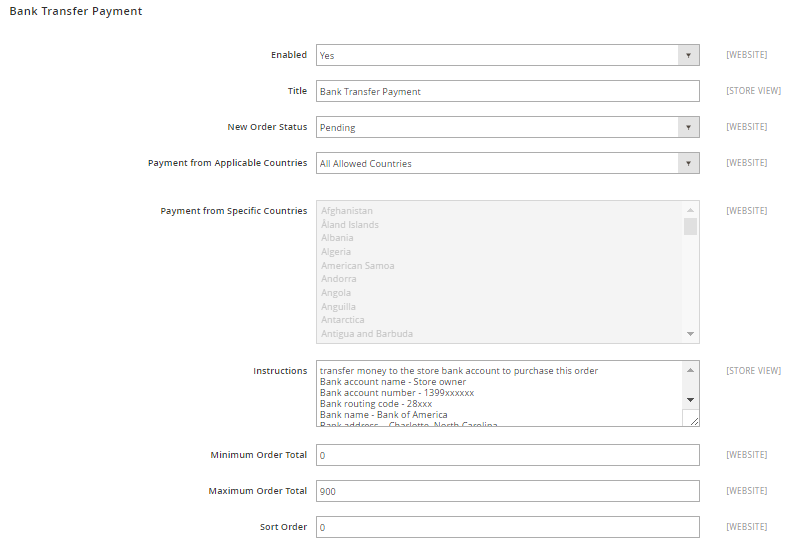
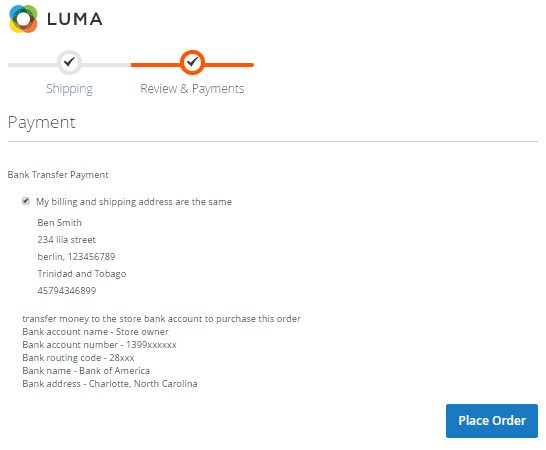
Step 3: Save the configuration {#step-3-save-configuration}
Save Config button in the upper-right corner when you are done.Here is the result:

Cash On Delivery is a type of transaction in which the customer makes payment to the shipping carrier when receiving the goods. This payment method is popular and convenient for buyers who do not prefer online payment methods but still want to send items to a certain address. With Magento Community Edition 2.0, you can accept and adjust Cash On Delivery payments for your store. The cash Delivery payment method is approved by admins for only customers from specific countries, and recipients can make payment by cash, check, or money order.
Pros: Builds trust with new customers; convenient for customers without credit cards.
Cons: Higher risk of order cancellations or returns; adds logistics complexity; may increase fraud risk.
When to use:
In regions where digital adoption is low or customers strongly prefer paying at delivery.
Follow these steps to configure Cash On Delivery Payment Method
Step 1: Go to the Cash On Delivery Payment Section
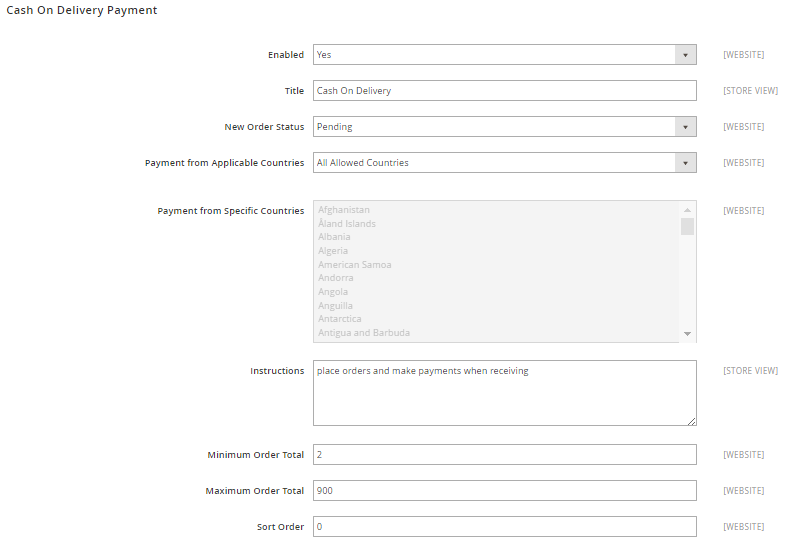
Sales > Payment Methods > Cash On Delivery Payment.Step 2: Complete the fields in the Cash On Delivery Payment Section {#step-2-complete-fields-in-cash-on-delivery-payment}
Enabled field, pick Yes to activate the Cash On Delivery Payment Method.Title field, enter a new title to change or leave the default of Cash On Delivery to recognize the Cash On Delivery payment method during checkout.New Order Status field, set Pending for new orders to wait until receipt of payment is confirmed by admin.Payment from Applicable Countries field, choose All Allowed Countries to accept Cash On Delivery Payment Method for customers from all countries specified in your store configuration or Specific Countries to approve this payment method for some definite countries which you select from the Payment from Specific Countries list.Instructions field, enter guidance for the customer to make a Cash On Delivery payment.Minimum Order Total and Maximum Order Total fields, set the order amounts required to qualify for this payment method.Sort Order field, enter a number to determine the position of Cash On Delivery in the list of payment methods that is shown during checkout (start from 0).
Step 3: Save the configuration {#step-3-save-configuration}
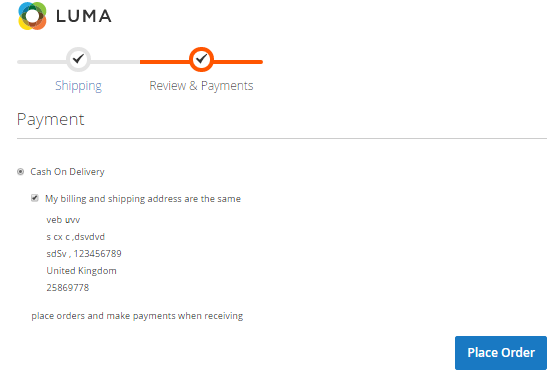
Save Config button in the upper-right corner when you are done.After setting up, you can select the COD payment method as below:
The Check Money Order Payment Method is the replacement of credit cards for online stores that customers can pay by check or money order. This payment method is normally set as default in Magento Community Edition 2.0 and you can now accept payments by check or money order. Actually, the check money order can be determined to be only approved for some specific countries. To manage the Check Money Payment Method, you can follow the steps in the guidance below.
Pros: Simple; useful for businesses dealing with traditional customers or certain government clients.
Cons: Very slow; high risk of fraud or bounced checks; declining usage globally.
When to use:
Rarely used today; still relevant for some offline or B2B transactions.
Follow these steps to configure Check Money Order Payment Method:
Step 1: Launch the Check Money Payment Method {#step-1-launch-check-money-payment-method}
Stores > Settings > Configuration.Sales > Payment Methods > Check / Money Order.Step 2: Complete the fields in Check/Money Order Section {#step-2-complete-fields-in-checkout-money-order-section}
Enabled field, pick Yes to activate Check Money Order Payment Method.Title field, enter a new title to change or leave the default of Check / Money order to recognize the Check Money Order payment method during checkout.New Order Status field, set Pending for new orders to wait until receipt of payment is confirmed by admin.Payment from Applicable Countries field, choose All Allowed Countries to accept the Check Money Order Payment Method for customers from all countries specified in your store configuration or Specific Countries to approve this payment method for some definite countries which you select from the Payment from Specific Countries list.Make Check Payable To field, enter the name of the party to whom the check must be payable.Send Check To field, type the address or PO Box where the checks are mailed.Minimum Order Total and Maximum Order Total fields, set the order amounts required to qualify for this payment method.Sort Order field, enter a number to determine the position of Check / Money Order in the list of payment methods that is shown during checkout (start from 0).
Step 3: Save the configuration
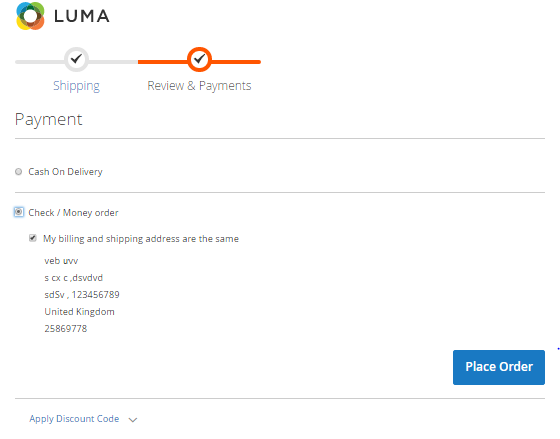
Save Config button in the upper-right corner when you are done.Here is the result:

People will never say no to free products; therefore Zero Subtotal Checkout is the payment method needed for the order that its grand total equals zero. Zero-grand total order may be the result of a discount or applied coupon with free shipping or created manually by admins due to any problem happening with the products in the last orders.
Pros: Seamless checkout when no payment is required; avoids errors for free promotions.
Cons: Limited use cases; must ensure it’s not abused for fraudulent orders.
When to use:
For orders where total = $0 (e.g., 100% discount, gift cards, reward points).
Follow the steps below to Configure Zero Subtotal Checkout Payment Method in Magento 2:
Step 1: Open the Zero Subtotal Checkout Tab {#step-1-open-zero-subtotal-checkout-tab}
Stores > Settings > Configuration.Sales > Payment Methods > Zero Subtotal Checkout.Step 2: Set options for Zero Subtotal Checkout Section
Title field, enter a new title to change or leave the default of “No Payment Information Required” to recognize the Zero Subtotal Checkout Payment Method during checkout.Enabled field, pick Yes to activate Zero Subtotal Checkout Payment Method.New Order Status field:
Pending for new orders to wait for the authorization;Processing if the payment is already authorized and processing;Suspected Fraud if a fraud is detected.Payment from Applicable Countries field, choose All Allowed Countries to accept Zero Subtotal Checkout Payment Method for customers from all countries specified in your store configuration or Specific Countries to approved this payment method for some definite countries which you select from the Payment from Specific Countries list.Sort Order field, enter a number to determine the position of Zero Subtotal Checkout Payment in the list of payment methods that is shown during checkout (start from 0).

Step 3: Save the configuration
Save Config button in the upper-right corner when you are done.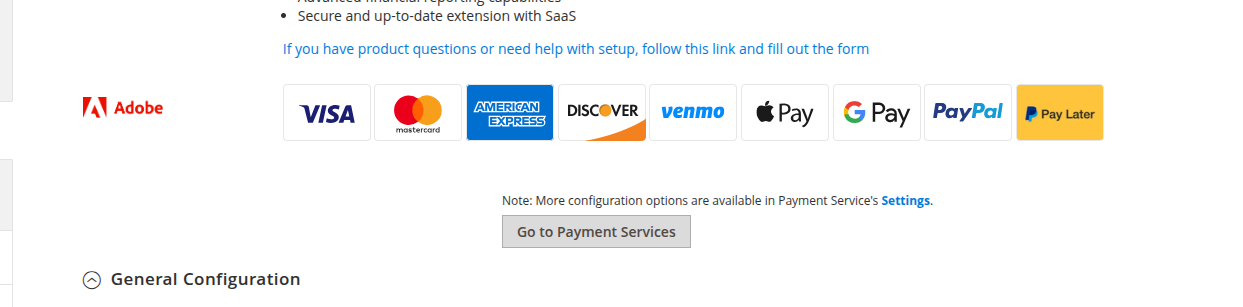
Prerequisites:
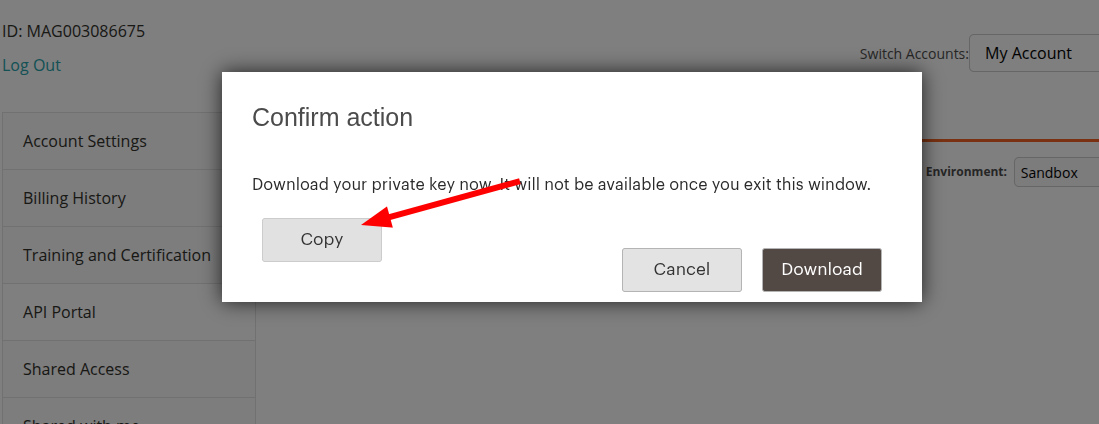
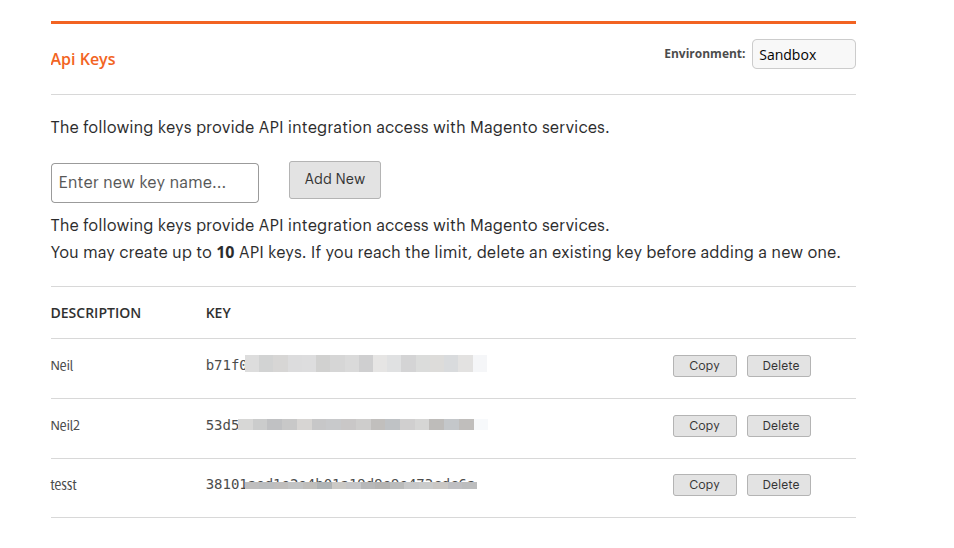
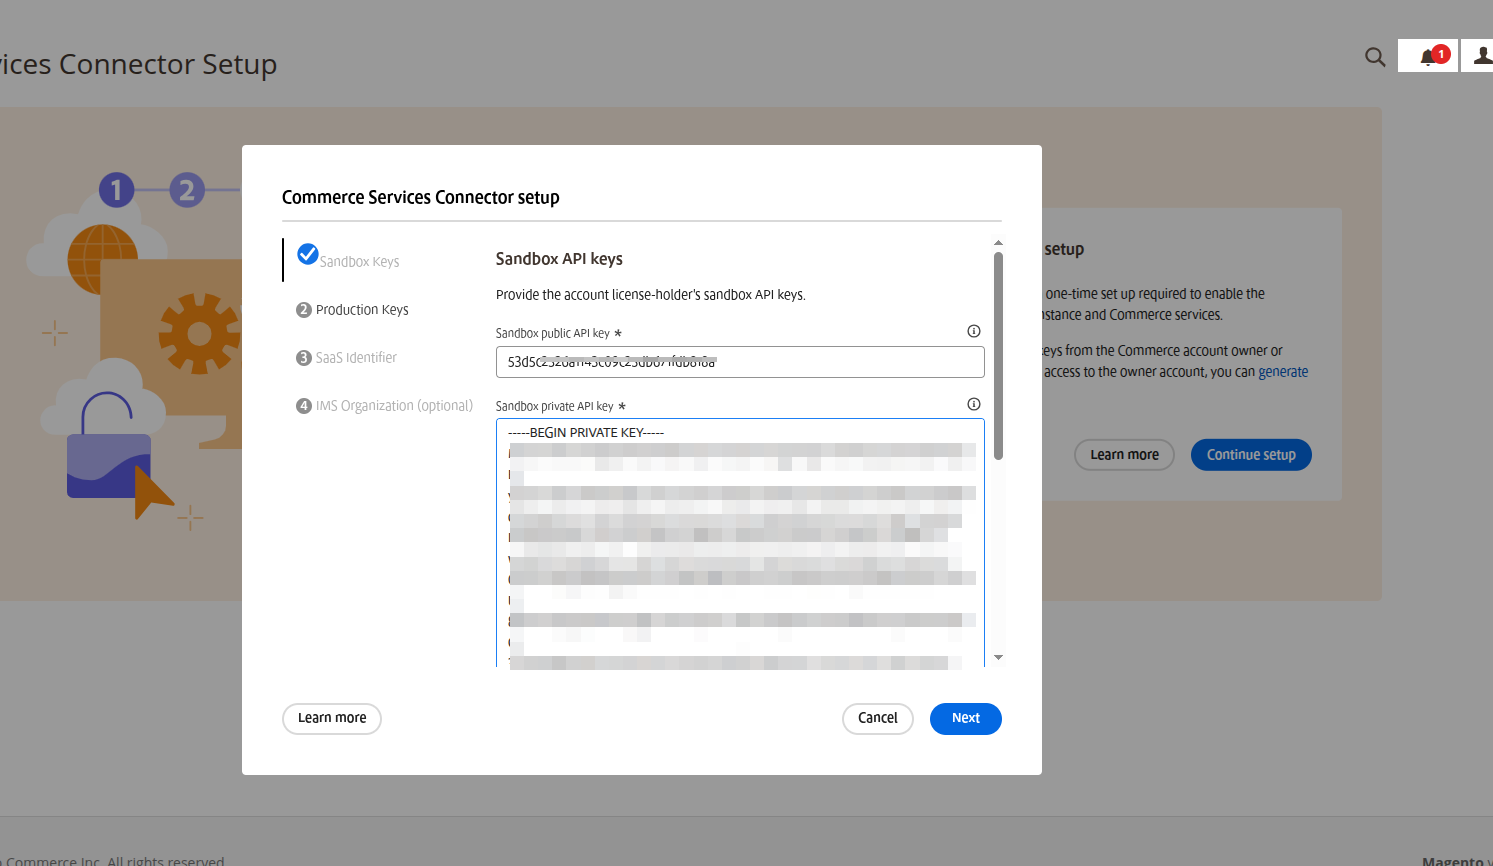
Step 1: Connect Magento to Adobe Payment Services

Click the Configure Commerce Services Connector button. If you’ve already passed that step, you can ignore this
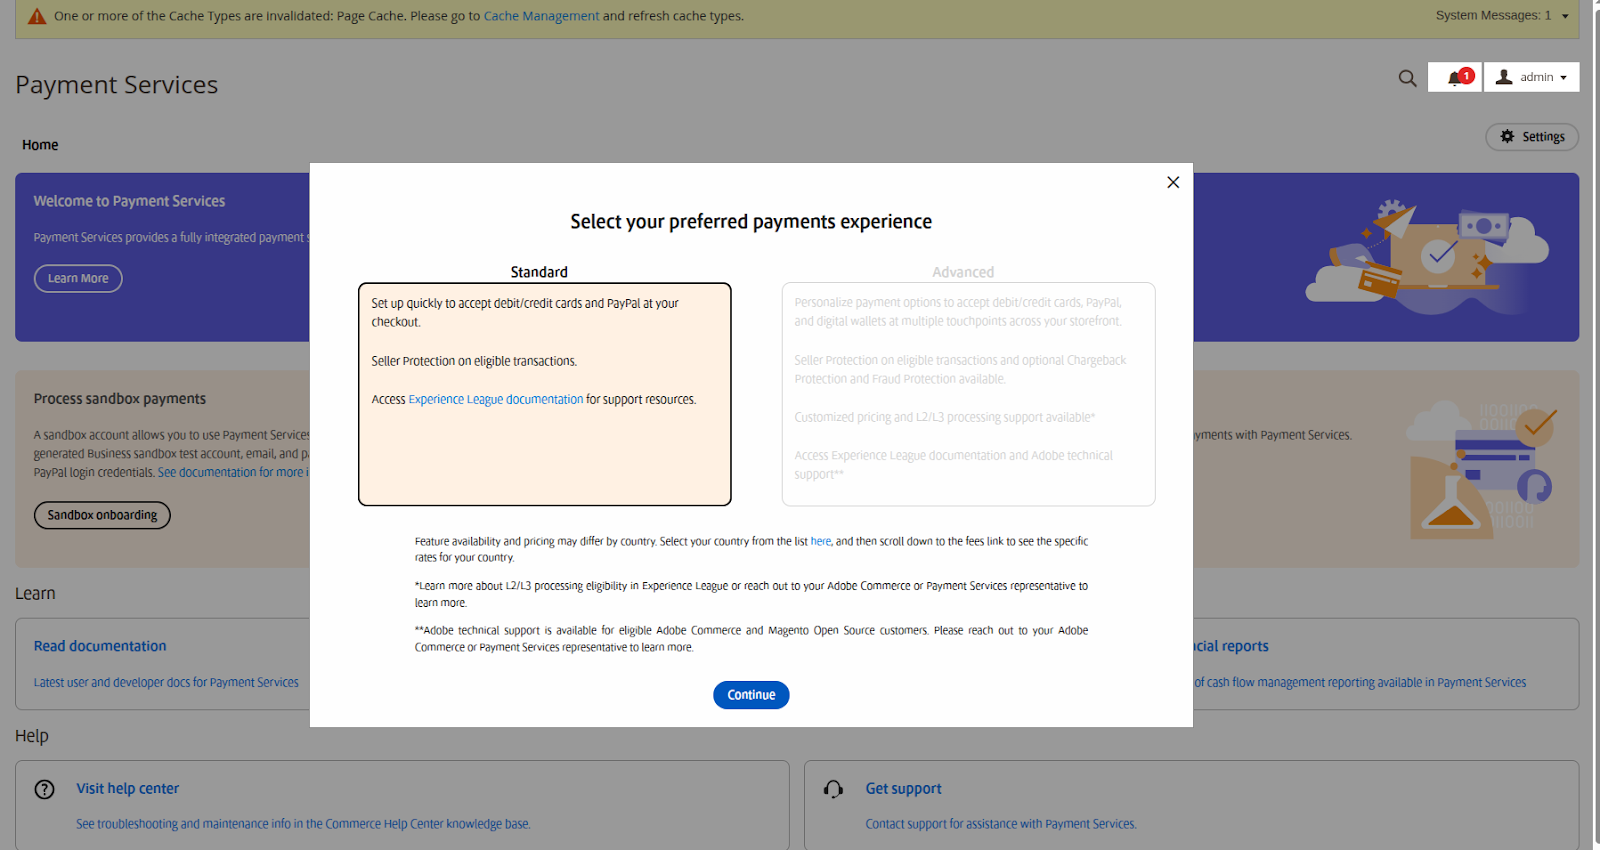
Step 2: Select Preferred Payment
Now, let’s configure the preferred payments experience.
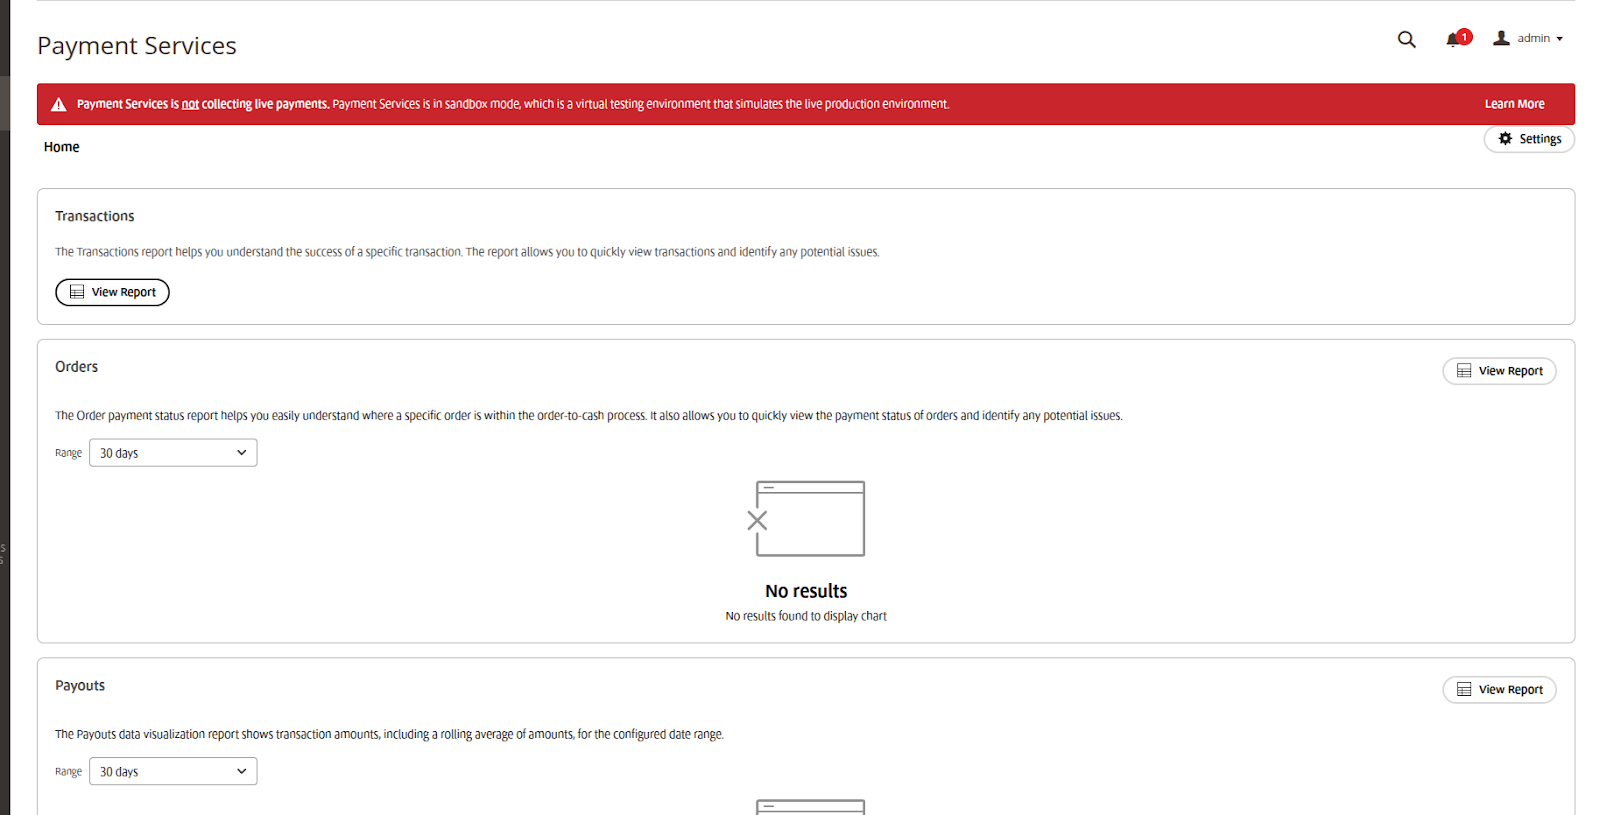
After successful setup, you will see this result on Payment Services
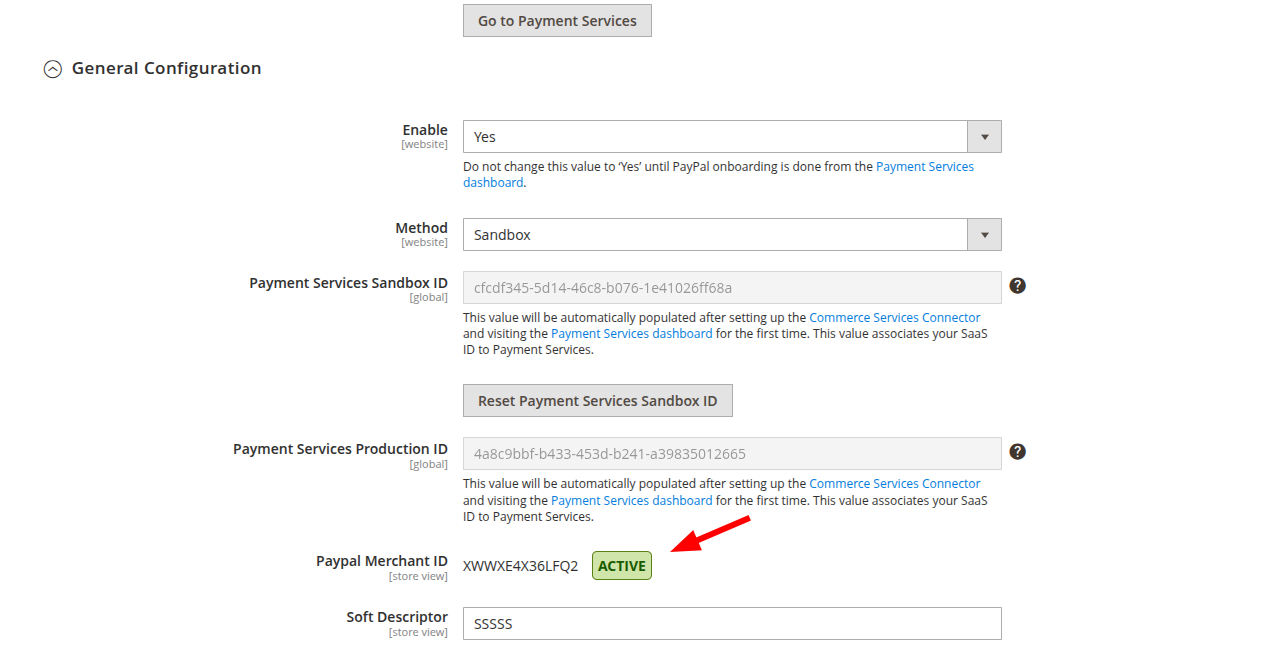
In the General Configuration section, you can see the Active status:
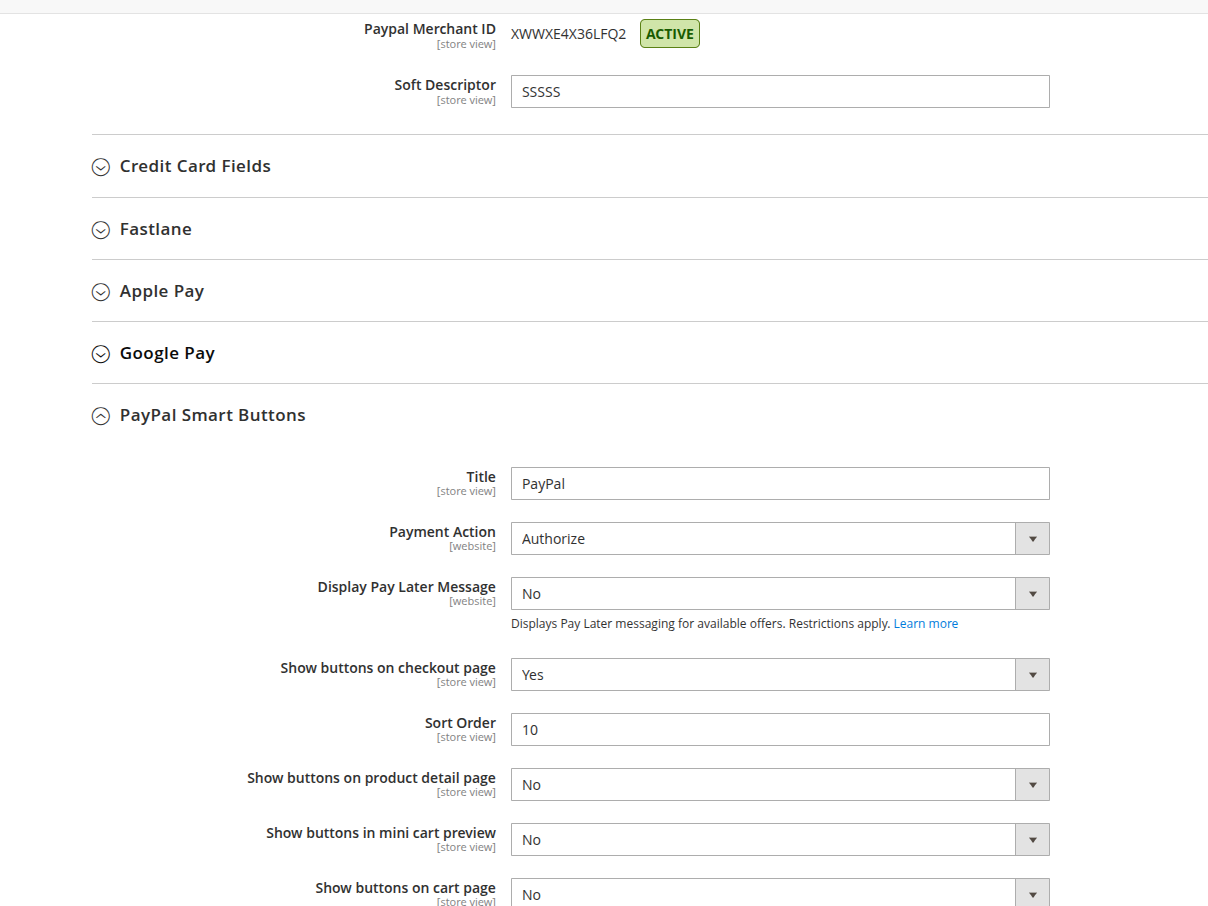
Step 3: Set your payment method
Let’s set up your Payment you want to use:
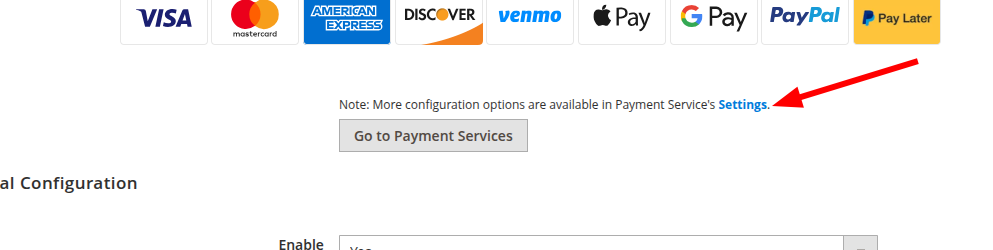
Next, click Settings
Follow steps in the General Settings:

Here is the result on frontend:
PayPal Express Checkout Payment Method is the most convenient payment method on the internet nowadays. It is confirmed that integrating PayPal into your store can increase conversion rate twice and raise the overall number of customers by up to 29%. PayPal is trusted and used widely for its fast checkout, utility when accepting debit cards, credit cards, and almost all currencies in the world, as well as absolute security. For all the reasons above, PayPal Express Checkout appears in every online store. To manage the PayPal Express Checkout Payment Method on your Magento website, let’s follow the steps below.
Pros: Instant checkout; trusted brand increases conversion; no need for customers to enter card details.
Cons: Fees can be higher than some gateways; PayPal disputes may favor customers; not all regions support PayPal.
When to use:
If you want to offer a fast, trusted, and widely recognized digital wallet.
Follow these steps to Configure PayPal Express Checkout Payment Method in Magento 2:
Step 1: Prepare PayPal Account {#step-1-prepare-paypal-account} Before integrating PayPal to your store, you should configure your PayPal account to take the information of your PayPal account ID, your email address, your API username, your API password, and your API signature.
Service Settings > Hosted Checkout Pages > Set Up, then set AVS field to No, CSC field to No and Enable Secure Token to Yes.Save.Save.Required PayPal Settings and set the options for the section.Email Address field, type the exact email that is used to sign up for your PayPal merchant account.API Authentication Methods field, select API Signature or API Certificate.Credentials from PayPal is an optional section; complete it if needed.Yes if you are using credentials from your sandbox account. Then, click Sandbox Credentials and follow the instructions to set up your testing environment if needed.API Uses Proxy to Yes and complete the Proxy Host and Proxy Port fields.Enable this Solution to Yes.Save config and start working with the Magento site.Step 2: Prepare for PayPal Express Checkout Configuration {#step-2-prepare-paypal-express-checkout-configuration} This step is used to build a basement to configure PayPal Express Checkout.
Stores > Settings > Configuration.Sales > Payment Methods.Store View in the upper-left corner where the configuration applies.Additional payment solutions and click Configure on PayPal Express CheckoutPayPal All-In-One Payment Solutions or PayPal Express Checkout to click Configure.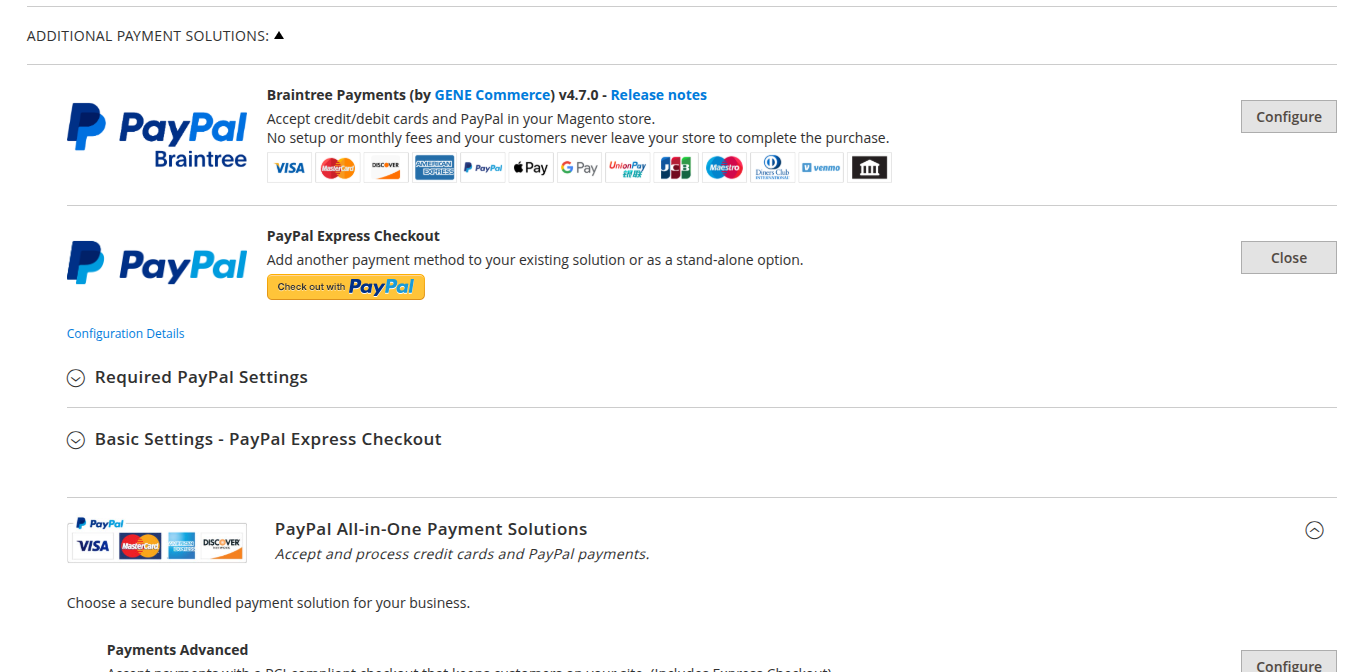
Step 3: Set options for Required Settings {#step-3-set-options-for-required-settings}
In Magento 2, you can choose to use PayPal Express Checkout or PayPal All-In-One solution. Once you configure a solution, the other is automatically deactivated. Both PayPal Express Checkout and PayPal All-In-One solution have three-part of settings: Required settings, Basic settings, and Advanced settings, therefore the guidance below only consists of the PayPal Express Checkout.
Expand the Required PayPal Settings then Express Checkout section.
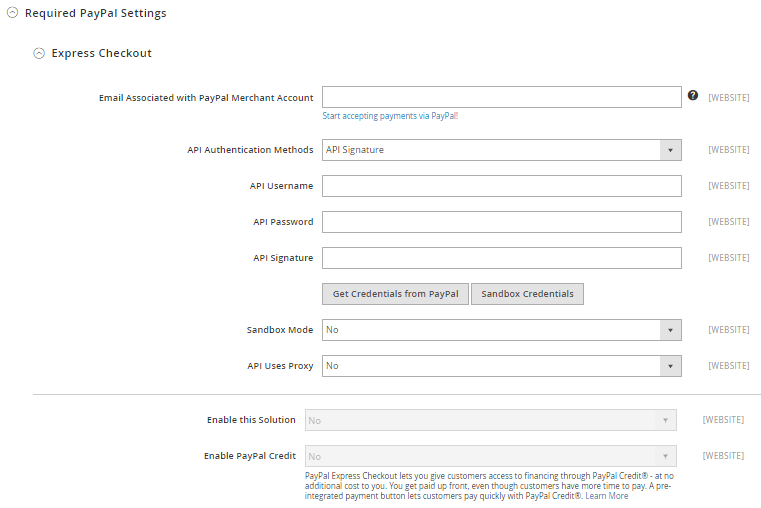
Email Associated with PayPal Merchant Account field, enter the exact mail that is specified in your merchant PayPal account.API Authentication Methods field, select one of the following:API Signature and fill the API Username, API Password and API Signature fields.API Certificate and fill in the API Username and API Password fields. In the API Certificate field, upload a file of the API Certificate to complete.Get Credentials from PayPal or Sandbox Credentials if needed, and a link to PayPal will be opened in a new window. You should log in and follow the instructions.API Uses Proxy to Yes, then complete the Proxy Host and Proxy Port fields.Enable This Solution field, choose Yes to activate PayPal Express Checkout.Enable PayPal Credit field, select Yes to accept PayPal Credit on your store.Advertise PayPal Credit section.Get Publisher ID from PayPal and take your account ID information, then fill in the Publisher ID field.Home Page section and set the options.Display field, choose Yes to enable the banner to appear on the Home Page or “No” to disable it.Position field, select the location of the banner on the Home Page.Size field, set the size of the banner that is suitable for your store.Catalog Category Page, Catalog Product Page, and Checkout Cart Page sections.Step 4: Set options for Basic Settings {#step-4-set-options-for-basic-settings}
You will start to configure how PayPal Express Checkout displays in this step.
Basic Settings section.Title field, enter a new title or leave it in default of PayPal Express Checkout.Sort Order field, enter a number to determine the position of PayPal Express Checkout Payment in the list of payment methods that is shown in the checkout page (start from 0).Payment Action field, set to one of the following:Authorization to approve the purchase but puts a hold on the funds to wait for them to be “captured” by the merchant.Sale to imply that the purchase is already authorized and can be withdrawn from the customer’s account at once.Order to show that the order is neither authorized nor captured. When Order is chosen, there are three more fields to complete. Note that, to change any default data in these fields, you need to contact to PayPal.Display on Product Details Page field, select Yes to display the Checkout with PayPal button on the product page.

Step 5: Set options for Advanced Settings {#step-5-set-options-for-advanced-setting} The advanced settings section includes advanced configuration when integrating PayPal.
Advanced Settings section.Display on Shopping Cart field, choose Yes to display the Checkout with PayPal button in the shopping cart.Payment Applicable From field, choose All Allowed Countries to accept PayPal Express Checkout for customers from all countries specified in your store configuration or Specific Countries to approve this payment method for some definite countries which you select from the Payment from Countries Payment Applicable From list.Debug Mode field, set Yes to write communications with the payment system into the log file. The log file for PayPal Payments Advanced is payments_payflow_advanced.log.Enable SSL Verification field to Yes to enable host authenticity verification.Enable SSL Verification to Yes to enable host authenticity verification.Transfer Cart Line Items to Yes to display a full summary of the customer’s order by line item from the PayPal site then set Transfer Shipping Options to Yes to include up to ten shipping options in the summary.Shortcut Buttons Flavor field, to determine the type of image used for the PayPal acceptance button, choose Dynamic to display an image that can be dynamically changed from the PayPal server or choose Static to display a specific image that cannot be dynamically changed.Enable PayPal Guest Checkout to Yes to allow customers without PayPal accounts to make purchases with this method.Require Customer’s Billing Address field, choose Yes to require the customer’s billing address for all purchases; choose No to exclude the requirement or choose For Virtual Quotes Only to require the customer’s billing address for virtual quotes only.Billing Agreement Signup field, set Auto to allow your customers to sign a billing agreement during the Express Checkout flow or use another method of payment; set Ask Customer to allow your customers to decide whether to sign a billing agreement during the Express Checkout flow or set Never to disable signing a billing agreement during the Express Checkout flow.Skip Order Review Step to Yes to let the customer complete the transaction from the PayPal site without returning to your Magento store for Order Review.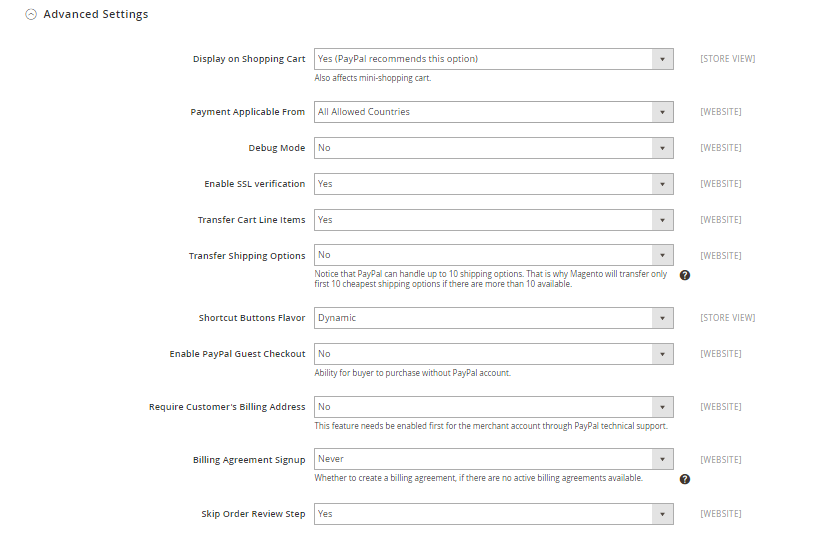
Save Config to save the process or continue with three more sections below if necessary for your store.PayPal Billing Agreement Settings to configure Billing Agreement for customers who have already entered into a billing
agreement with your company.Enabled to Yes to activate the PayPal Billing Agreement, then complete the settings in the same way as the instructions for the PayPal Express Checkout.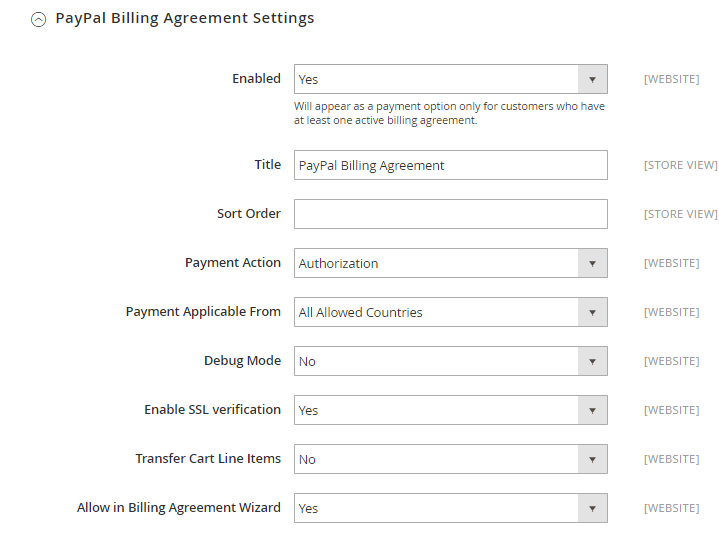
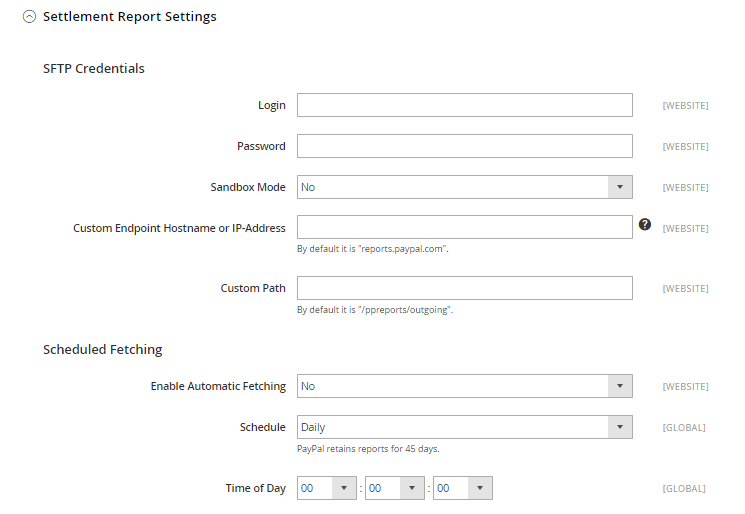
Settlement Report Settings section, If you have signed up for PayPal’s Secure FTP Server, enter the SFTP login
credentials in Login and Password fields.Sandbox Mode to Yes to run test reports before “going live” with Express Checkout on your site.Custom Endpoint Hostname or IP Addressfield. By default, the value is: reports.paypal.com.Custom Path field to show where reports are saved. By default, the value is: /ppreports/outgoing.Under Scheduled Fetching, set Enable Automatic Fetching to Yes to generate reports according to a schedule and choose the frequency to generate the report in the Schedule field. Then in the Time of Day field, set the hour, minute, and second when you want the reports to be generated.
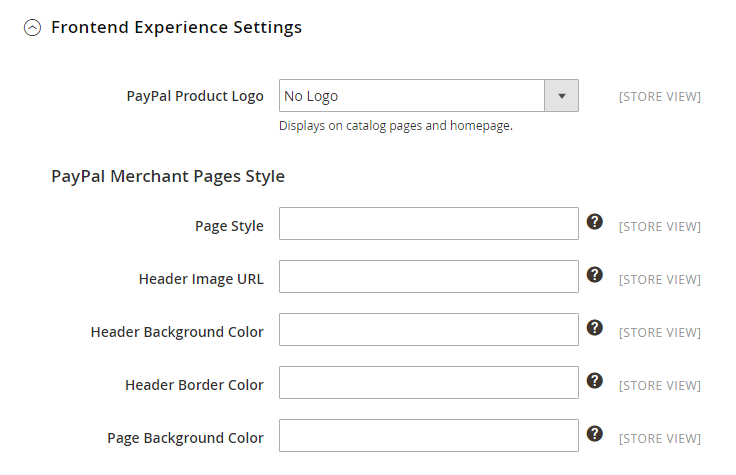
Frontend Experience Settings, allows you to customize the appearance of your PayPal merchant pages and PayPal logos on your site.PayPal Product Logo field, choose the size of PayPal Logo to display on your catalog pages and homepage.Page Style field, enter the name of the page style that you want to apply to your PayPal merchant pages.Header Image URL field, enter the URL of the image you want to appear in the upper-left corner of the payment page. The maximum file size is 750 pixels wide by 90 pixels high.In the Header Background Color, Header Border Color and Page Background Color fields, enter the six-character hexadecimal code, without the “#” symbol to complete.
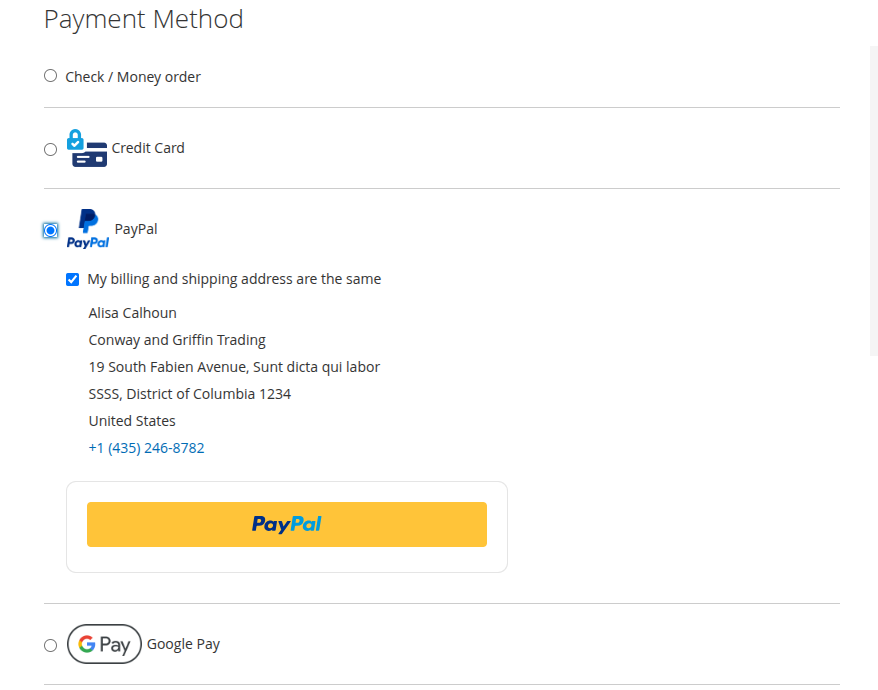
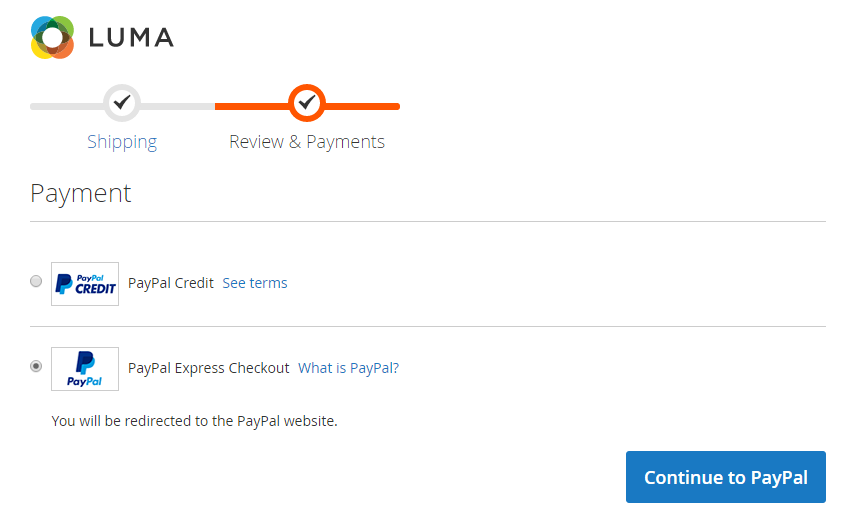
Save Config button in the upper-right corner when you are done.Check the result below:
Braintree is a full-stack payment platform that allows your customers to check out by accessing credit and debit cards, PayPal, Apple Pay, Android Pay, Venmo, Bitcoin, and more. With the Braintree platform, you can easily accept payment from an app or website. Notice that Braintree Payment Method can only be used with your store when Magento Secure Payment Bridge is enabled and configured correctly.
In short, before starting the configuration to set the Braintree payment method in your Magento store, you may want to find more details about Braintree and its acceptable use policy on its site.
Note: In the Magento 2.4.0 release, Braintree payment method extension is now included.
Pros: Wide payment options; strong fraud protection; supports recurring/subscription payments; smooth checkout.
Cons: Transaction fees apply; setup can be slightly technical; may not be ideal for very small merchants.
When to use:
If you want an all-in-one solution that supports credit/debit cards, PayPal, Apple Pay, Google Pay, and recurring billing.
Follow these steps to configure Braintree Payment Method in Magento 2:
Step 1: Start the Braintree Payment Method Configuration {#step-1-start-braintree-payment-method-configuration}
[Stores](https://www.mageplaza.com/kb/setup-magento-2-multi-store.html) > Settings > Configuration.Sales > Payment Methods.Braintree section then click on the Configure button to start the configuration.
Step 2: Set options for Basic Braintree Settings {#step-2-set-options-for-basic-settings}
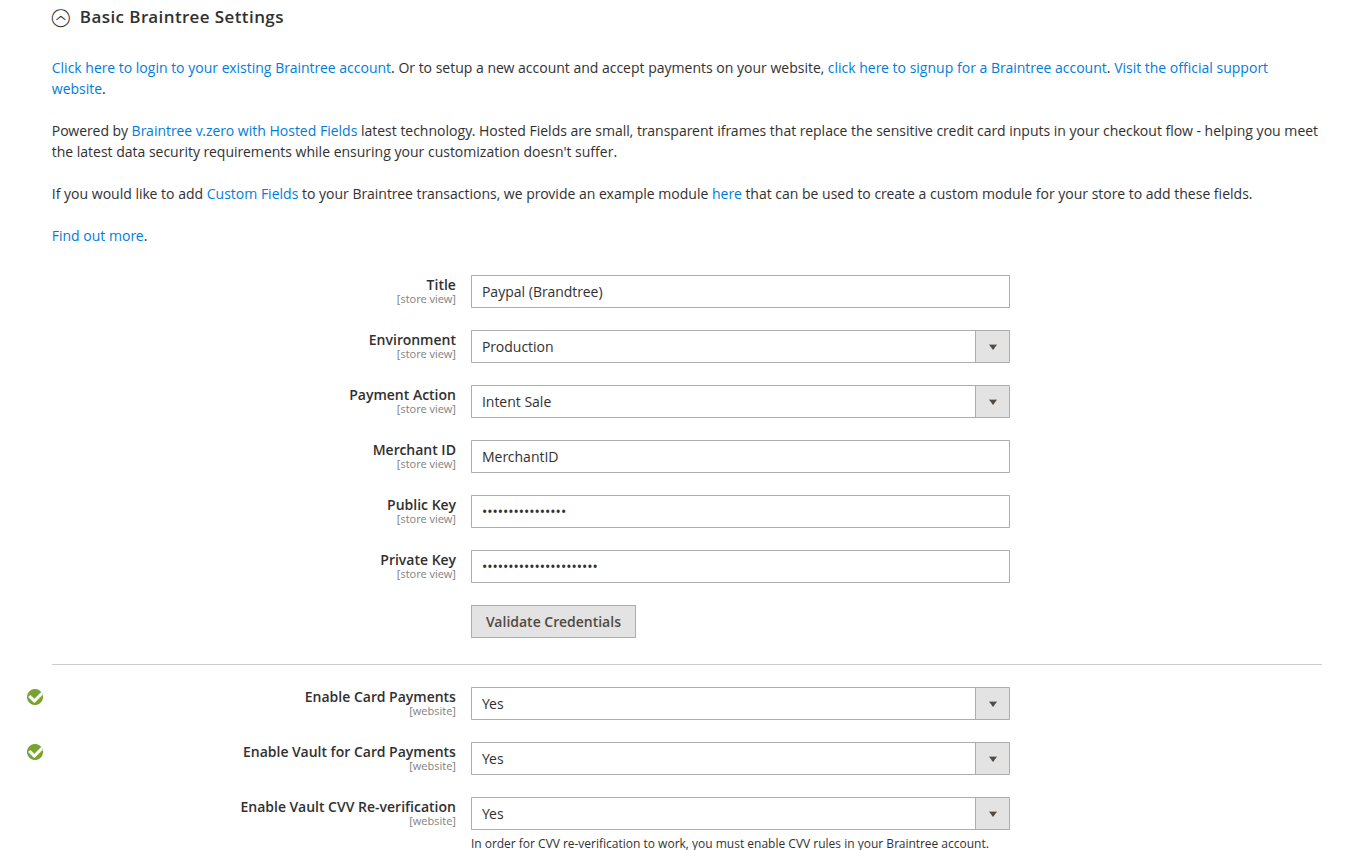
Basic Braintree Settings section, go to Braintree Payments to log in or sign up for a new account or click on Click here to login to your existing Braintree account Or click here to signup for a Braintree account and get your credentials.Title field, enter a new title or leave the default of Credit Card (Braintree).Environment field, set Sandbox to configure in the test environment or set Production when you are ready to go live.Payment Action field, select Authorize Only to approve the purchase, but put a hold on the funds to wait for being captured by the merchant or Authorize and Capture to imply that the purchase is already authorized and can be withdrawn from the customer’s account at once.Merchant Account ID, Merchant ID, Public Key and Private Key fields, Enter the credentials from your Braintree account.Enable this Solution to Yes to activate the Braintree payment method.Enable PayPal through Braintree to Yes to include PayPal as a payment option with Braintree.Step 3: Set options for Advanced Braintree Settings {#step-3-set-options-for-advanced-settings}

Debug to Yes to save a log file of interactions between your store and Braintree.Capture action field, choose Invoice to create an invoice when the payment is captured or Shipment to create invoice and shipment record when the payment is captured and change the status of the order to Authorized.New Order Status field, set Processing or Suspected Fraud.Yes to store customer credit card information in the Braintree vault.Allow Duplicate Cards field is set to No by default. You can change this setting at your discretion.CVV Verification to Yes to require customers to provide the 3-digit security code from the back of a credit card. If you want to use CVV verification, make sure to enable AVS and/or CVV in the Settings/Processing section of your Braintree account.Credit Card Types list, choose the types of credit cards that are accepted by your store as payment through Braintree.Enable Credit Card auto-detection on Storefront to Yes to detect the credit card type when the customer enters the number.Advanced Fraud Protection to Yes to apply Braintree fraud protection to transactions. Make sure that Advanced Fraud Protection is enabled in the Settings/Protection section of your account.Yes to improve performance by caching some results. Notice that the Magento cache must be enabled to use the cache with Braintree.Sort Order field, enter a number to determine the position of Braintree Payment Method in the list of payment methods that is shown on the checkout page (start from 0).Step 4: Set options for Country Specific Settings {#set-options-for-country-specific-settings}
Payment from Applicable Countries field, choose All Allowed Countries to accept Braintree Payment Method for customers from all countries specified in your store configuration or Specific Countries to approve this payment method for some definite countries which you select from the Payment from Specific Countries list.Country Specific Credit Card Types section:
Add button.Country and choose the Allowed Credit Card Type from the list.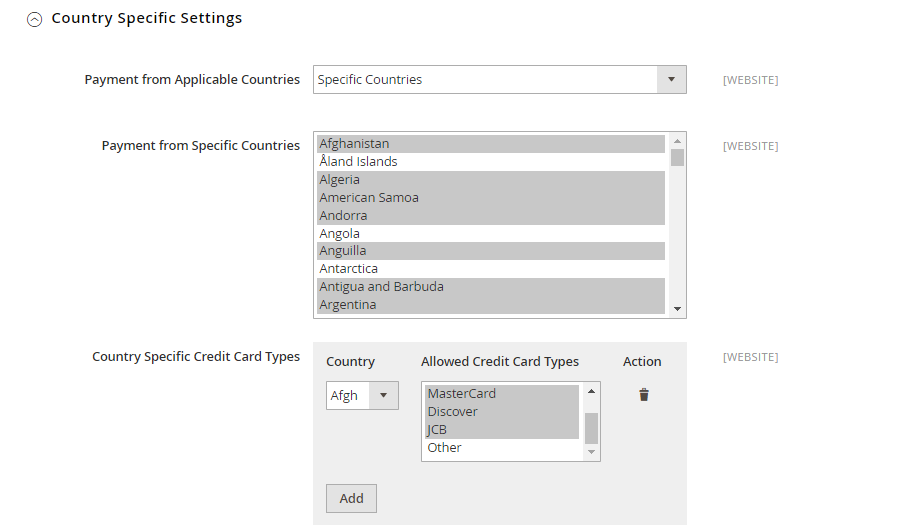
Step 5: Enable the Payment you want
In this guide, let’s take examples for GooglePay through Braintree and Paypal through Braintree:
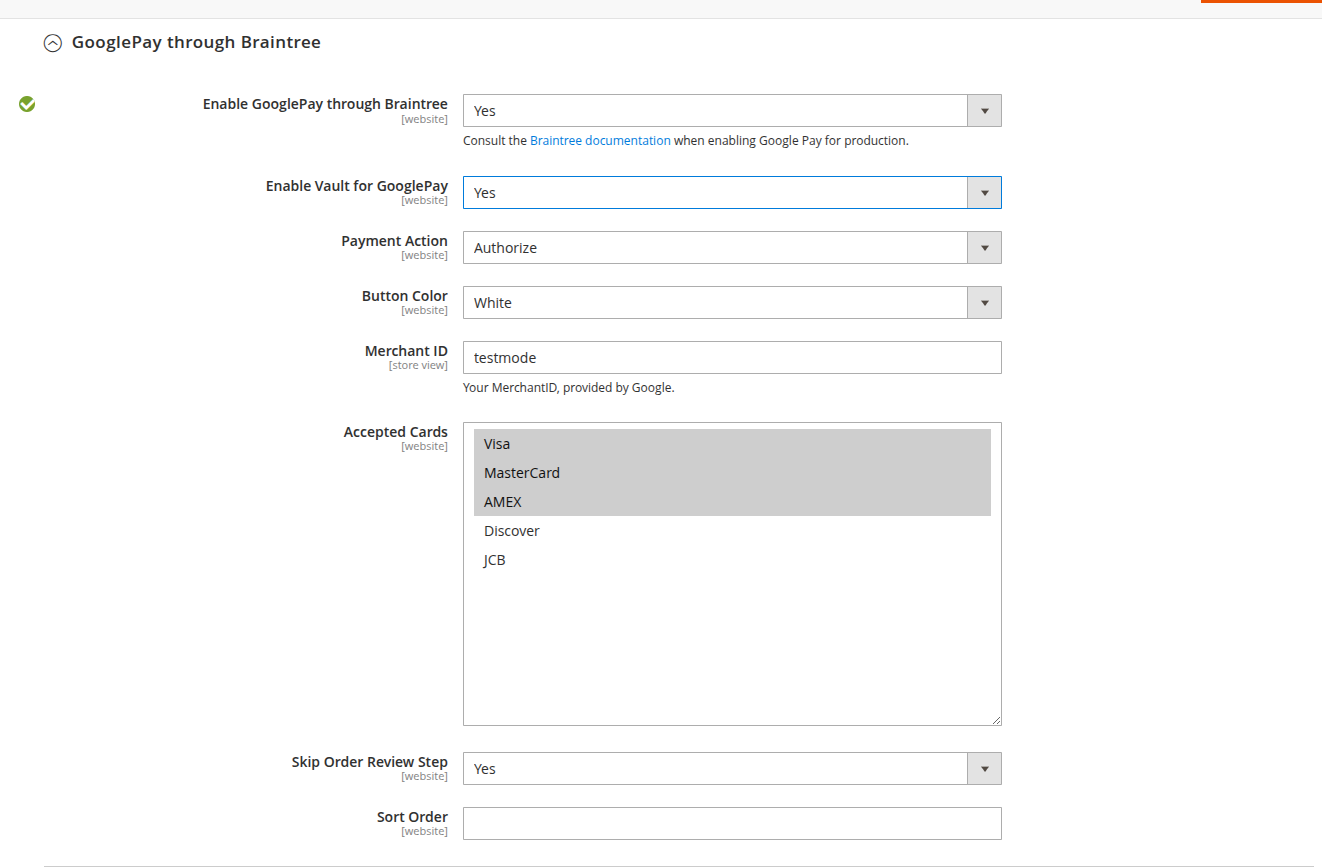
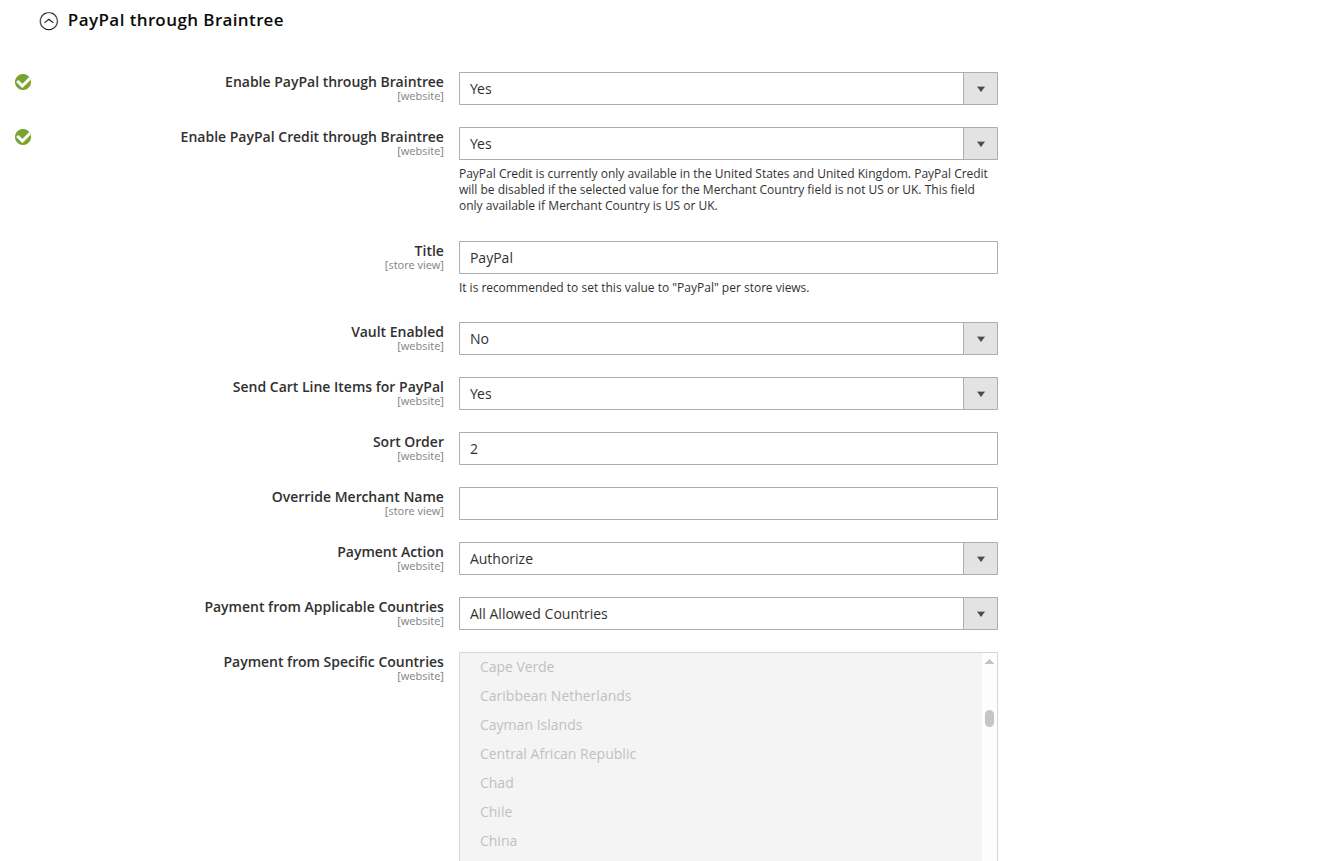
Title field, enter a new titleSort Order field, enter a number to determine the position of Braintree’s payment by PayPal in the list of payment methods that is shown during checkout (start from 0).Override Merchant Name field, enter the name as you want it to appear to display your merchant name differently than what is specified in your store configuration.Payment Action field, set Authorize to approve the purchase, but puts a hold on the funds to wait for being captured by the merchant or Authorize and Capture to imply that the purchase is already authorized and can be withdrawn from the customer’s account at once.Payment from Applicable Countries field, choose All Allowed Countries to accept Braintree’s payment by PayPal for customers from all countries specified in your store configuration or Specific Countries to approved this payment method for some definite countries that you select from the Payment from Specific Countries list.Require Customer’s Billing Address to Yes to require that customers provide a billing address.Display on Shopping Cart to Yes to display the PayPal button in the mini shopping cart and on the shopping cart page.Allow to Edit Shipping Address Entered During Checkout) on PayPal Side to Yes to enable customers to edit the shipping address while completing a PayPal transaction.Debug to Yes to save a log file of interactions between your store and PayPal through Braintree.Step 6: Set options for 3D Verification Settings {#step-6-set-options-for-3d-verfication-settings}
3d Secure Verification to Yes to add a verification step for customers using credit cards that are enrolled in a verification program such as Verified by VISA.Save Config button in the upper-right corner when you are done.
There are 3 more options:
Threshold amount. The minimum order amount required to trigger 3DS.Applicable Countries or for Specific Countries.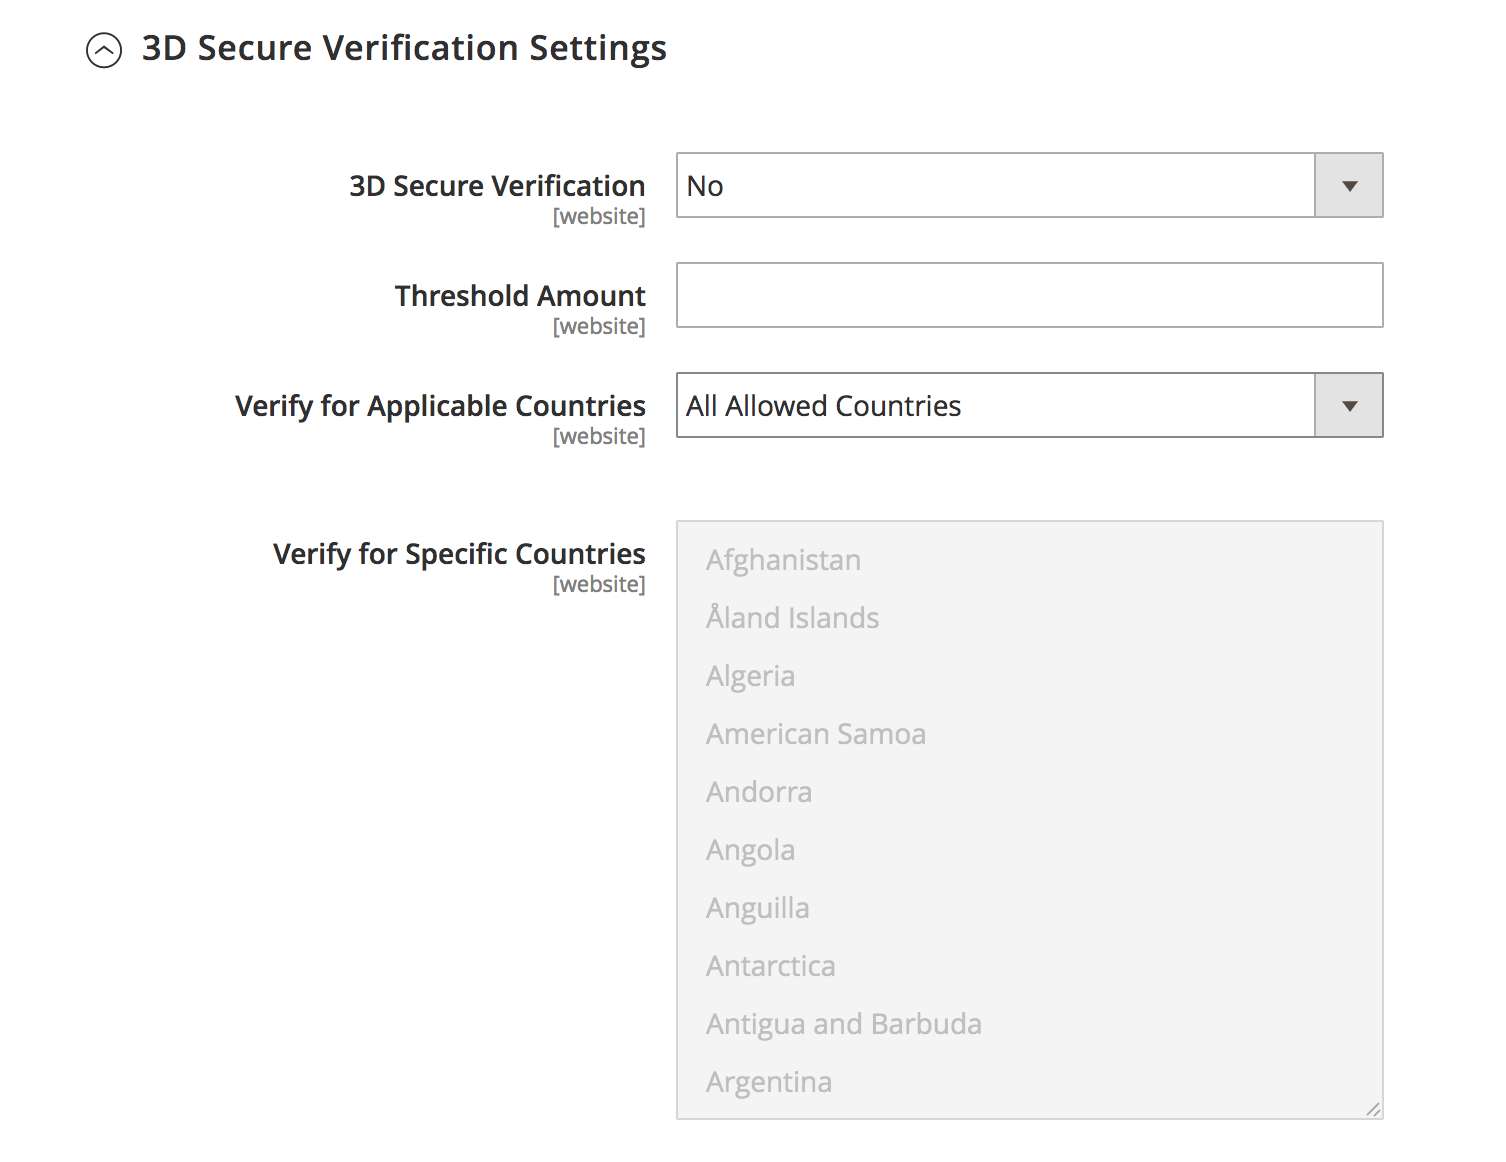
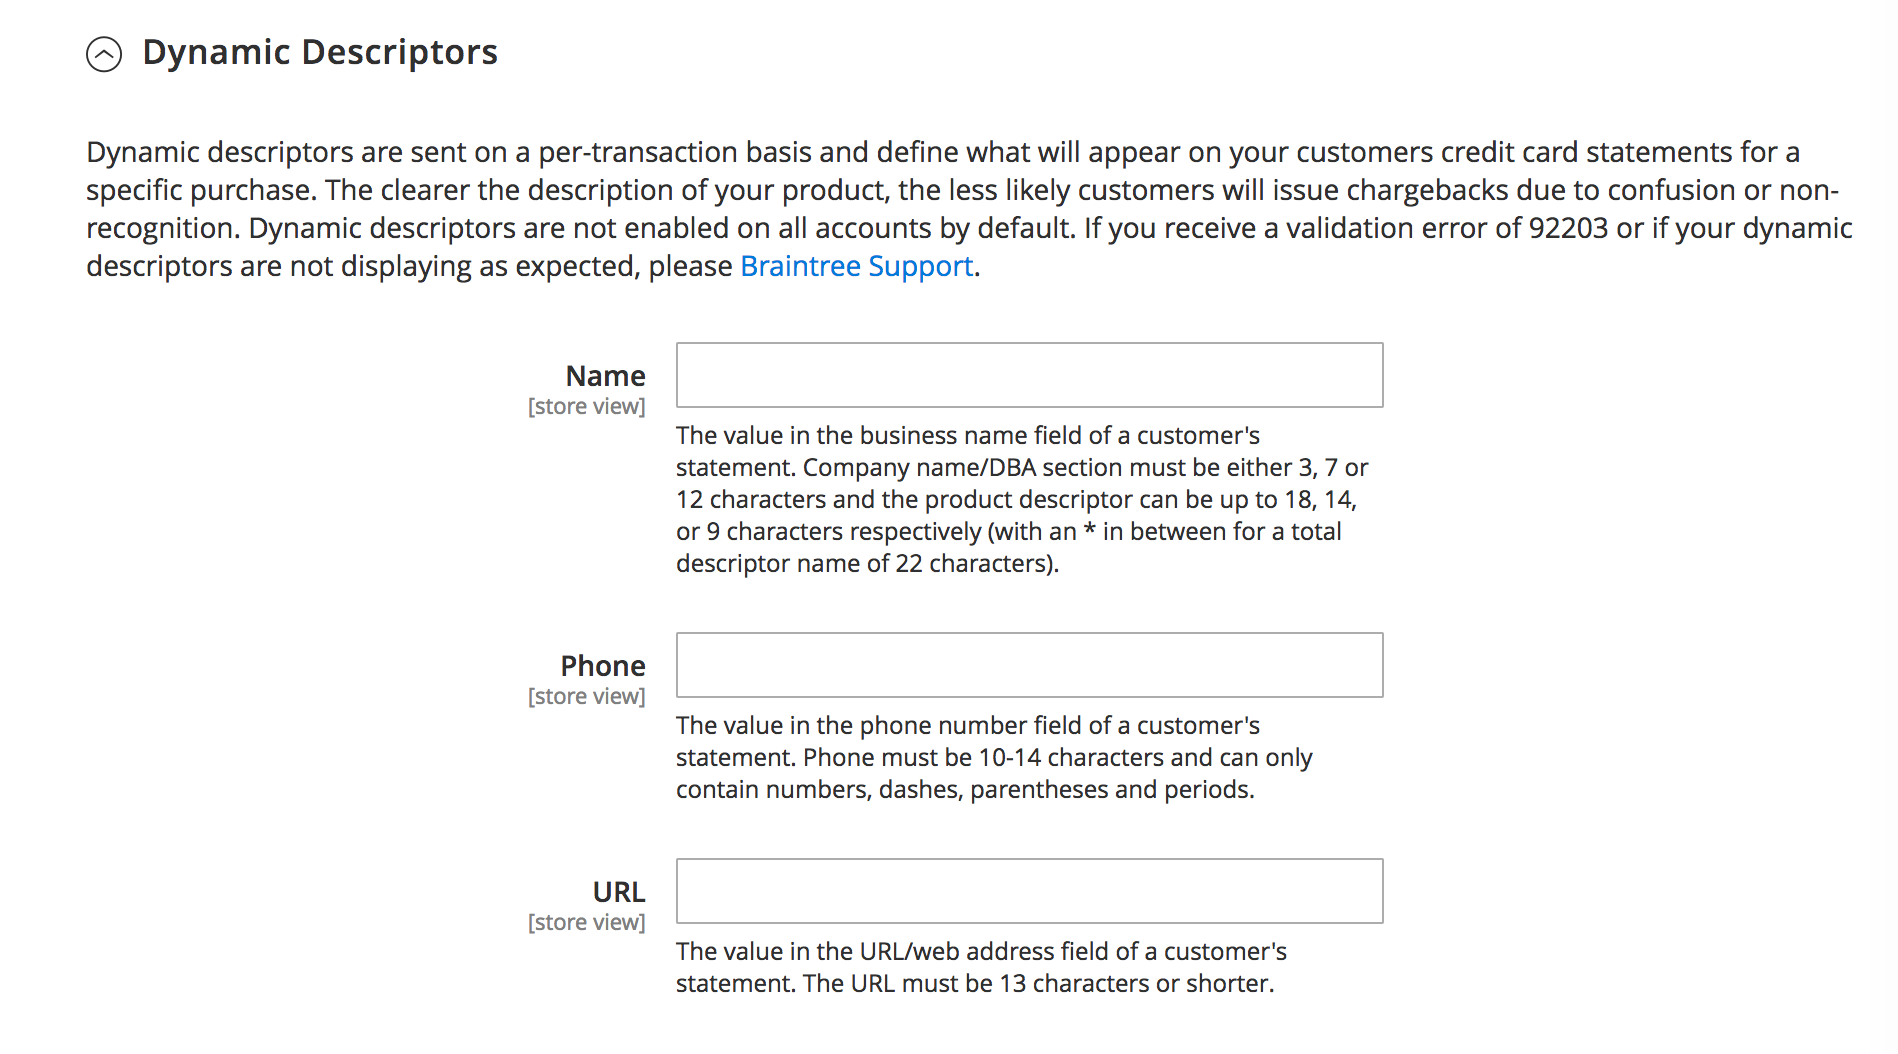
Step 7: Set Dynamic Descriptors
Basically, Dynamic Descriptors are custom descriptors configured and passed with each transaction via the API. In this section, there are 3 options for filling out the description’s Name, Phone number, and URL.

Authorize.Net Direct Post is useful for Magento website that have a plenty of stores as merchants who can totally manage their checkout pages. Particularly, merchants have the own accounts on Authorize.Net and they will complete all checkout content and forms on their sites. In fact, this will bring more security for merchant payment information as the form is posted to Authorize.Net’s secure servers. It is clearly visible that Authorize.Net Direct Post plays the role of third-party in Magento site, the same as PayPal. However, with Authorize.Net, customers can finish the transaction process while remaining in the Magento store, instead of being redirected to the third-party website.
Note: From Magento 2.4 forwards, the Authorize.Net payment method has been removed. If merchants want to continue using this method, they should install the extension on the Commerce Marketplace.
Pros: Secure, PCI-compliant; supports recurring billing; fraud protection tools included.
Cons: Requires monthly fees and transaction fees; setup is more complex than PayPal; limited availability outside the U.S.
When to use:
If you’re based in the U.S. and want a reliable gateway for credit card payments.
Follow theese steps to configure Authorize.Net Direct Post in Magento 2:
Step 1: Prepare for Authorize.Net Direct Post Method This step is about preparing the appearance of Authorize.Net Direct Post payment method to display on your checkout page. Let’s follow the instruction below.
Stores > Settings > Configuration.Sales > Payment Methods.Authorize.Net Direct Post section and set options.
Enabled field, set Yes to activate Authorize.Net Direct Post.Set Payment Action field, select Authorize Only to accept Authorize.Net to authorize customer’s funds, and create an order in your store. After the process, you can compose an invoice and capture the customer’s funds. Or select Authorize and Capture to let Authorize.Net authorize and capture customer’s funds and creates an order and invoice in your store.Title field, enter a new name for Authorize.Net Direct Post to show on the checkout page or leave the default of “Credit Card Direct Post (Authorize.net)”.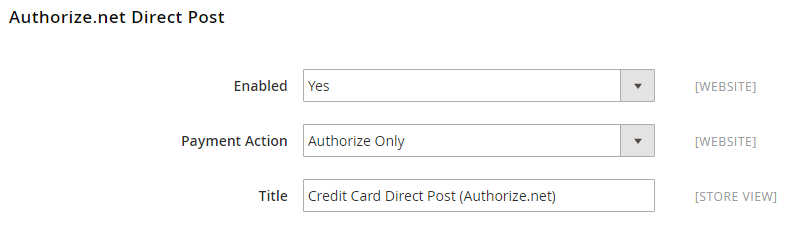
Step 2: Set the basement Before launching the Authorize.Net Direct Post Method for your Magento store you need to set the basement which actually is the process of providing your Authorize.Net merchant account.
API Login ID, Transaction Key and Merchant MD5 fields, enter your credentials and hash value from your Authorize.Net merchant account. You can find hash value on the Authorize.Net website at Account > Settings > Security Settings > MD5-Hash.New Order Status field, set Processed Ogone Payment or Processing to be suitable with the nature of the transaction.Test Mode field to Yes to set your configuration in the test environment. When you are sure that the system runs well and there is no bug, turn Test Mode into No for adapting on live transaction.Gateway URL and Transaction Details URL fields, type the new URLs or leave them in the default. In case you receive a temporary URL for test transactions, remember to restore the original URL when you are ready to process live transactions.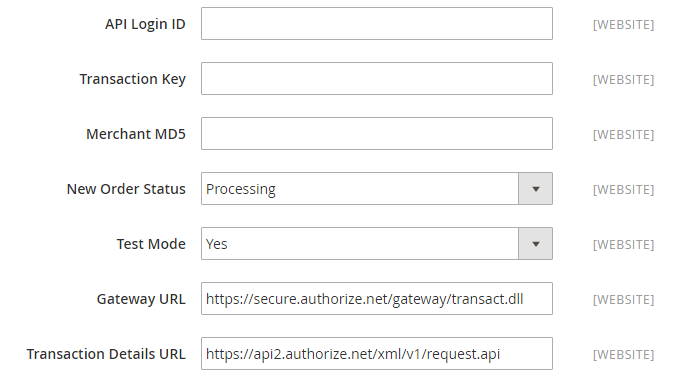
Step 3: Complete the last configuration This is the last step of the guidance which concludes of the common requirement for configuring payment method in Magento.
Accepted Currency field, choose the currency being circulated in your location or use the one that gives your target customers the most convenience at checkout.Debug to Yes to save logs between your store and the Authorize.Net system.Email Customer to Yes if you want to send emails to customers then type your business email address in the Merchant’s Email field.Credit Card Types box, select all type of credit card that is accepted in your store.Credit Card Verification to Yes to require customers to enter a card verification value.Payment from Applicable Countries field, choose All Allowed Countries to accept Authorize.Net Direct Post for customers from all countries specified in your store configuration or Specific Countries to approve this payment method for some definite countries which you select from the Payment from Specific Countries list.Minimum Order Total and Maximum Order Total fields, set the order amounts required to qualify for this payment method.Sort Order field, enter a number to determine the position of Authorize.Net Direct Post in the list of payment methods that is shown during checkout (start from 0).
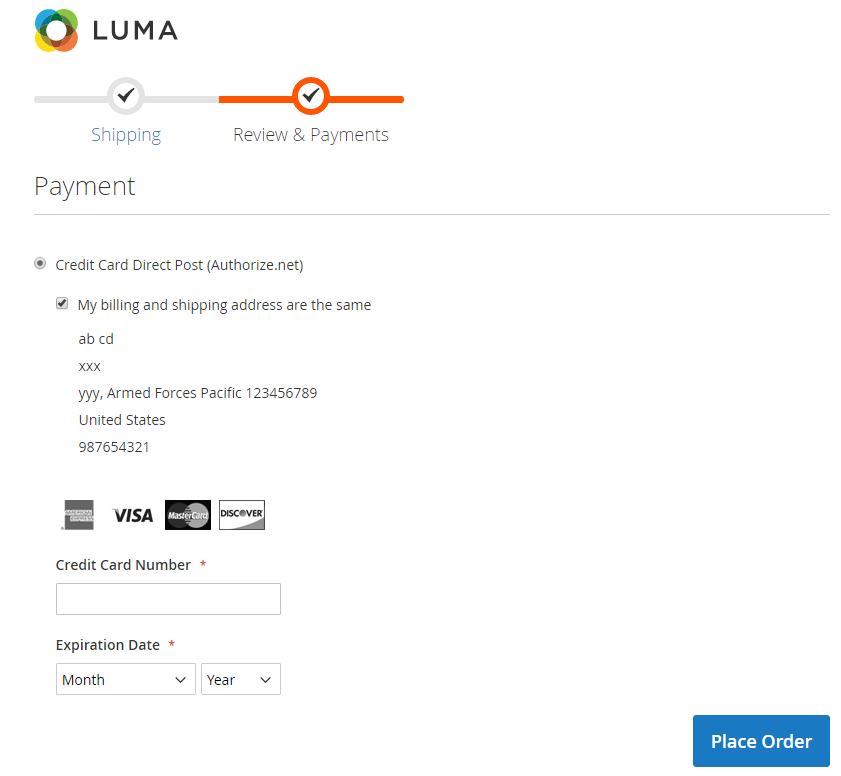
Save Config button in the upper-right corner when you are done.Here is the result on frontend:
Read more: Top 10 best Magento 2 payment gateways
You can enable and configure your payment methods within the Magento 2 Admin panel:
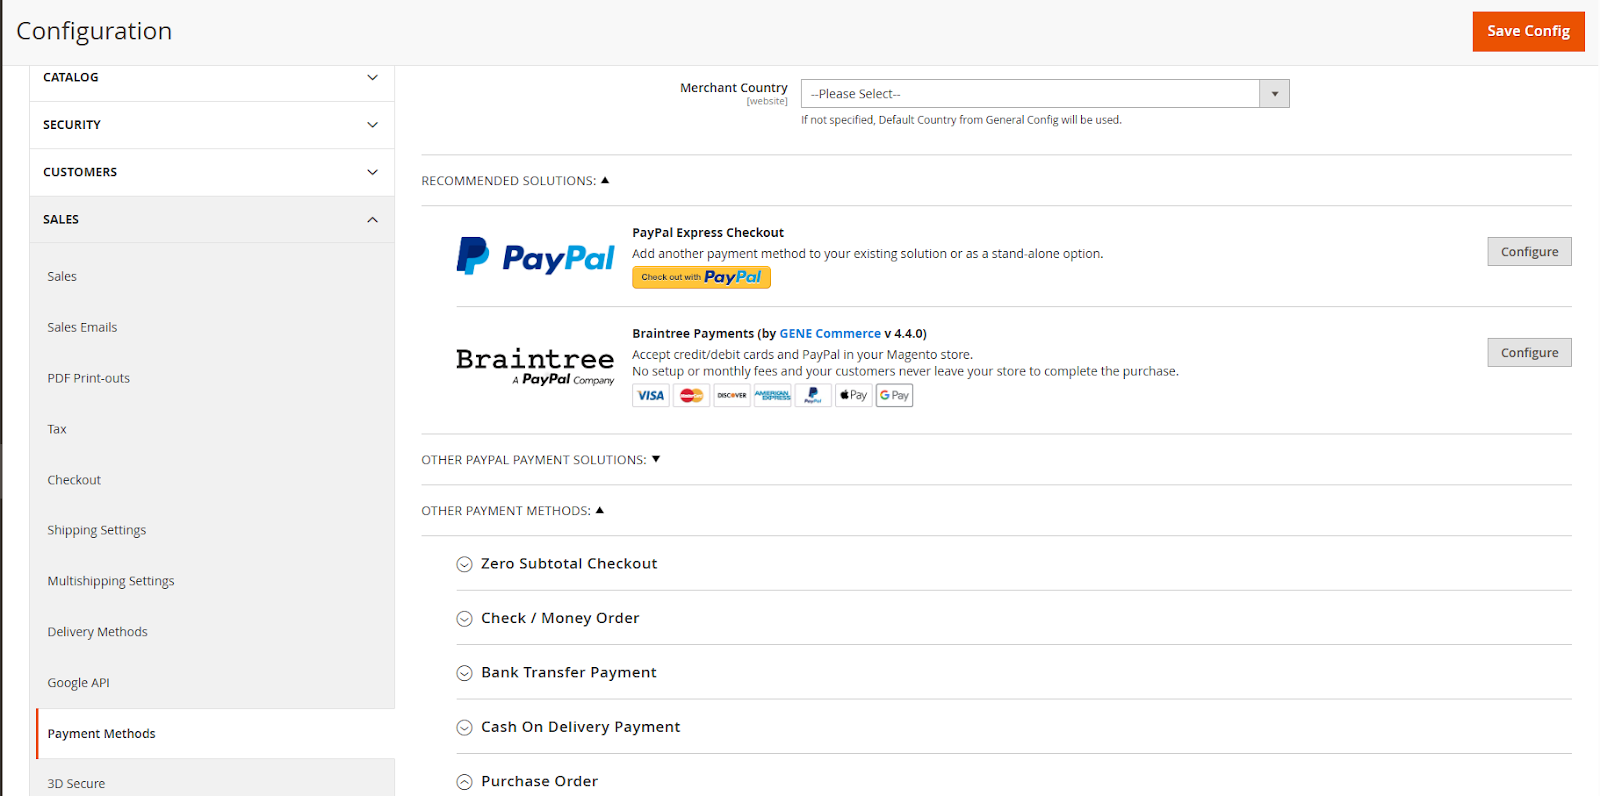
Stores > Configuration.Sales > Payment Methods.Magento 2 supports above payment methods by default, but many merchants quickly realize that these options are not flexible enough for real-world business scenarios. Without customization, stores can run into problems with customer experience, operational costs, and checkout performance. Below are the most common limitations, and how Mageplaza extensions help e-commerce businesses overcome them.
By default, Magento 2 doesn’t allow merchants to show or hide payment methods based on customer groups, shipping address, country, cart total, shipping method, or promo code. This creates a one-size-fits-all checkout that may not be suitable for different business cases. For example, wholesalers may want to allow “Purchase Order” only for B2B clients, or you may want to disable “Cash on Delivery” for overseas shipping.
Effect on business: This lack of flexibility can confuse customers, increase failed orders, and expose your store to higher risks or operational costs.
💡 How Mageplaza helps:
With Payment Restrictions, you can create rules to restrict payment methods by customer group, location, cart conditions, shipping methods, and even coupon codes. This ensures each customer sees only the payment methods that make sense for them, streamlining checkout and reducing errors.
Magento 2 doesn’t give you a way to charge extra fees for specific payment methods. This becomes a problem when certain methods, such as Cash on Delivery, Bank Transfer, or International Gateways, involve extra handling, shipping, or administrative costs. Merchants often absorb these costs, reducing profit margins.
Effect on business: Over time, these hidden costs can add up, eating into profitability, especially if customers overwhelmingly choose the most expensive payment option for you to process.
💡 How Mageplaza helps:
With the Extra Fee extension for Magento 2, you can set flexible rules to add handling fees to certain payment methods. For example, add a $5 COD fee or a 2% surcharge for international credit card payments. This way, your margins are protected while still giving customers the freedom to choose.
The default Magento 2 checkout separates steps and doesn’t always display payment details clearly on one screen. Customers may need to click through Shipping information first, which means multiple steps, or may not immediately see which methods are available, which slows down the process.
Effect on business: A longer, more confusing checkout flow is a proven reason for cart abandonment. Customers want clarity and speed, and if they find checkout too complicated, they may drop off before completing their order.
💡How Mageplaza helps:
Magento 2 One Step Checkout extension reorganizes the checkout into a single-page layout where customers can view shipping, payment, and order summary all at once. Payment methods are displayed neatly, with all relevant information visible. This reduces friction, speeds up checkout, and helps improve conversion rates.
Magento 2 doesn’t allow you to choose a default payment method that appears pre-selected at checkout. Every customer must manually pick one before completing their order, even if 80% of your buyers typically use the same method.
Effect on business: This adds unnecessary friction for repeat customers and slows down checkout. In some cases, customers may abandon their cart if they forget to complete this step.
💡How Mageplaza helps:
With One Step Checkout, you can set a default payment method so that it’s pre-selected when the customer reaches the checkout page. For example, if most of your customers pay by PayPal or Credit Card, you can make it the default option, speeding up the process and reducing drop-offs.
You can do this through Mageplaza One Step Checkout extension.
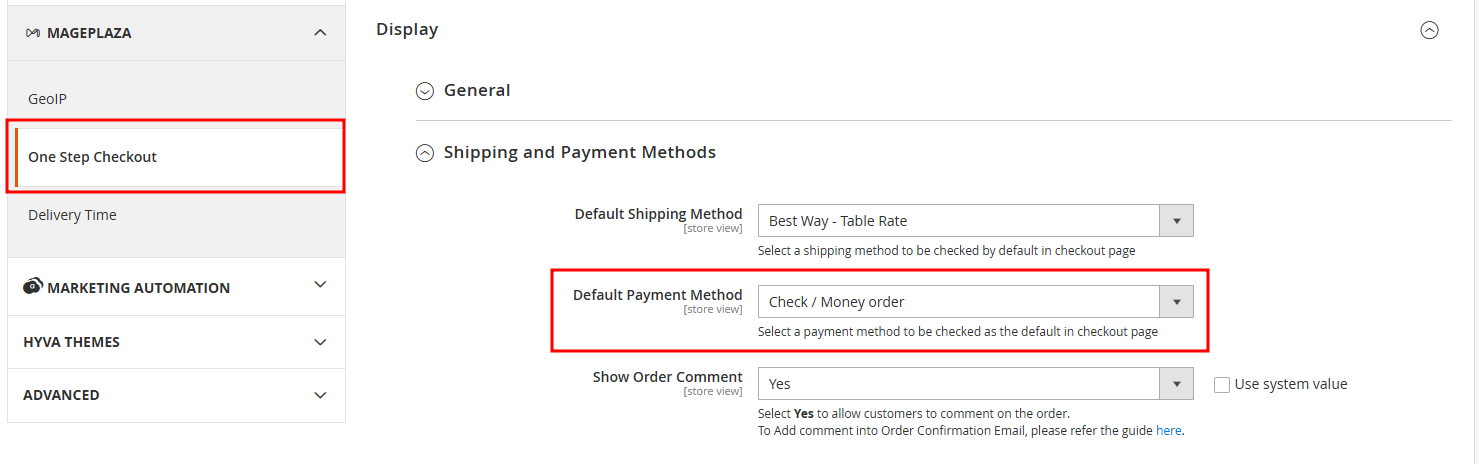
Go to Mageplaza > One Step Checkout. Then go to Default Payment Method and select the method.
Magento 2 offers a solid range of default as well as integrated payment methods, but knowing their pros, cons, best use cases, and limitations is key to choosing the right mix for your store. While offline options like Bank Transfer or Check/Money Order work well for B2B and high-value orders, online gateways such as PayPal provide speed, security, and global reach. To go beyond the basics, merchants can enhance checkout with extensions to fully control your financial flow. With the right setup, your Magento 2 store can deliver a seamless, flexible, and trustworthy payment experience that reduces abandonment and drives growth.

Jacker is the Chief Technology Officer (CTO) at Mageplaza, bringing over 10 years of experience in Magento, Shopify, and other eCommerce platforms. With deep technical expertise, he has led numerous successful projects, optimizing and scaling online stores for global brands. Beyond his work in eCommerce development, he is passionate about running and swimming.
Related Post

Change Store Email Addresses - Mageplaza

Change Welcome Message - Mageplaza
Customize the welcome message on your store's homepage to provide a personalized touch for your customers. Improve the user experience with our step-by-step guide.

Configure Magento 2 Contact Form & Email: Detailed Guides - Mageplaza
Configure the email address for your Magento 2 store's contact form and ensure that your customers can easily get in touch with you with this informative guide

How to Install Magento 2 with Sample Data - Mageplaza
How to install Magento 2 with Sample Data. In this topic we will discuss about How to Install Magento 2 Step by Step in Manage Store topic

6 Steps To Stop Brute Force Attacks - Mageplaza
How To Stop Brute Force Attacks in Magento 1, 2. In this topic we will discuss about How To Stop Brute Force Attacks in Manage Store topic

How to set Locale, Language, and Country in Magento 2 - Mageplaza
Setup Locale State Country in Magento 2 provides setup your store information on Locale Options that determines the timezone, language, country and the days.
Change Store Email Addresses - Mageplaza
Change Welcome Message - Mageplaza
Customize the welcome message on your store's homepage to provide a personalized touch for your customers. Improve the user experience with our step-by-step guide.
Configure Magento 2 Contact Form & Email: Detailed Guides - Mageplaza
Configure the email address for your Magento 2 store's contact form and ensure that your customers can easily get in touch with you with this informative guide
How to Install Magento 2 with Sample Data - Mageplaza
How to install Magento 2 with Sample Data. In this topic we will discuss about How to Install Magento 2 Step by Step in Manage Store topic
6 Steps To Stop Brute Force Attacks - Mageplaza
How To Stop Brute Force Attacks in Magento 1, 2. In this topic we will discuss about How To Stop Brute Force Attacks in Manage Store topic
How to set Locale, Language, and Country in Magento 2 - Mageplaza
Setup Locale State Country in Magento 2 provides setup your store information on Locale Options that determines the timezone, language, country and the days.